Table of Contents
This section outlines the high-level process of several processes available for moving people (HR) in the Space Management system.
Drag and Drop
This sub-section outlines the high-level process of moving a person with the drag and drop method.
| Step | Action |
|---|---|
| 1 |
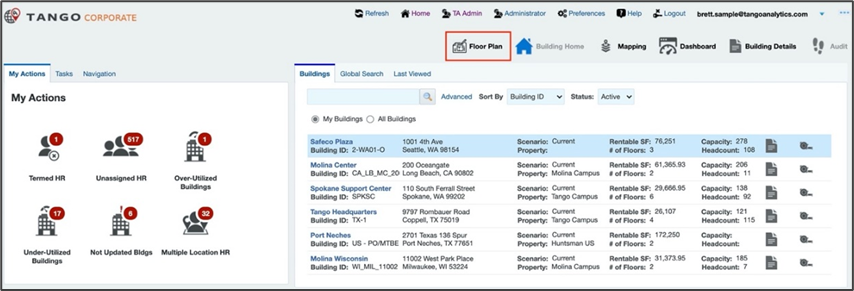
Click on the Floor Plan viewer button on the Building Home screen. The Floor Plan viewer will appear in a new tab.
|
| 2 |
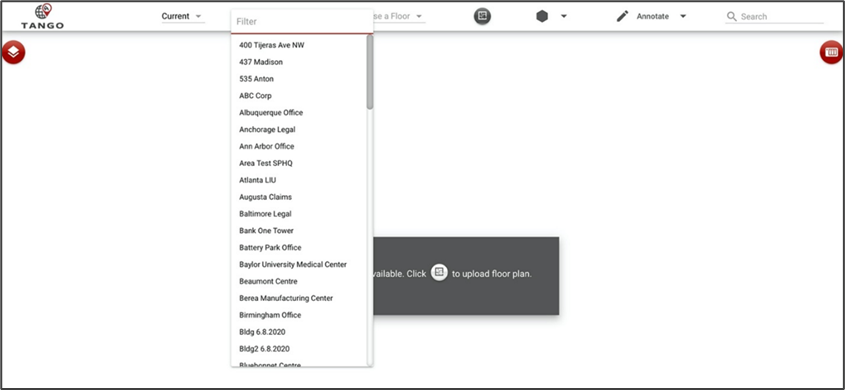
The Floor Plan viewer will load showing the Current scenario or “as-is live data” where you can search for or select the Building and Floor of your choosing.
|
| 3 |
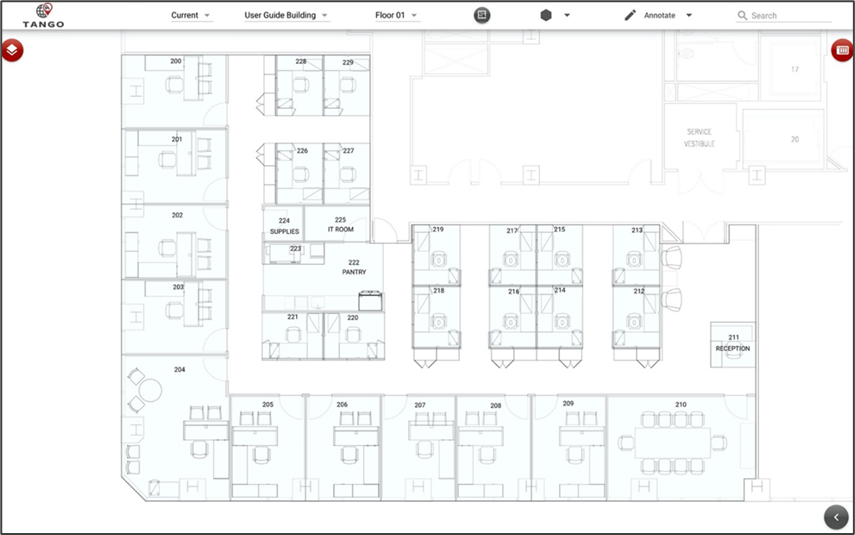
The selected floor plan is displayed.
|
| 4 |
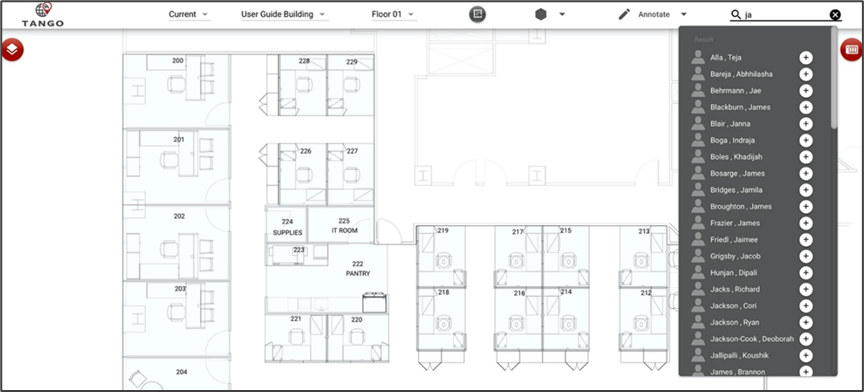
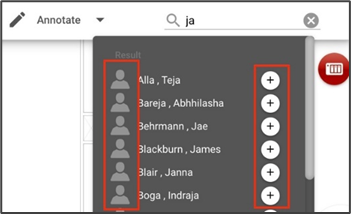
Using the search at the top right, enter some characters in the person’s name to get results.
|
| 5 |
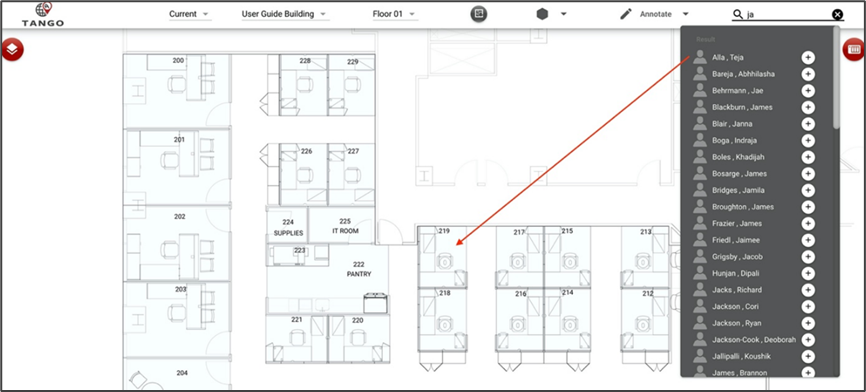
Click and drag the person icon to the desired space or click the + to place them in the clipboard for placement.
|
| 6 |
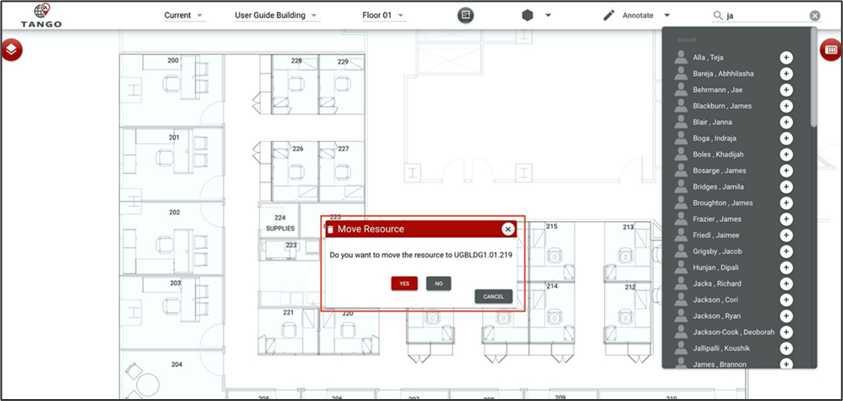
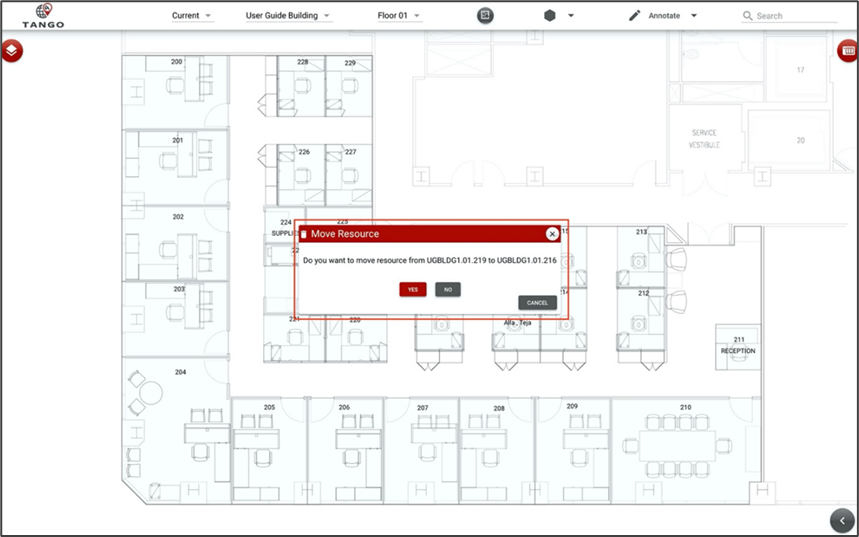
The Move Resource conformation screen will appear. Select Yes to move them or No/Cancel to abort.
|
| 7 |
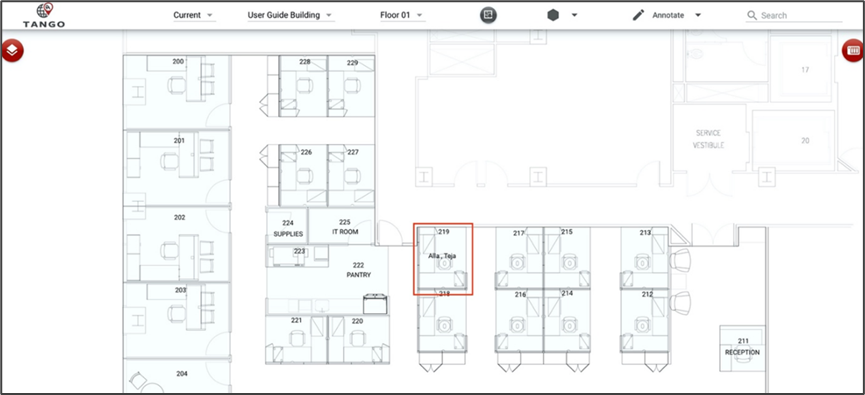
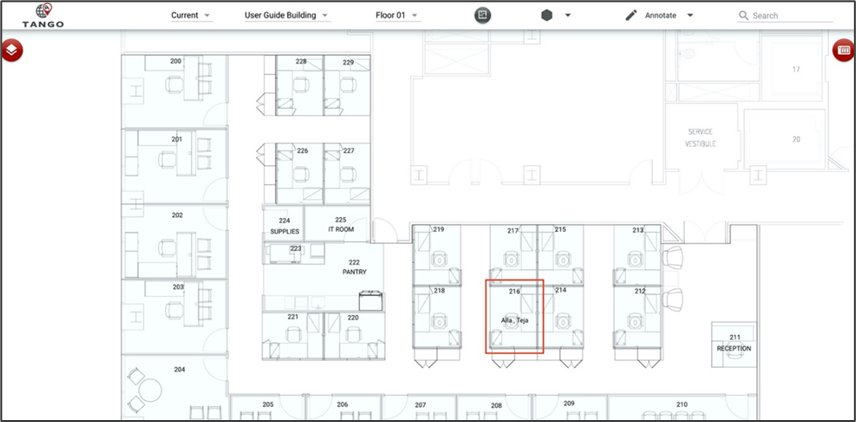
The selected person has been moved.
|
| 8 |
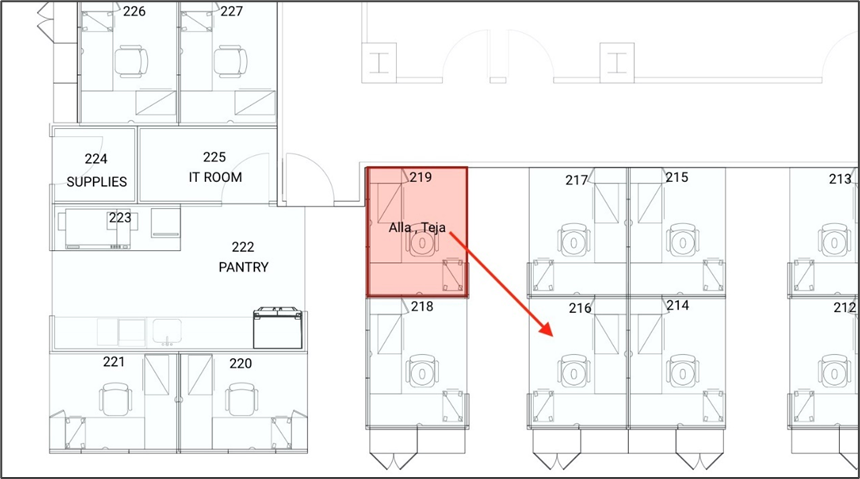
To drag and drop someone to another space, simply drag the label to another space.
|
| 9 |
The Move Resource confirmation screen will appear again, press Yes to move them.
|
| 10 |
The person has been moved successfully.
|
Creating a MAC (Move, Add, Change)
This sub-section outlines the high-level process of moving a person with a MAC Request (Move, Add, Change).
| Step | Action |
|---|---|
| 1 |
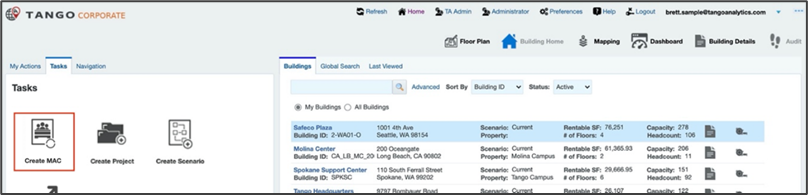
Click on Tasks tab on the Building Home screen and then click the Create MAC icon.
|
| 2 |
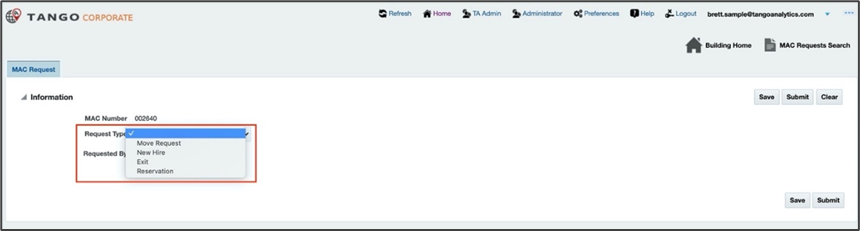
The Create MAC dialog will appear. Choose a Request Type such as Move Request.
|
| 3 |
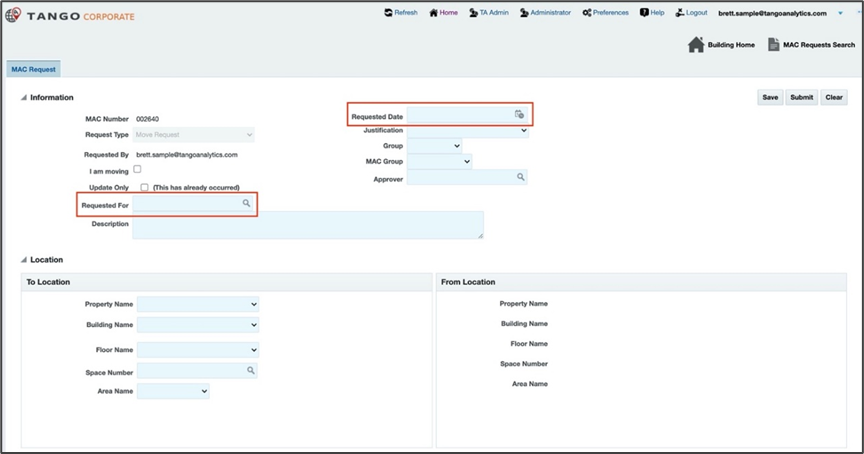
The screen will refresh to show the Move Request form. At a minimum select a person using the Requested For field and a Requested Date to move.
|
| 4 |
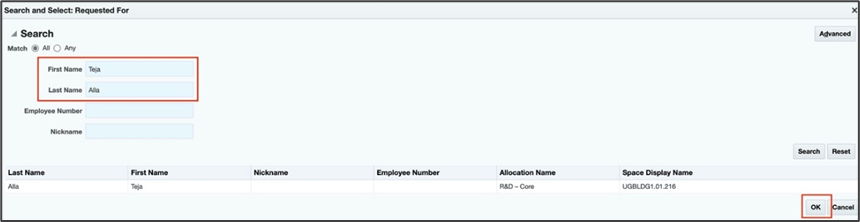
Search for the person to move, select the record and press Ok.
|
| 5 |
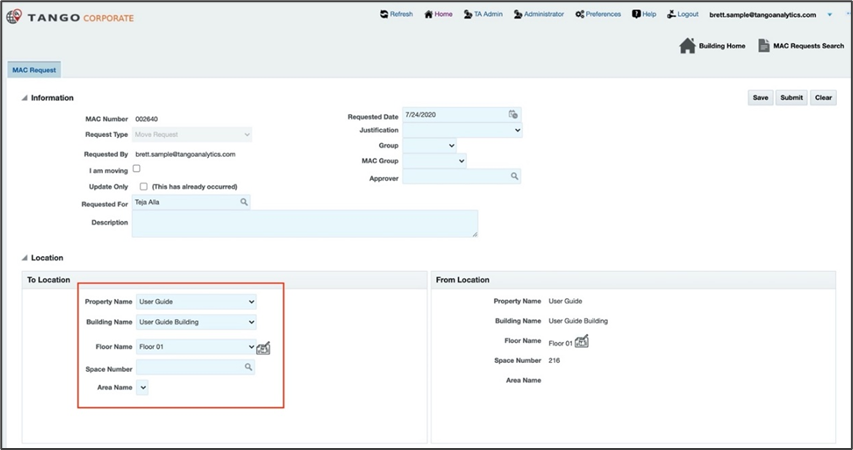
If the person selected is in a location, their current Building and Floor will be populated in the To Location area.
|
| 6 |
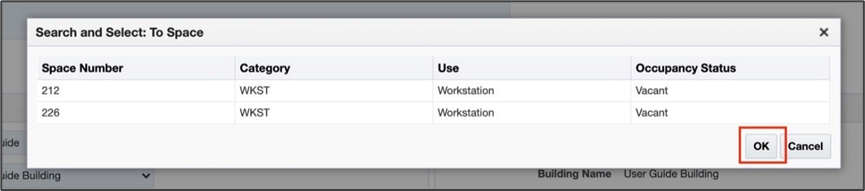
You can view the floor plan to locate available seats or simply search for a space. Once you have located the desired space, press Ok.
|
| 7 |
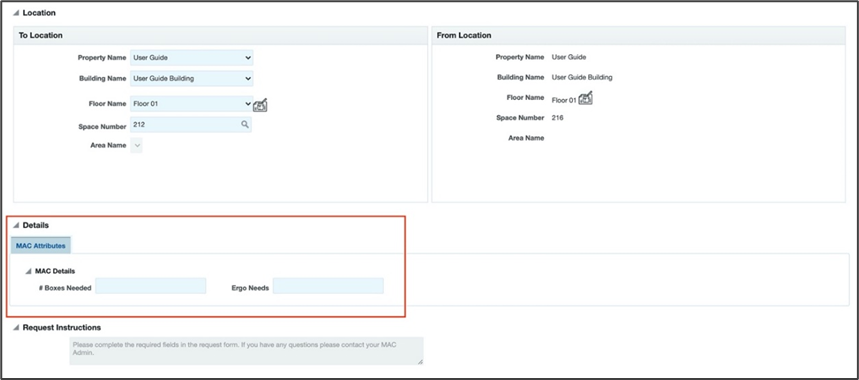
Complete any MAC Additional Attributes as configured in your environment.
|
| 8 |
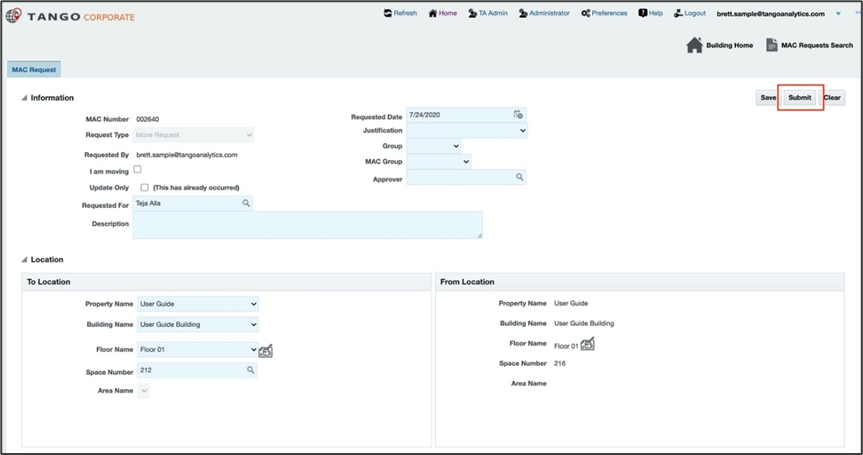
Once you have all the MAC Request details entered, press Submit to complete the process of creating a MAC Request. Note, you may be notified by email as configured in your specific environment.
|
Creating a Scenario
This sub-section outlines the high-level process of moving a person within a Scenario.
| Step | Action |
|---|---|
| 1 |
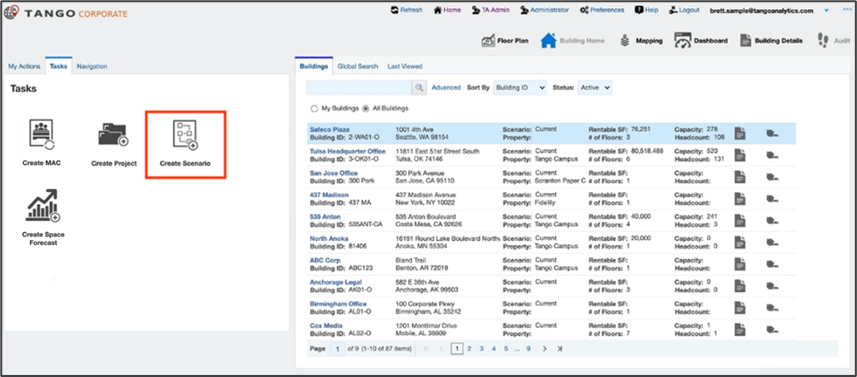
Tasks tab on the Building Home screen and then click the Create Scenario icon.
|
| 2 |
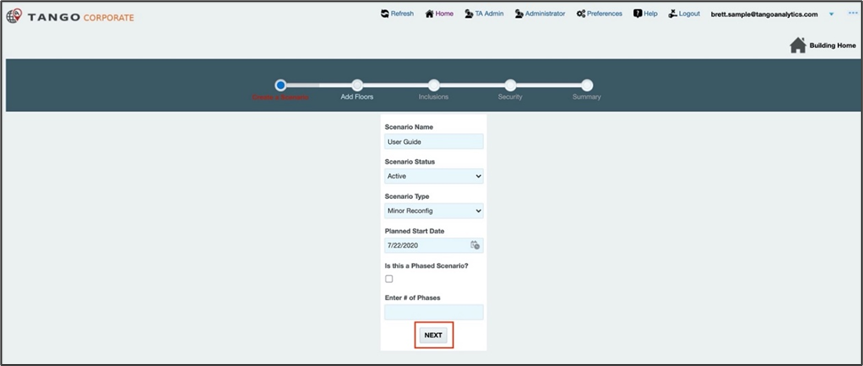
The Create Scenario Wizard will appear on the screen. Enter the desired information and press Next.
|
| 3 |
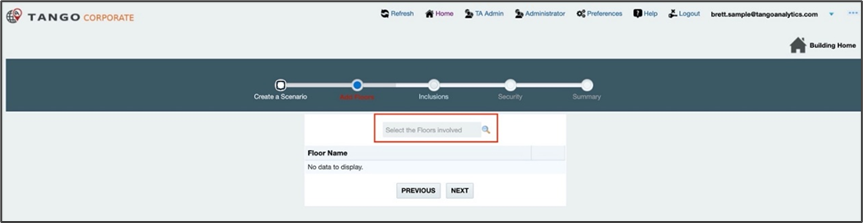
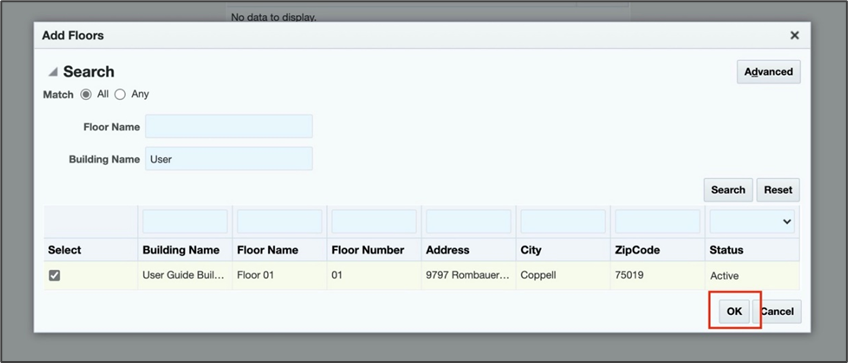
Select the desired floor plans to include in the scenario.
|
| 4 |
Once the floors have been located and selected, press Ok.
|
| 5 |
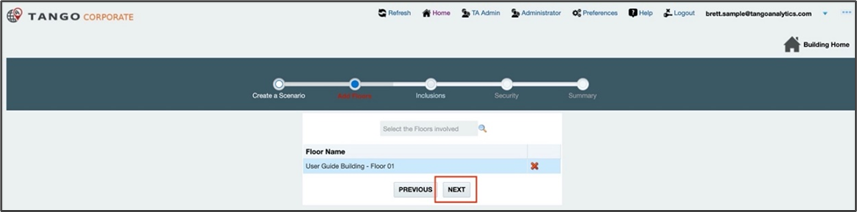
Click Next to include the floors.
|
| 6 |
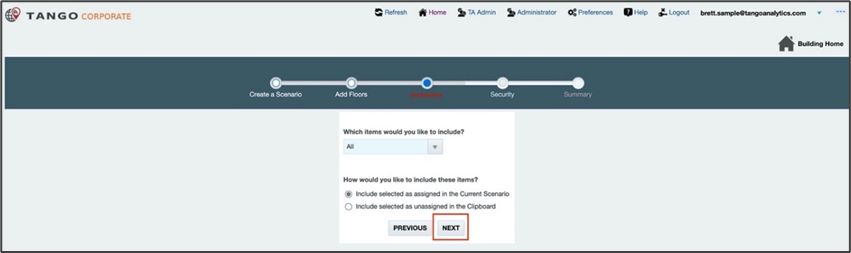
You can then choose to include People (HR) or Assets or both within your scenario and then designate if they should remain at their current assignments or be placed in the clipboard for placement. Click Next to continue.
|
| 7 |
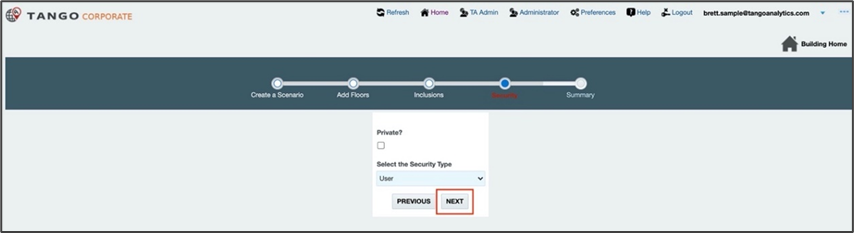
For security, you can choose to make the scenario private and restrict it to either a user or group. Click Next to continue.
|
| 8 |
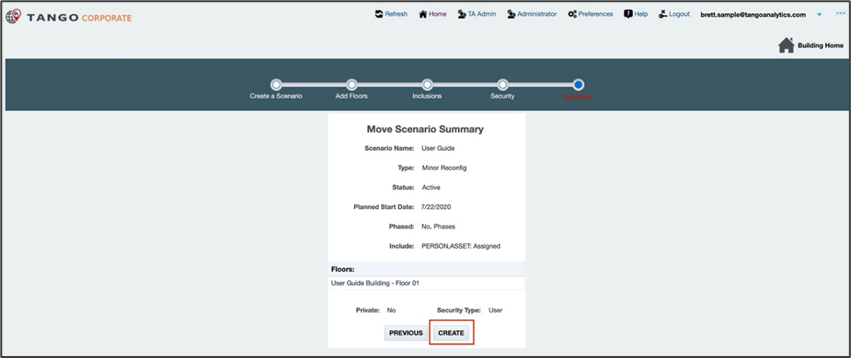
The last step in the wizard is the summary. If everything looks good here, press Create.
|
| 9 |
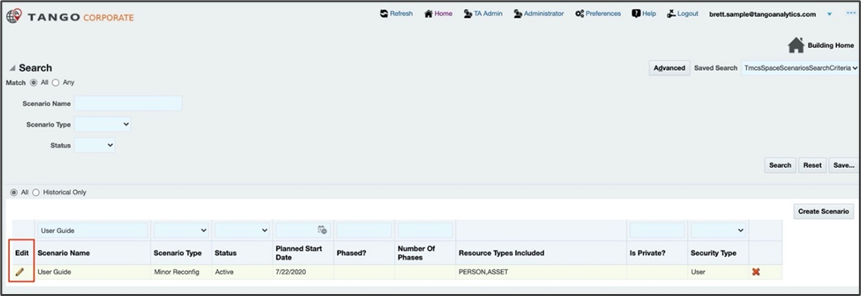
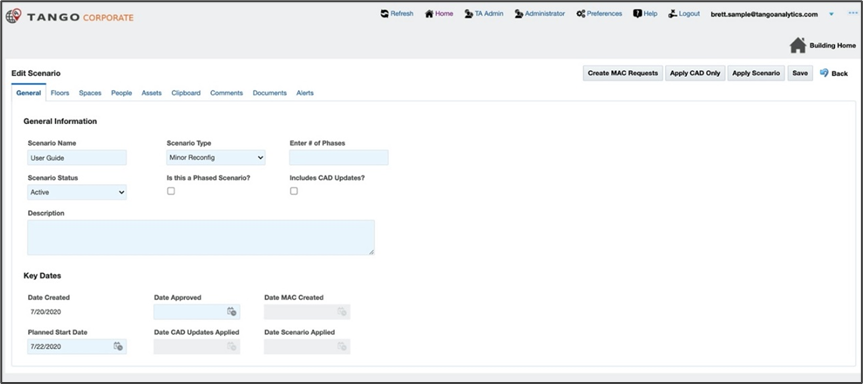
Once the scenario has been created you will be taken to the scenario search screen where you can click the Edit button to view and interact.
|
| 10 |
The scenario has successfully been created.
|
| 11 |
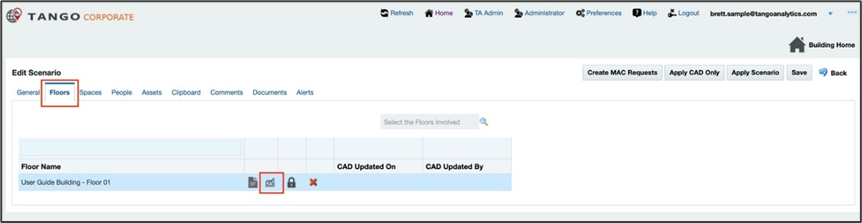
Using the Floors tab, you can open the drawing to move people around, add them to the clipboard, and update the drawing configuration. Once the scenario has been adjusted, you can create MAC requests or apply the scenario.
|
Creating a Stack Plan
This sub-section outlines the high-level planning process beneficial in visually presenting alternatives or interactively creating stack plans.
| Step | Action | ||||||||||||||||||
|---|---|---|---|---|---|---|---|---|---|---|---|---|---|---|---|---|---|---|---|
| 1 |
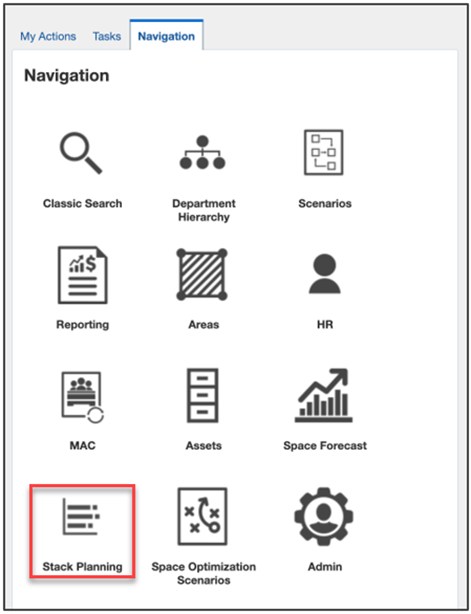
Navigation tab on the Building Home screen and then click the Stack Planning icon.
|
||||||||||||||||||
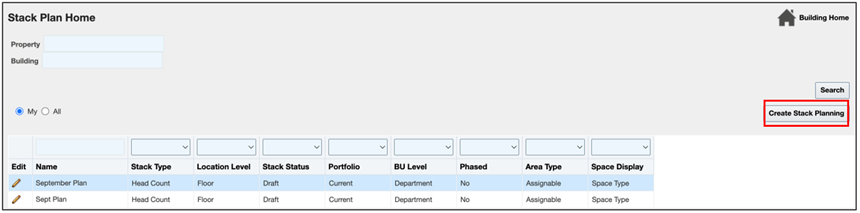
| 2 | The Stack Planning Home will appear on the screen. Press Create Stack Planning to start a new stack plan. |
||||||||||||||||||
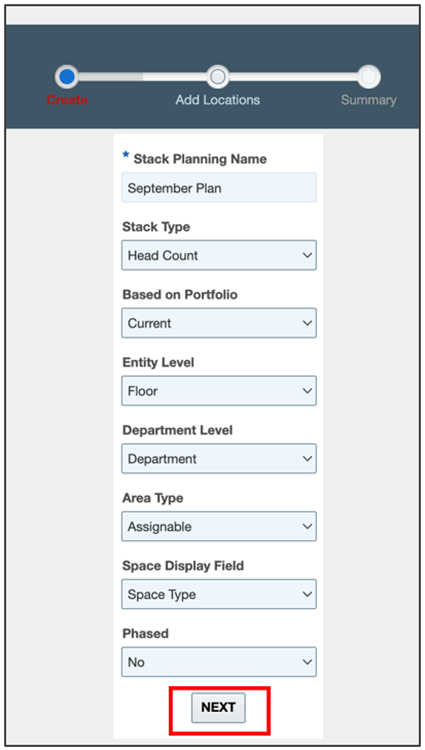
| 3 |
The Create Stack Planning Wizard will appear on the screen. Enter the desired information and press Next.
|
||||||||||||||||||
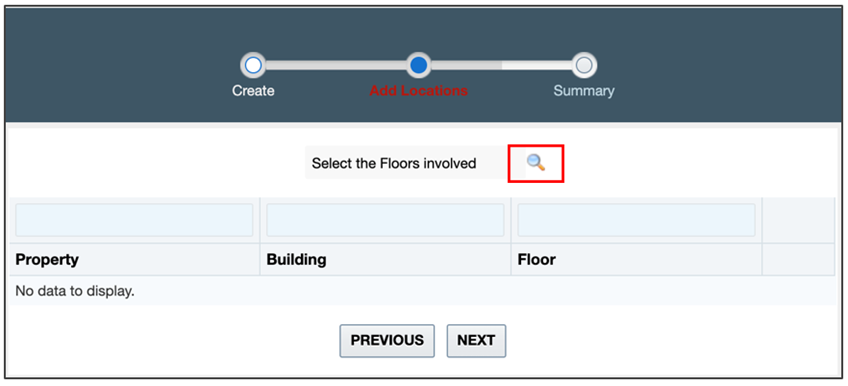
| 4 |
Depending on the entry level chosen, use the Search button, Select the desired properties, buildings or floors, to include in the stack plan.
|
||||||||||||||||||
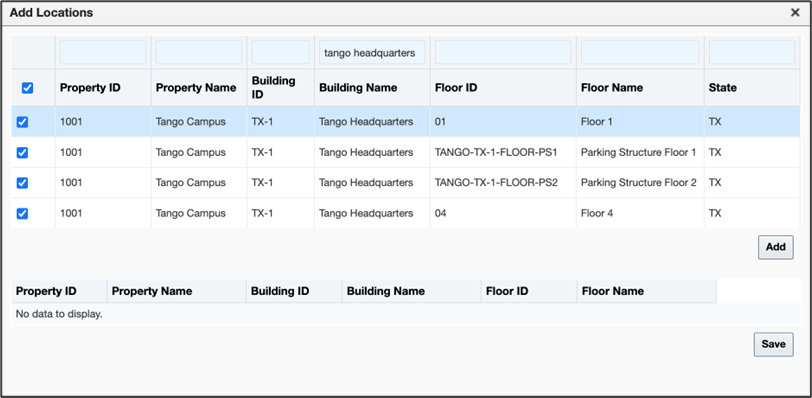
| 5 |
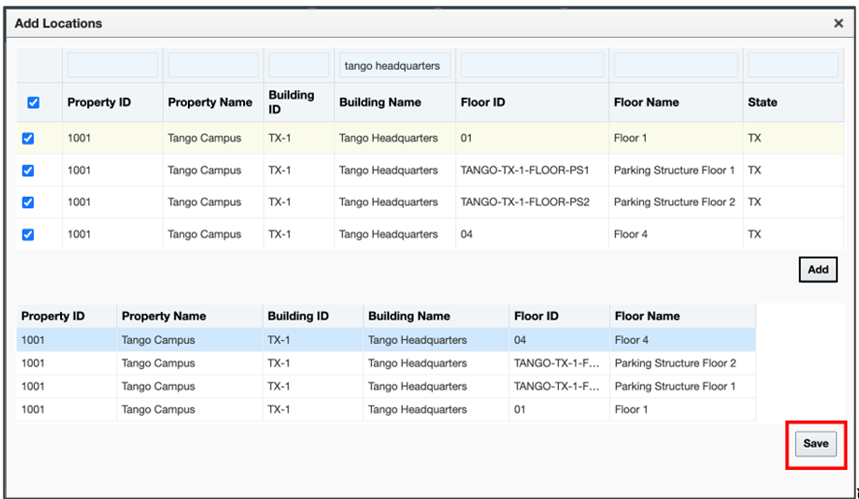
Add Locations will appear on screen. Once the properties, building or floors have been located and selected, press Add.
|
||||||||||||||||||
| 6 |
Press Save to save the locations selection.
|
||||||||||||||||||
| 7 |
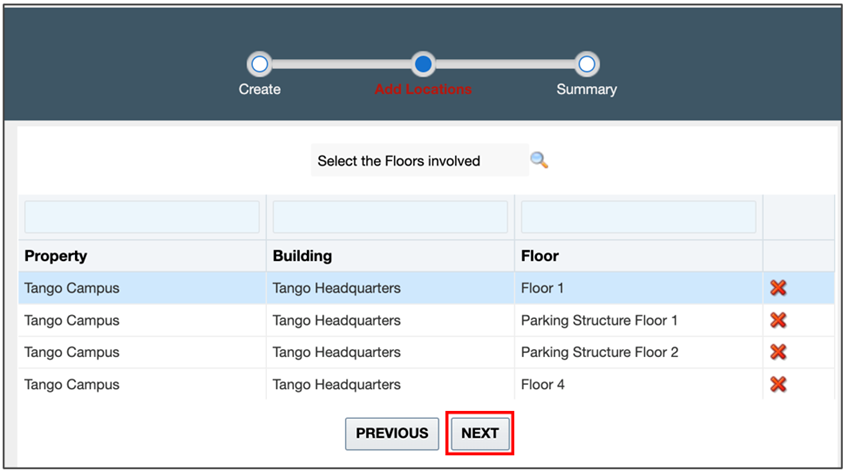
Review the desired list of properties, buildings or floors and press Next.
|
||||||||||||||||||
| 8 | The last step in the wizard is the summary. If everything looks good here, press Create.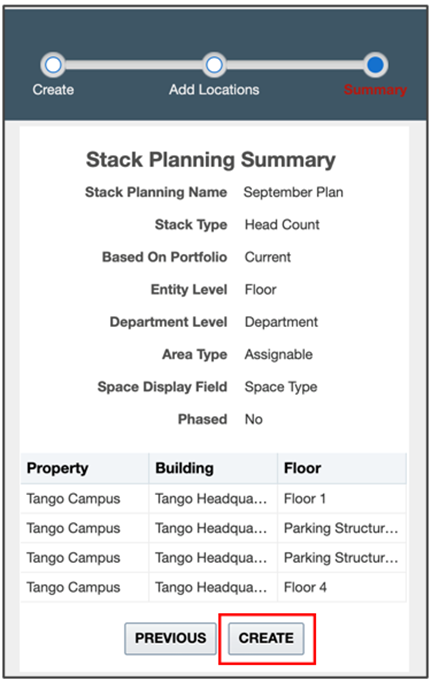
|
||||||||||||||||||
| 9 |
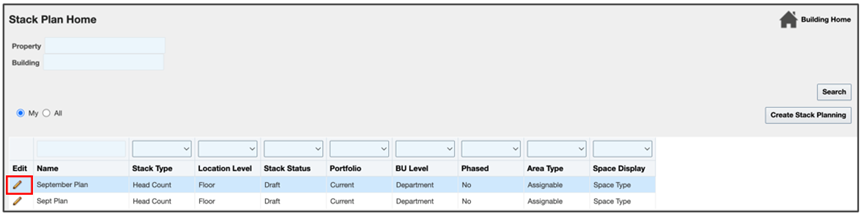
Once the stack plan has been created you will be taken to the Stack Plan Home screen where you can click the Edit button to get to the stack plan details.
|
||||||||||||||||||
| 10 |
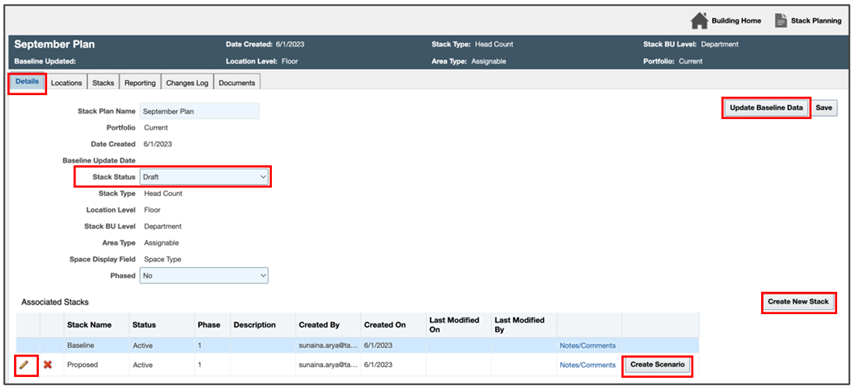
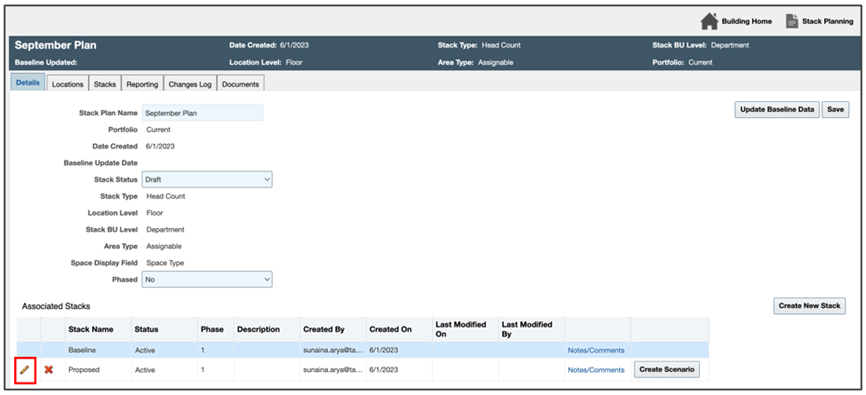
To view/edit the stack plan details, go to the Details tab. It allows you to manage the stack plan details, the associated Stacks list and the associated Scenarios list.
|
||||||||||||||||||
| 11 |
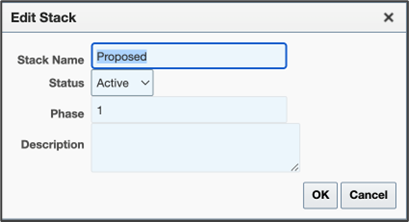
You will notice the proposed stack is already created for you to start new stack for your plan, with the same data as baseline. You can add the proposed stack name and description by clicking the Edit button.
|
||||||||||||||||||
| 12 |
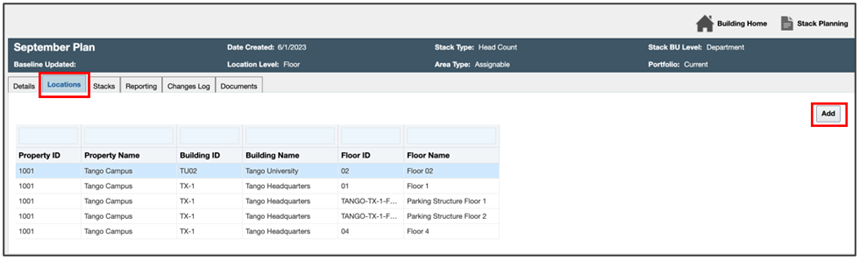
Click on Locations Tab on the Stack Plan screen to view the selected list of locations. To Add more floors, buildings, or properties to the stack plan, use the Add button to get to the Add Locations screen and select the desired location(s), Add and Save.
|
||||||||||||||||||
| 13 |
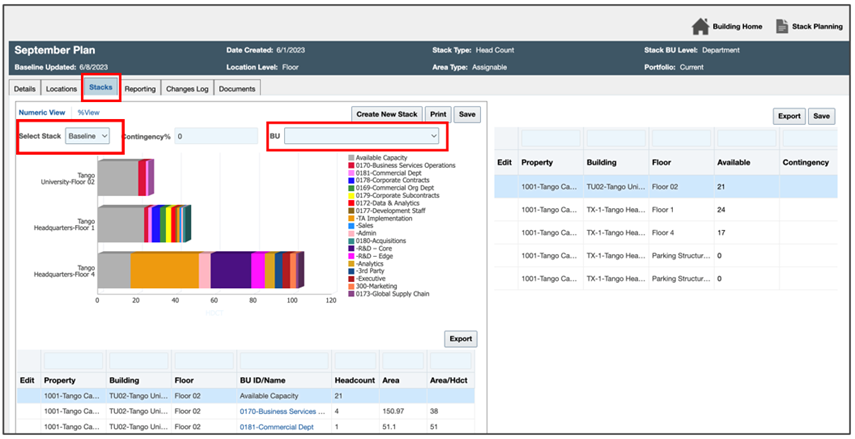
Click on Stacks tab on the Stack Plan screen to do the stack planning with the selected location(s).
|
||||||||||||||||||
| 14 |
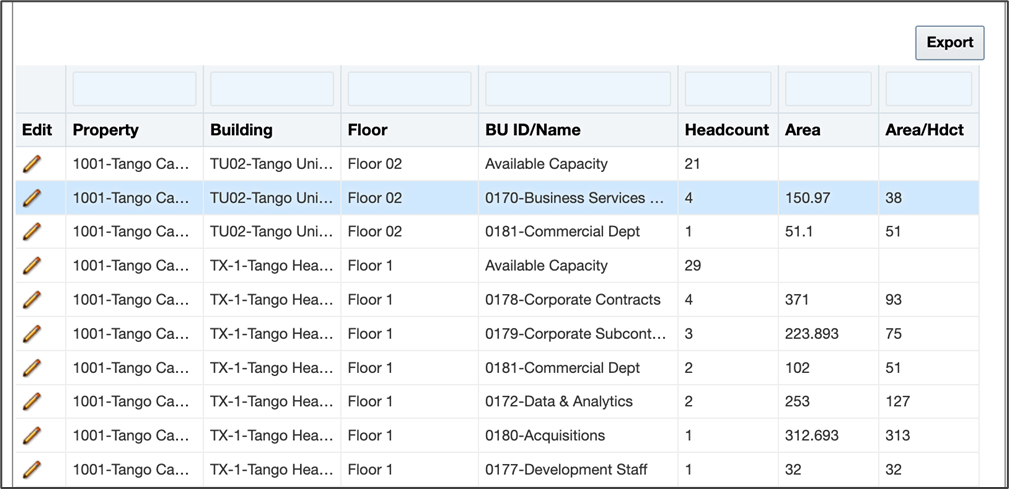
Bottom left section shows the details for each BU on each Floor, Building or Property.
|
||||||||||||||||||
| 15 |
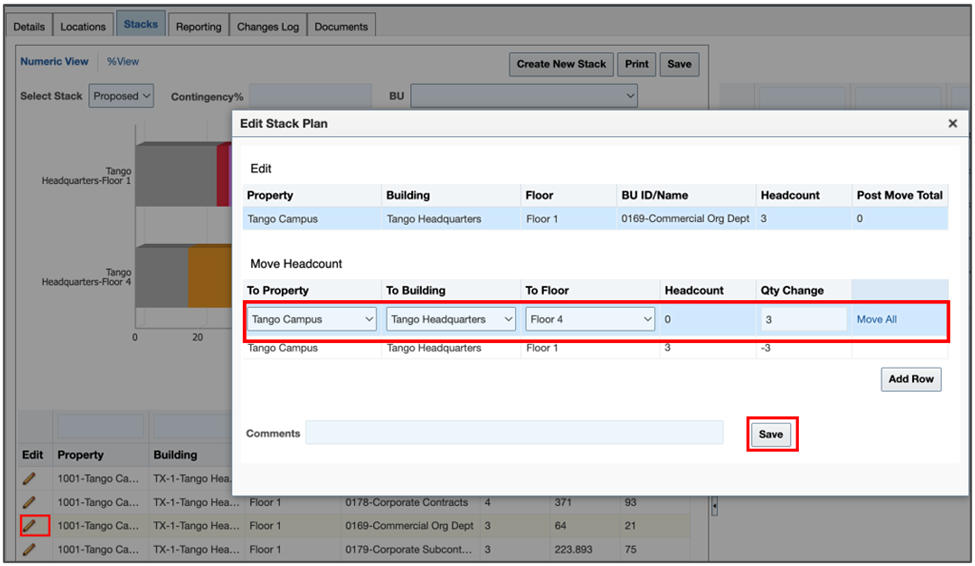
Click the Edit button to move the selected BU headcount to another Property/Building/Floor or move to Unassigned stack. You can choose to move all or can specify the headcount. You cannot move more Headcount than is already on the Floor. If needed, add a row by clicking on Add Row button to select another property/building/floor or move to unassigned stack. After all the changes are done to the selected BU headcount, click on Save to apply the changes.
|
||||||||||||||||||
| 16 |
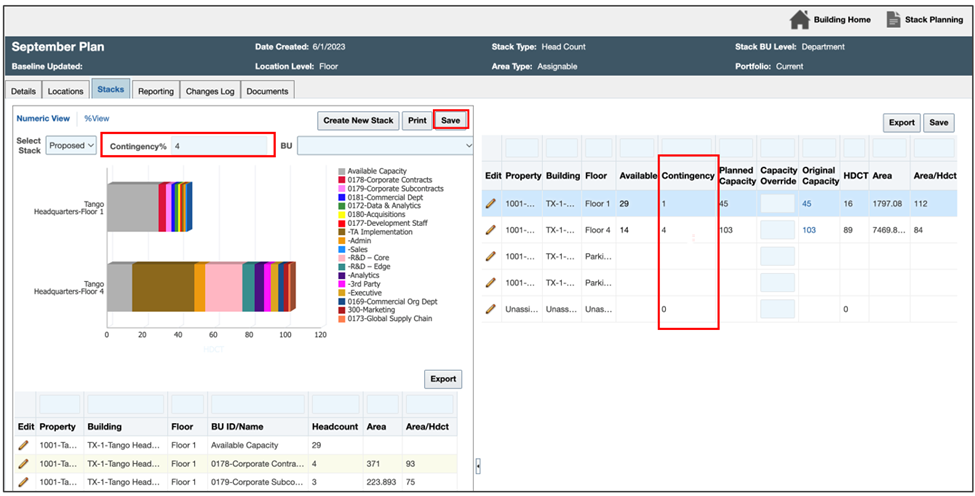
To have a contingency applied to the stack Plan, specify the percentage value and click on Save to apply
|
||||||||||||||||||
| 17 |
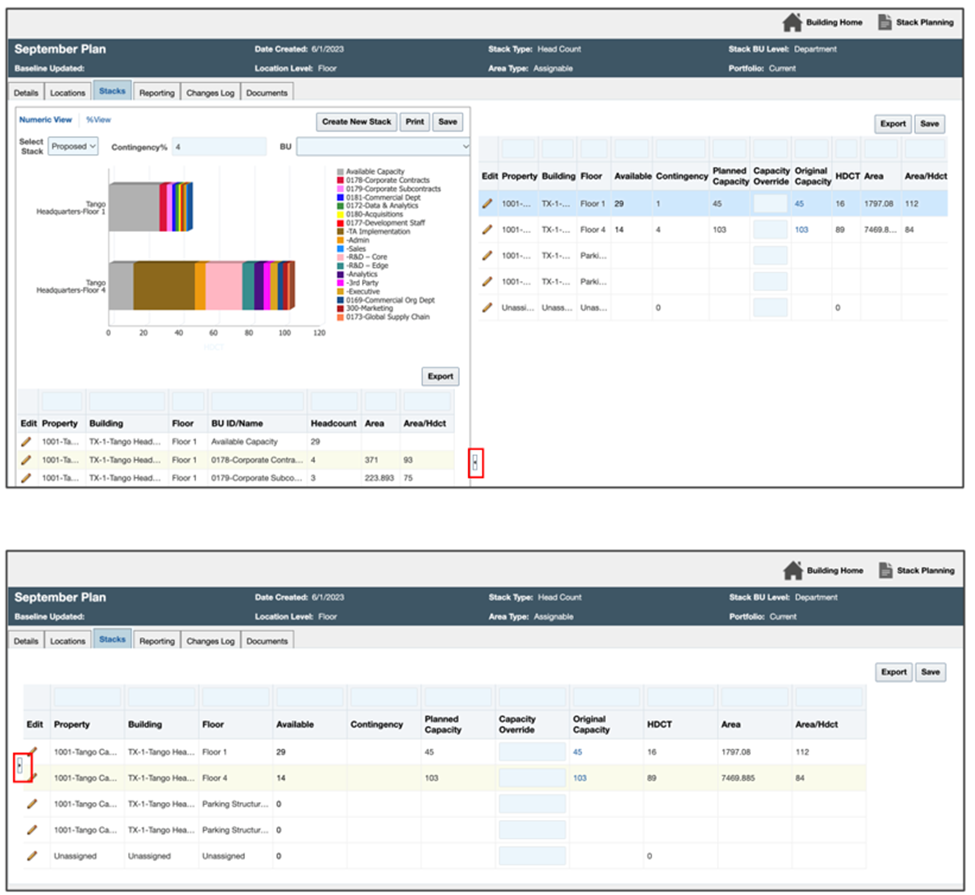
You can Expand/Colapse/Adjust the view to work with the plan at the location level or the stack view by using the Colapse/restore pane button.
|
||||||||||||||||||
| 18 |
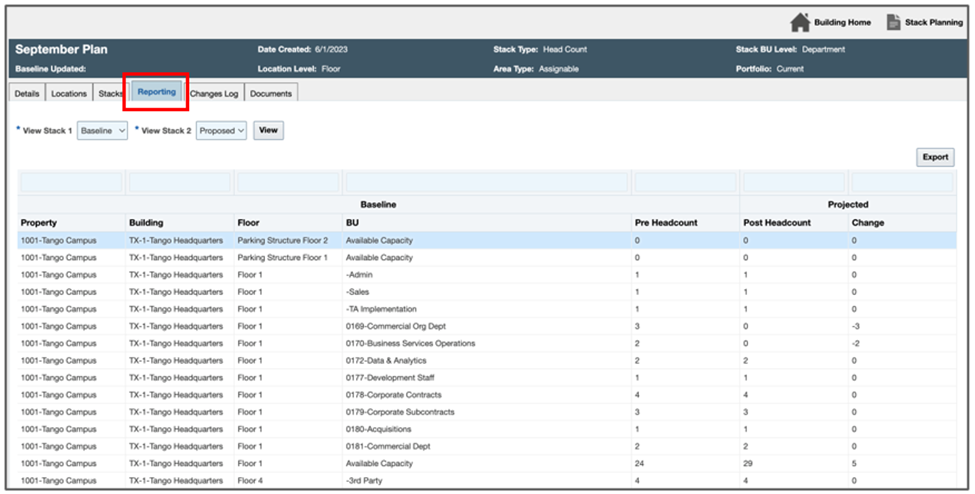
After all the edits are saved, you can compare between the stacks using Reporting Tab.
|
||||||||||||||||||
| 19 |
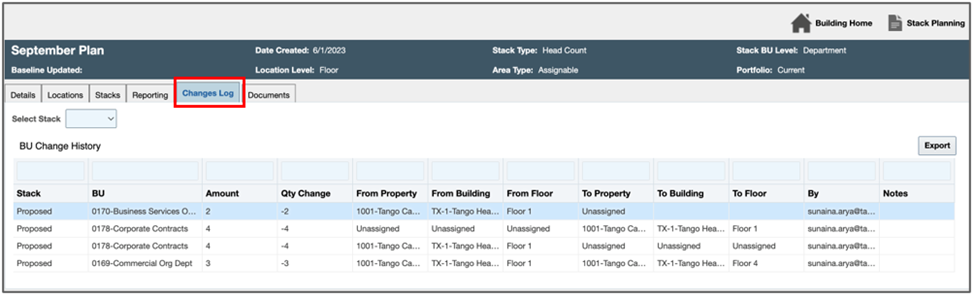
All the changes are tracked and can be reviewed using Changes Log Tab.
|

Was this article helpful?
That’s Great!
Thank you for your feedback
Sorry! We couldn't be helpful
Thank you for your feedback
Feedback sent
We appreciate your effort and will try to fix the article