Table of Contents
This section outlines the high-level process of creating various records within the Space Management system in Tango.
Creating a Property
This sub-section outlines the high-level process of creating a Property record. Structural Hierarchy: Property >> Building >> Floor >> Space / Area
| Step | Action |
|---|---|
| 1 |
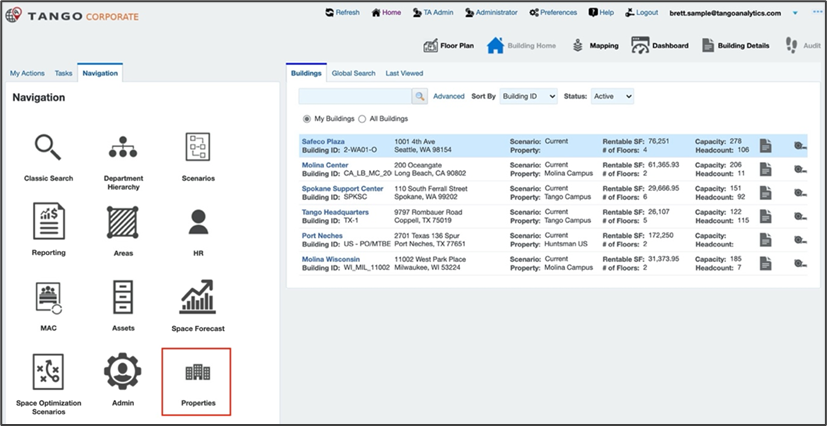
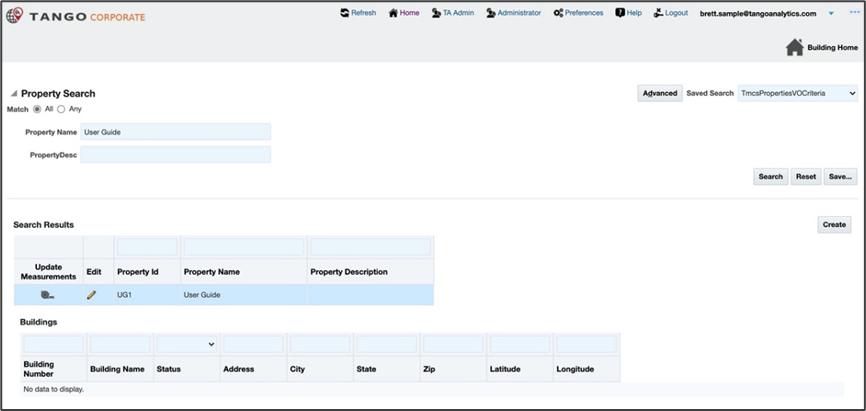
Click on Navigation tab on the Building Home screen and then click the Properties icon. Alternatively, this page can be accessed from the Home page Property icon.
|
| 2 |
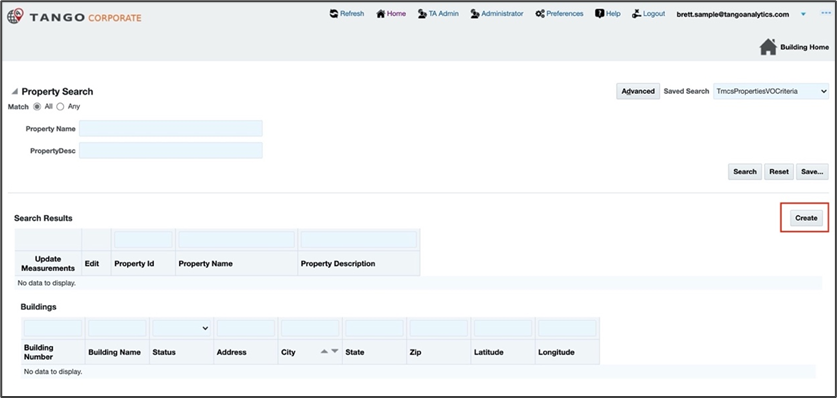
The Property Search will be displayed. Click the Create button to create a Property.
|
| 3 |
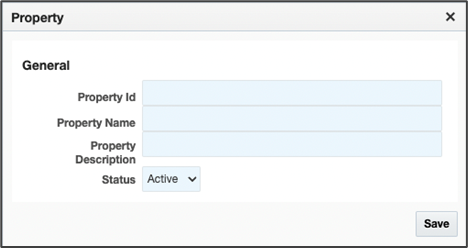
Populate the Property Id and Property Name field.
|
| 4 |
Click Save to create the Property record.
|
| 5 |
The new Property can be found in the Property Search.
|
Creating a Building
This sub-section outlines the high-level process of creating a Building record.
Structural Hierarchy: Property >> Building >> Floor >> Space / Area
| Step | Action |
|---|---|
| 1 |
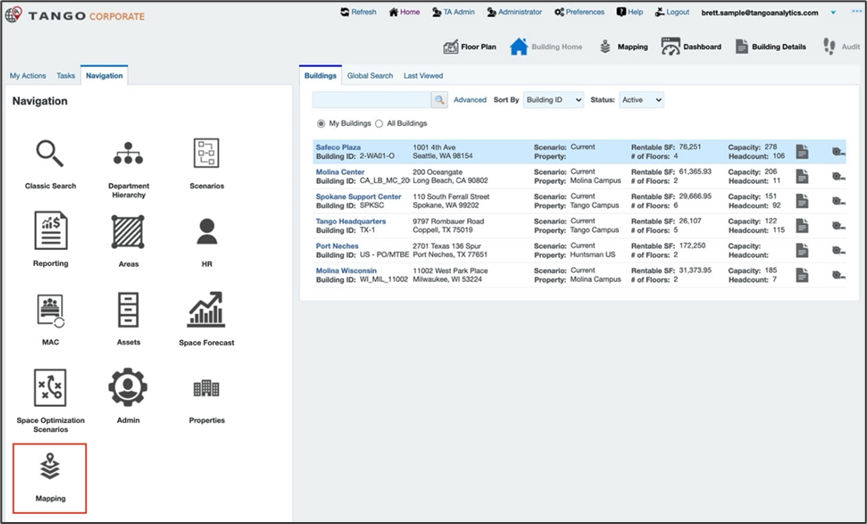
Click on Navigation tab on the Building Home screen and then click the Mapping icon. Alternatively, this page can be accessed from the Home page Mapping icon or mapping in the top menu.
|
| 2 |
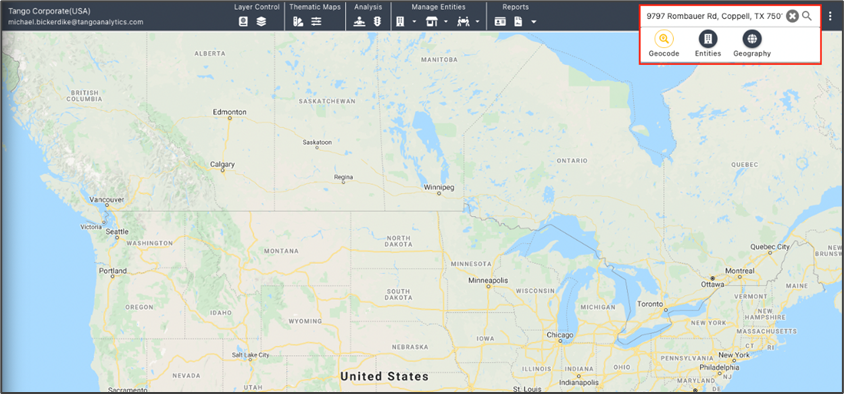
A new tab will open, and the map will display on the screen where you can search for the building address.
|
| 3 |
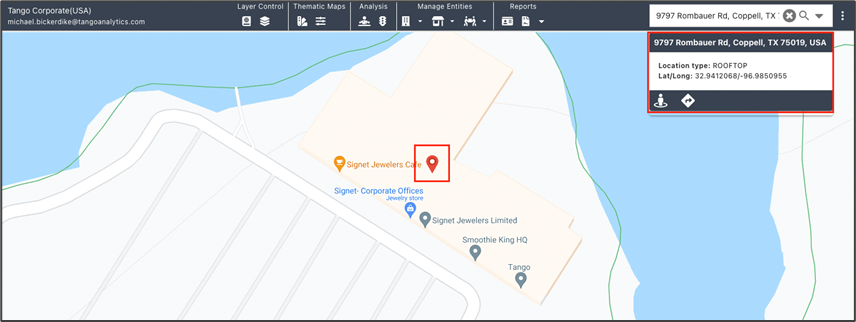
Click the desired result and the map will display it.
|
| 4 |
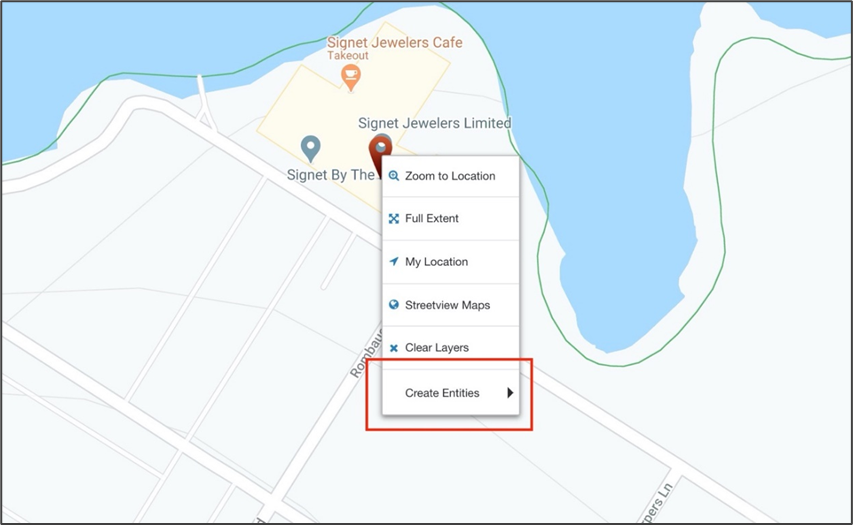
Option 1: Right click the red drop pin and select Create Entities.
|
| 5 |
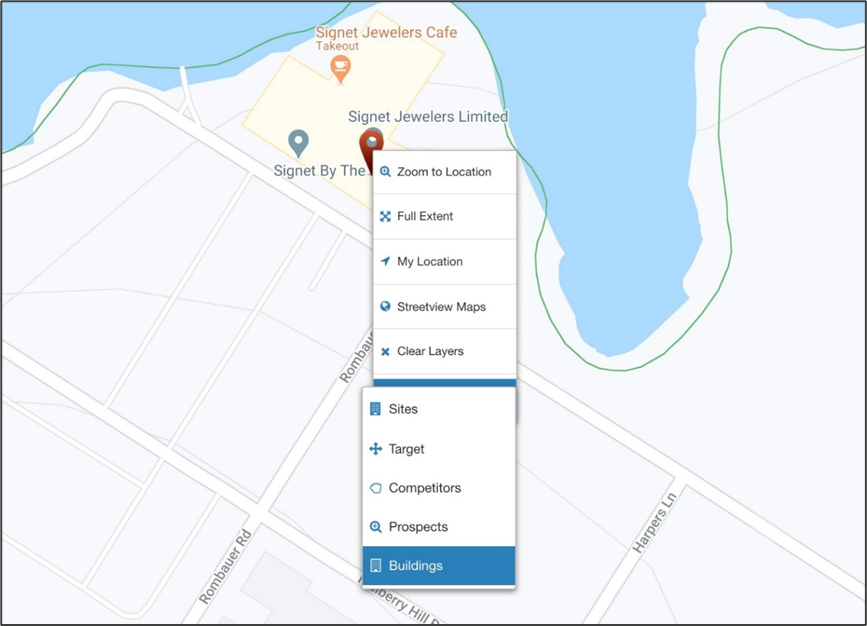
Option 1: Choose Buildings and the building create page will appear.
|
| 6 |
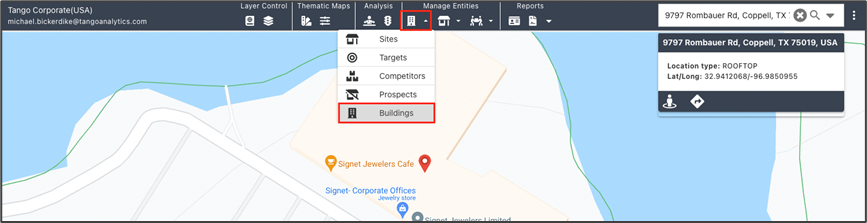
Option 2: Under Manage Entities in the top bar, choose Buildings.
|
| 7 |
Option 2: Click on the location marker or anywhere on the map to open the building create page.
|
| 8 |
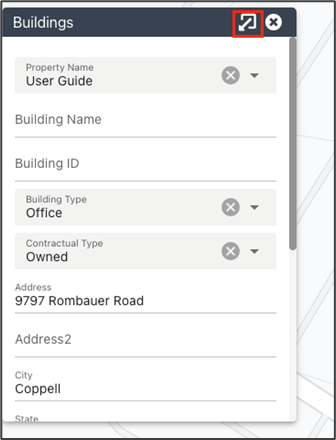
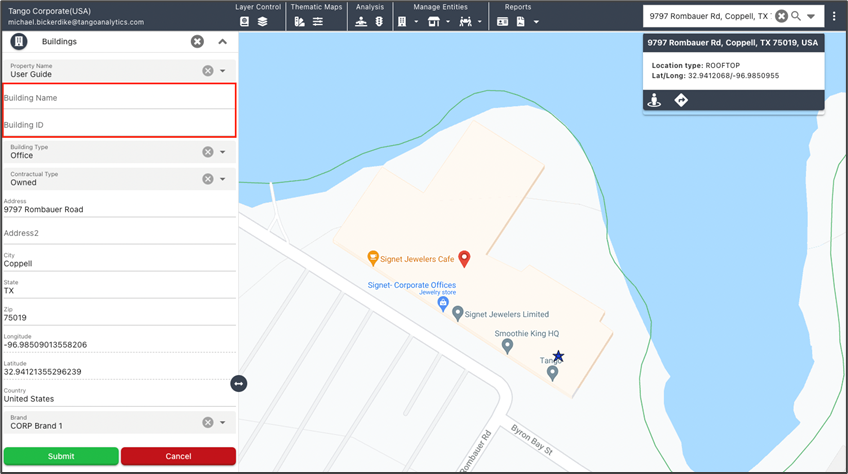
The building create page will be on the left side of the screen.
|
| 9 |
Alternatively, you can click the dock icon on the top right to dock it to the side of the screen. Choose the correct Property (It will default to the first option in the list) and populate a Building Name and Building ID.
|
| 10 |
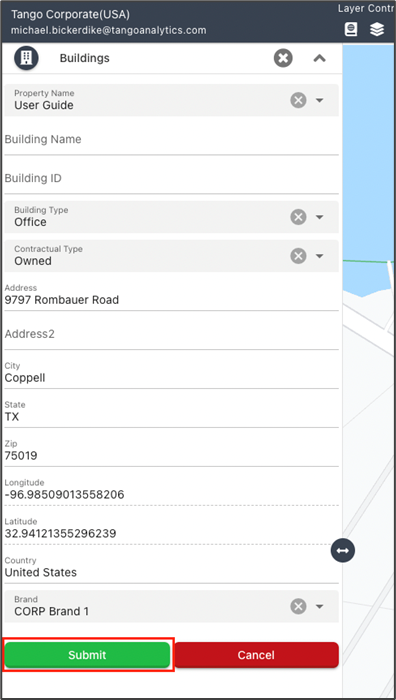
Click Submit to create your Building.
|
| 11 |
A confirmation message will be displayed at the bottom of the screen once it has been processed. If you see this icon
|
| 12 |
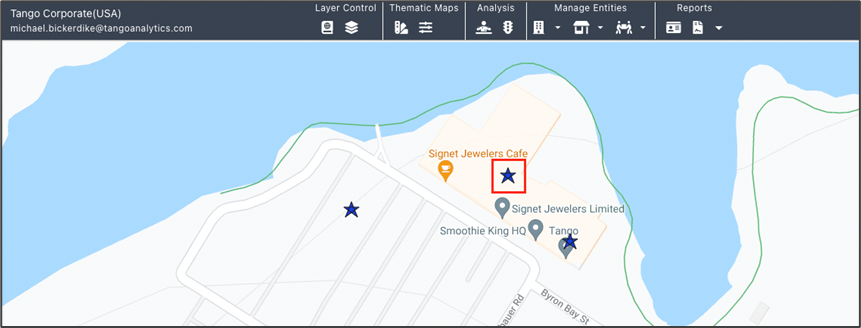
The Building is now marked on the map with an icon e.g., Start, Triangle, etc. Note, the icons on the map could be different in your particular environment.
|
| 13 |
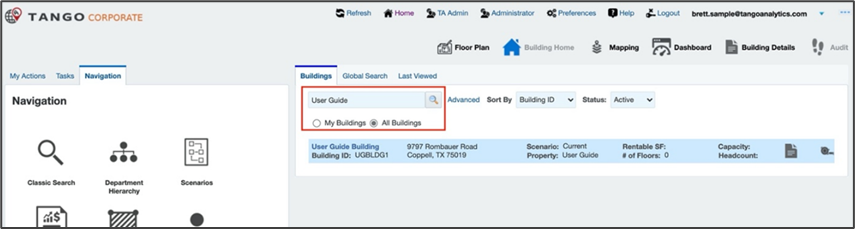
The Building can now be found in the Classic Search a well as the Building Home page search under All Buildings.
|
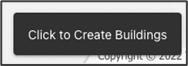
 loading, the Building is in the process of being created.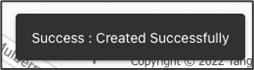
Creating a Floor
This sub-section outlines the high-level process of creating a Building record.
Structural Hierarchy: Property >> Building >> Floor >> Space / Area
| Step | Action |
|---|---|
| 1 |
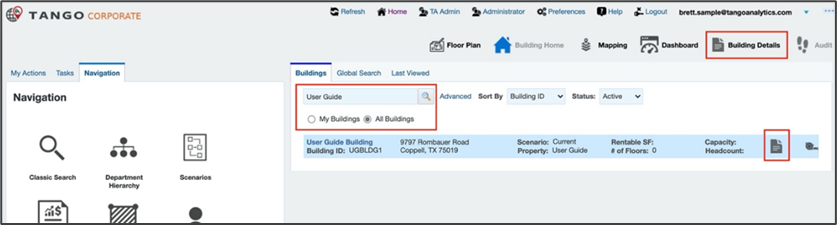
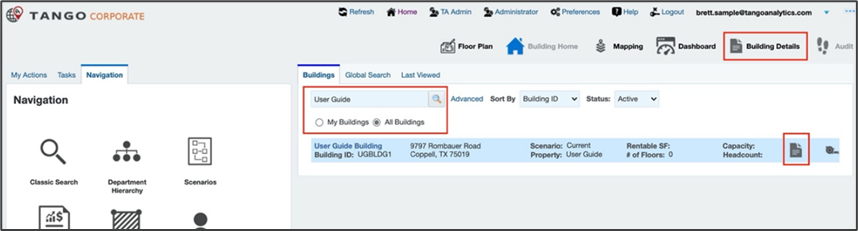
From the Building Home page search select All Buildings if the building is not listed under My Buildings. Search for the building desired and press the Building Details button on the record or in the top menu.
|
| 2 |
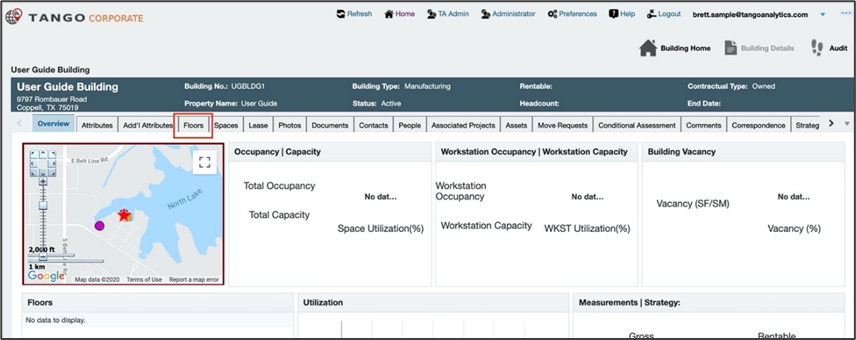
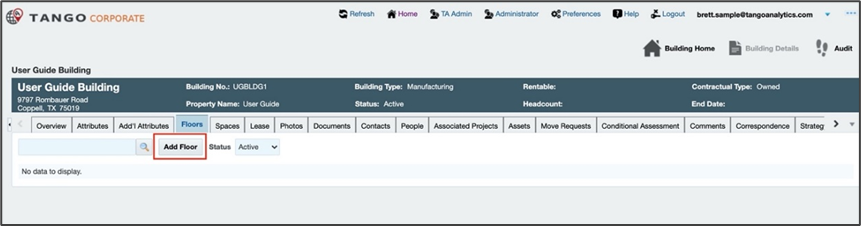
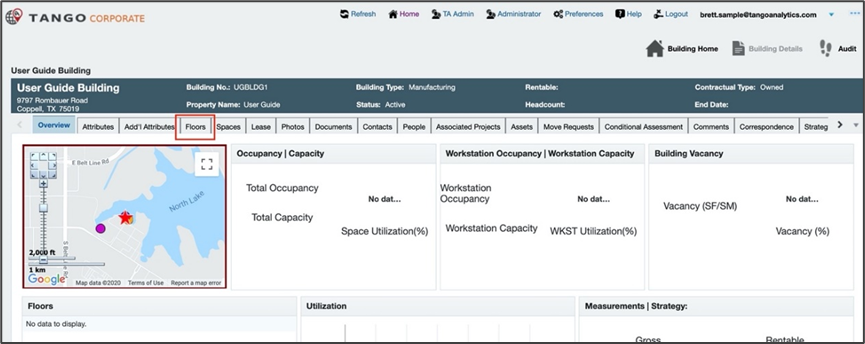
Click on the Floors tab in the building record.
|
| 3 |
Click Add Floor to create a new floor.
|
| 4 |
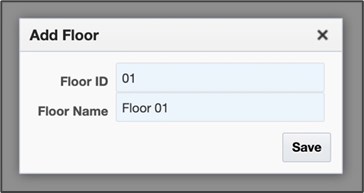
Enter the Floor ID and Floor Name and press Save.
|
| 5 |
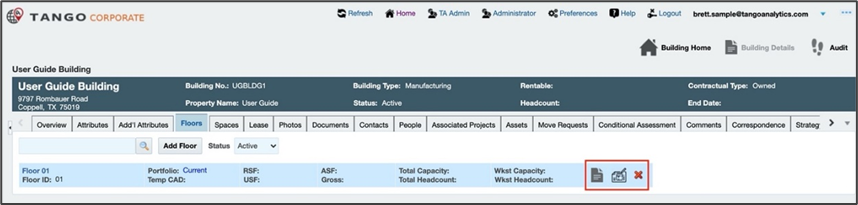
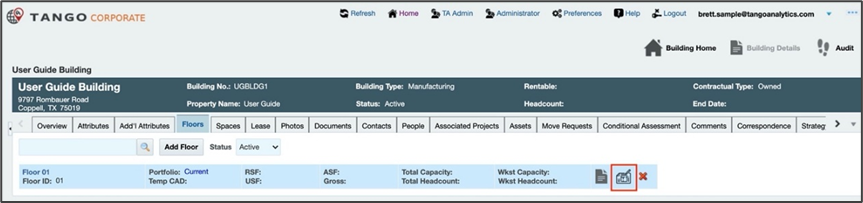
The floor has been created and displayed in the Floors tab. Click on the detail icon to see the floor information, the drawing viewer icon to upload a drawing or to view an existing one or click the X to archive the floor.
|
Creating an Area
This sub-section outlines the high-level process of creating an Area. Note, Areas are sometimes also referred to as Neighborhoods or Zones in other systems.
Structural Hierarchy: Property >> Building >> Floor >> Space / Area
| Step | Action | ||||||||||||||
|---|---|---|---|---|---|---|---|---|---|---|---|---|---|---|---|
| 1 |
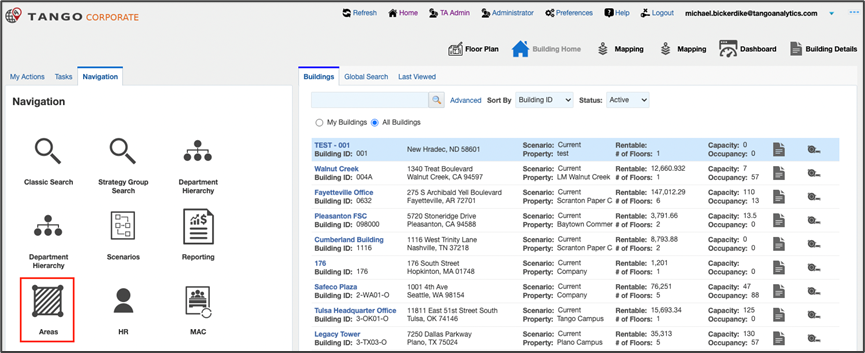
Click on Navigation tab on the Building Home screen and then click the Areas icon.
|
||||||||||||||
| 2 |
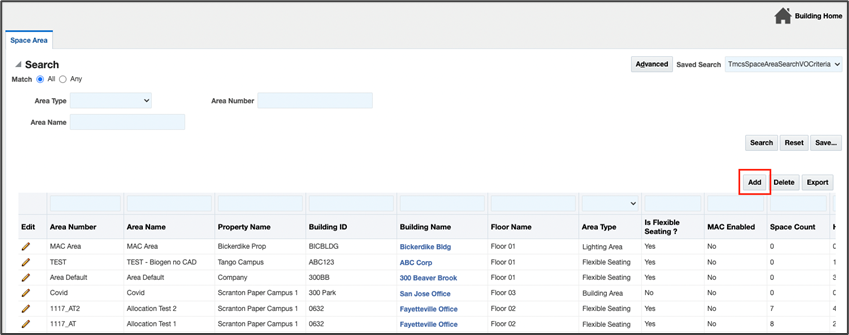
Click the Add button to create a new Area. Note, click the Search button to retrieve any existing areas in the search.
|
||||||||||||||
| 3 |
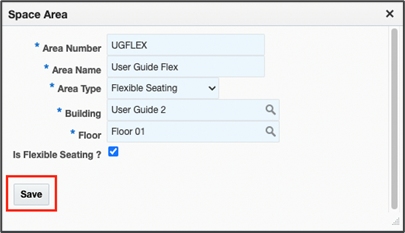
The new Area dialog will pop up, enter any required information here and click Save.
|
||||||||||||||
| 4 |
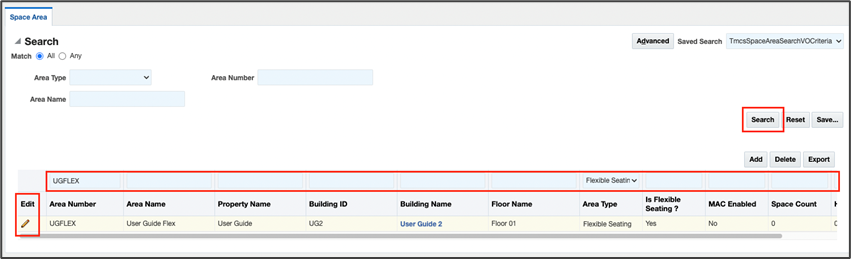
To locate the Area that was just created, use the header columns to filter out the results and click Search. The edit button can be used to make changes within the Area record itself.
|
||||||||||||||
| 5 |
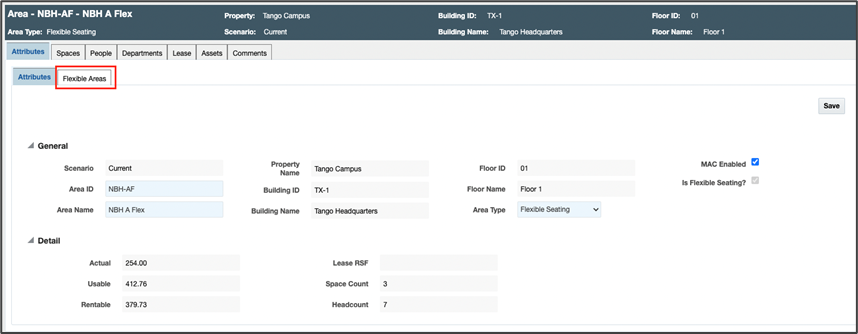
The example below shows a Flex Area which allows people to be allocated to this Area and share the associated spaces. Note, when an area is flagged as Is Flexible Seating, a Flexible Areas tab will be visible. Click on this tab to make changes.
|
||||||||||||||
| 6 |
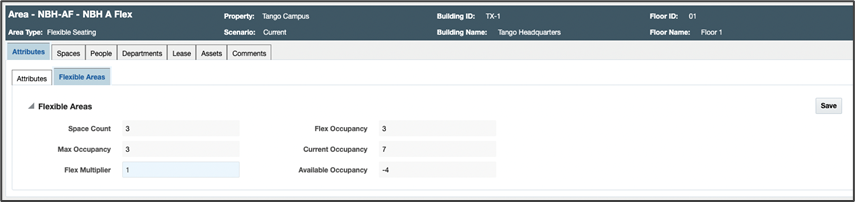
The Flexible Areas tab will allow the end user to modify the Flex Multiplier to determine the Flex Occupancy desired.
|
||||||||||||||
| 7 |
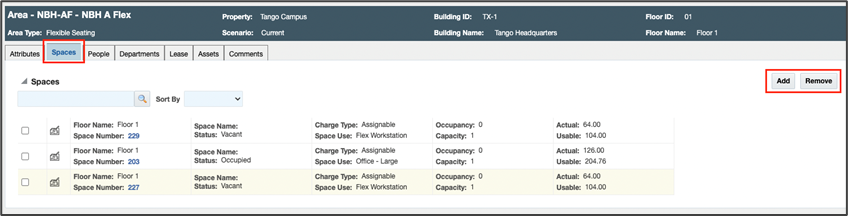
The Spaces tab is where the spaces that are a part of this Flexible Area are shown. Using the Add and Remove buttons, the user can adjust which spaces are associated.
|
||||||||||||||
| 8 |
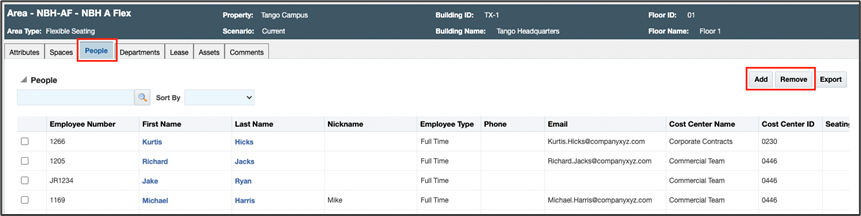
The People tab is where the people who are sharing this Flexible Area are shown. Using the Add and Remove buttons, the user can adjust who is associated.
|
||||||||||||||
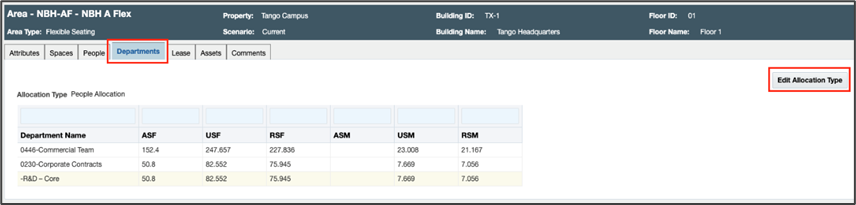
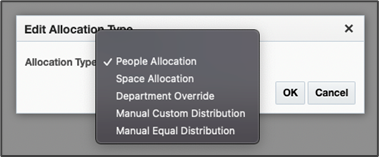
| 9 |
The Departments tab is where the Flexible Area Department Allocations are distributed. Using the Edit Allocation Type button, the end user can determine how to allocate the Departments.
|
||||||||||||||
| 10 |
The Flexible Areas tab will allow the end user to modify the Flex Multiplier to determine the Flex Occupancy desired.
|
Uploading a Drawing
This sub-section outlines the high-level process of uploading a CAD file into Space Management which essentially will create the space records in the system. There is currently not a way to create spaces without a CAD file (.dwg) at the time this document was created.
Structural Hierarchy: Property >> Building >> Floor >> Space / Area
| Step | Action |
|---|---|
| 1 |
From the Building Home page search select All Buildings if the building is not listed under My Buildings. Search for the building desired and press the Building Details button on the record or in the top menu.
|
| 2 |
Click on the Floors tab in the building record.
|
| 3 |
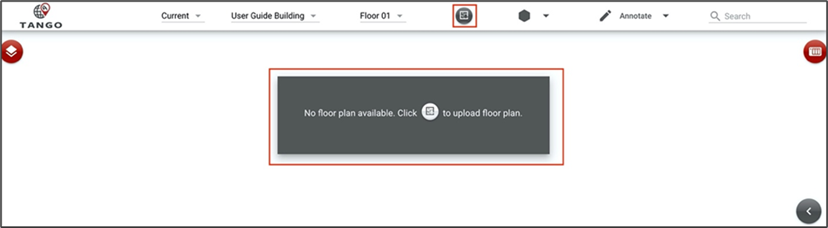
Click the Drawing Viewer icon to open the floor plan view.
|
| 4 |
Click the Upload button.
|
| 5 |
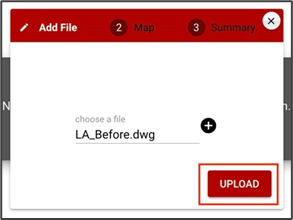
Locate the drawing you want and click upload.
|
| 6 |
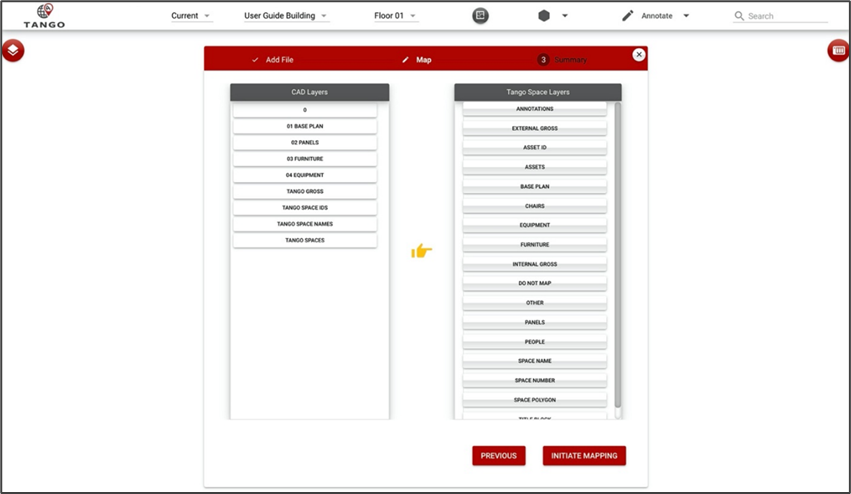
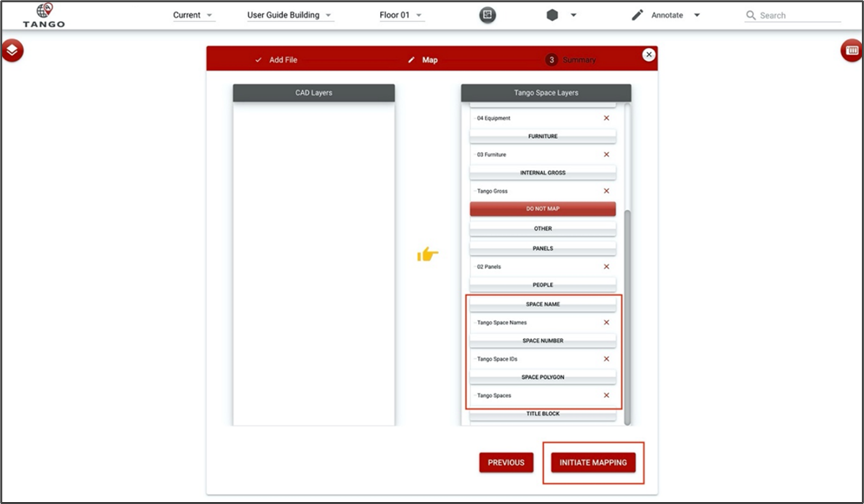
The layer mapping dialog will appear. Map the layers accordingly.
|
| 7 |
Most layers will be placed on the Base Plan layer. Map your Space Names, Space Numbers, and Space Polygons to their respective layers.
|
| 8 |
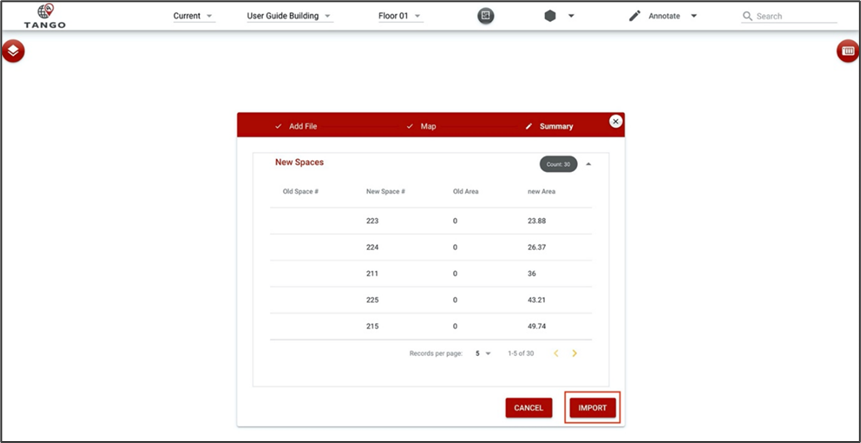
The drawing import summary will display. Click Import to complete the upload.
|
| 9 |
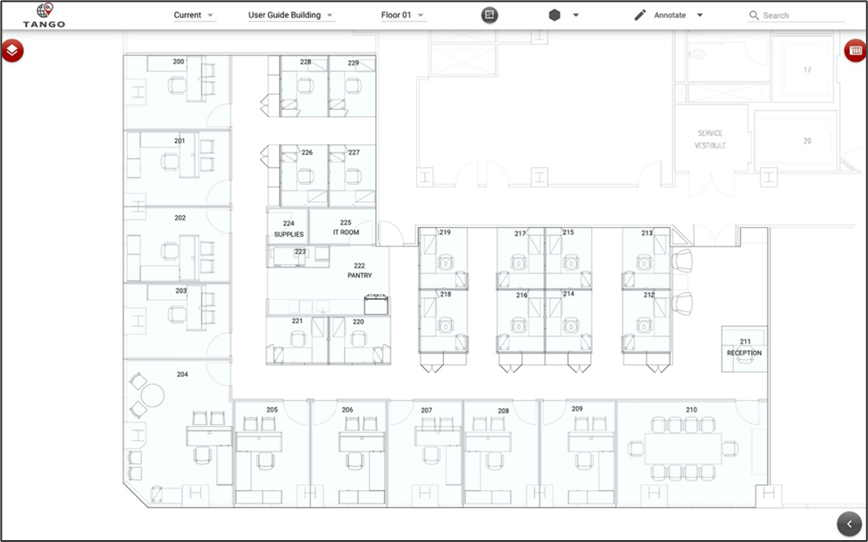
The drawing import is complete.
|
Creating an Asset
This sub-section outlines the high-level process of an Asset record in Space Management.
| Step | Action |
|---|---|
| 1 |
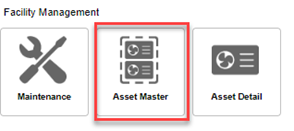
Click the Asset Master icon from the Home screen after Login.
|
| 2 |
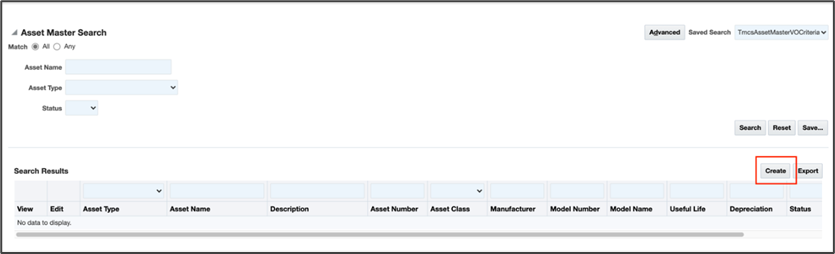
Click the Create button to Create a Master Detail record.
|
| 3 |
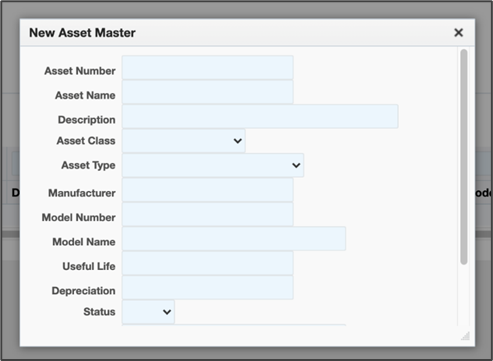
Populate the New Asset Master form with the desired values and click Create. The Asset Master has been created.
|
| 4 |
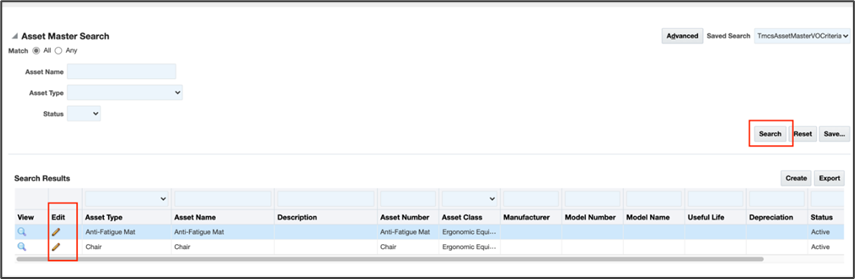
Using the Search button, locate the new record or an existing record and press Edit.
|
| 5 |
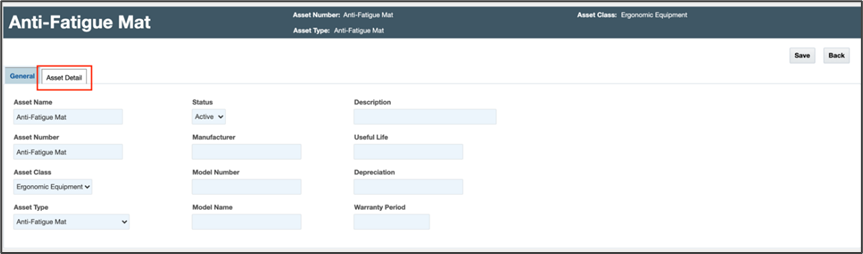
Click the Asset Detail tab.
|
| 6 |
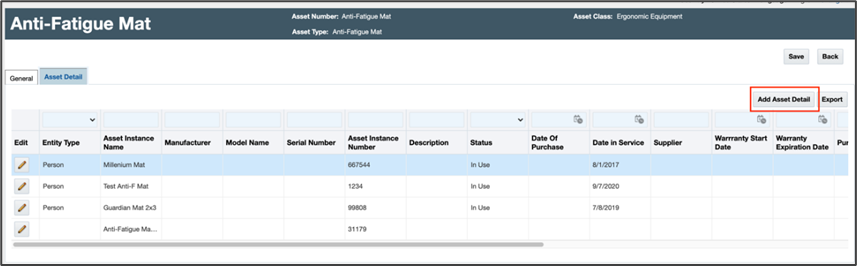
Click the Add Asset Detail button to create one.
|
| 7 |
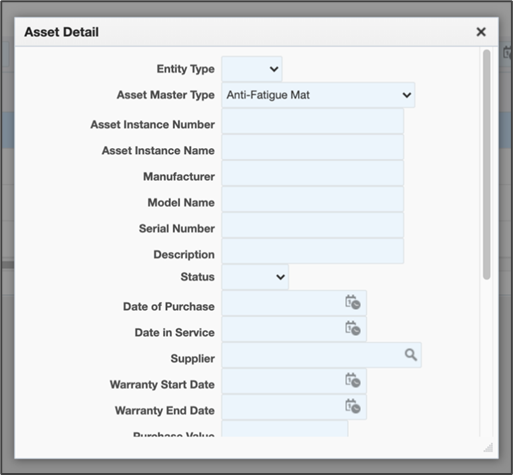
Populate the Asset Detail form with the desired values and press Save.
|
|
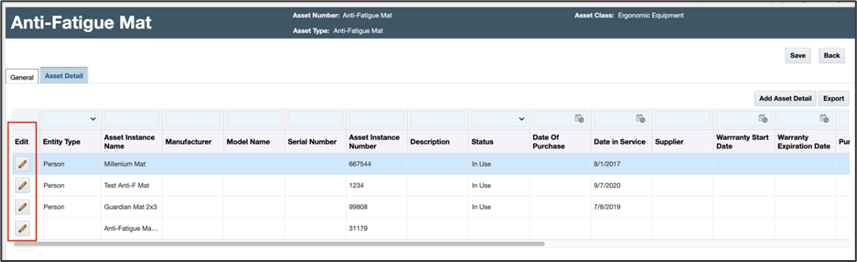
The Asset Detail has been created and is now editable in the search.
|
Was this article helpful?
That’s Great!
Thank you for your feedback
Sorry! We couldn't be helpful
Thank you for your feedback
Feedback sent
We appreciate your effort and will try to fix the article