Table of Contents
A Master Project Bid is created by setting the Bid Category field in the Find Project button pop-up on the Bid Administration Tab to Master Project. A Master Project Bid is like a Single Project Bid, but it supports Master/Child Projects.
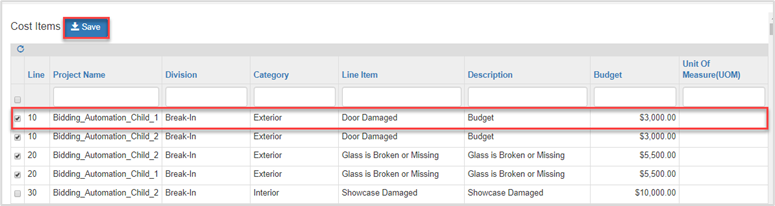
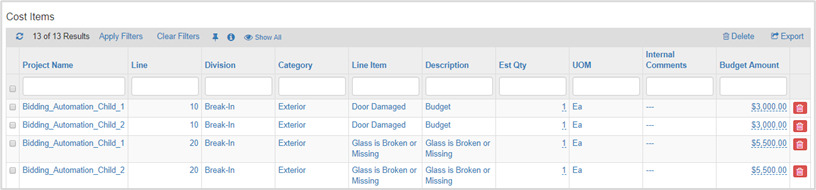
The primary difference between single and master project bids is the Cost Item reports has an additional field for the Project Name. This is because a Master Project will have two or more child projects with matching Cost Items.
Create a New Master Bid
Note: Refer to Create a Bid for detailed new bid creation procedures.
| Step | Action |
|---|---|
| 1. |
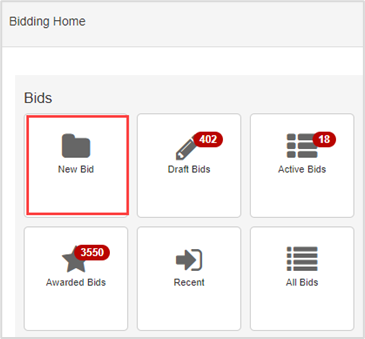
Click New Bid.
|
| 2. |
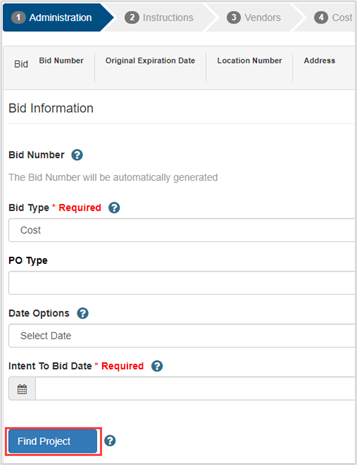
Click Find Project.
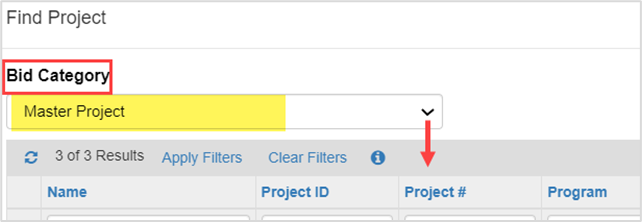
Choose Master Project in the Bid Category drop-down
Click a green arrow on the project in the Master Project results.
Information from the TA Project module populates on the associated Project fields on the Bid record.
|
| 3. | Complete the fields in Administration tab following the Administration Tab procedure. |
| 4. |
Click Save, then Next.
|
| 5. | Complete the Instructions tab using the Instructions tab procedure, then click Save and Next. |
| 6. | Complete the Vendors tab using the Vendors tab procedure, then click Save and Next. |
| 7. |
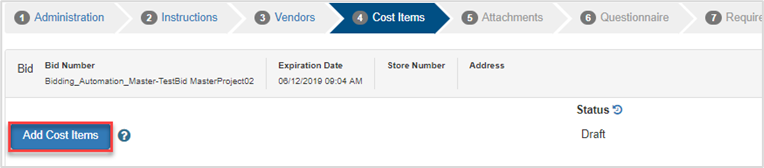
Complete the Cost Items tab using the Cost Items tab procedure and perform the following to add and edit existing line items:
|
| 8. | Complete the Attachments tab using the Attachment tab procedure, then click Save and Next. |
| 9. | Complete the Questionnaire tab using the Questionnaire tab procedure, then click Save and Next. |
| 10. | Complete the Requirements tab using the Requirements tab procedure, then click Save and Next. |
| 11. | Complete the Summary/Solicit tab using the Summary/Solicit tab procedure. |



Master Project Bid Response
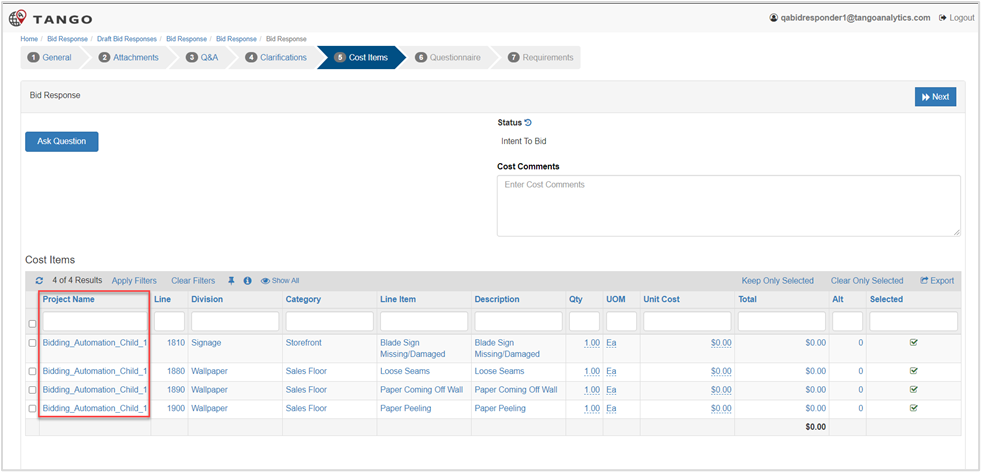
After the Bid Manager solicits the bid, vendors can respond and update their associated bids, as applicable.
Note: Master Projects include a Project Name column for each Cost Item.
Master Project Active Bid
Follow the Active Bid Procedures.
Master Project Closed Bid
Follow the Closed Bid Procedures and perform the following procedure.
Compare/Award Bid
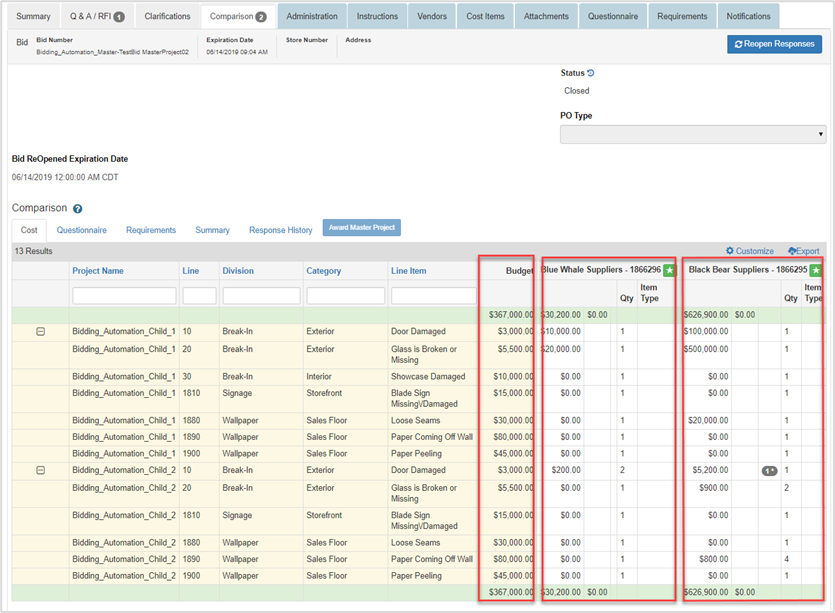
In a Master Project Bid, there are multiple Child Projects, so the Bid Manager can award each Project to different responders, or they can award all Projects to a single responder.
Upon submission of Bid Information and closing of the Bid process, the Bids can be compared and awarded.
| Step | Action |
|---|---|
| 1. |
Select the bid.
|
| 2. |
Click the Comparison tab. Note: A badge count displays the number of responses is available to compare.
|
| 3. |
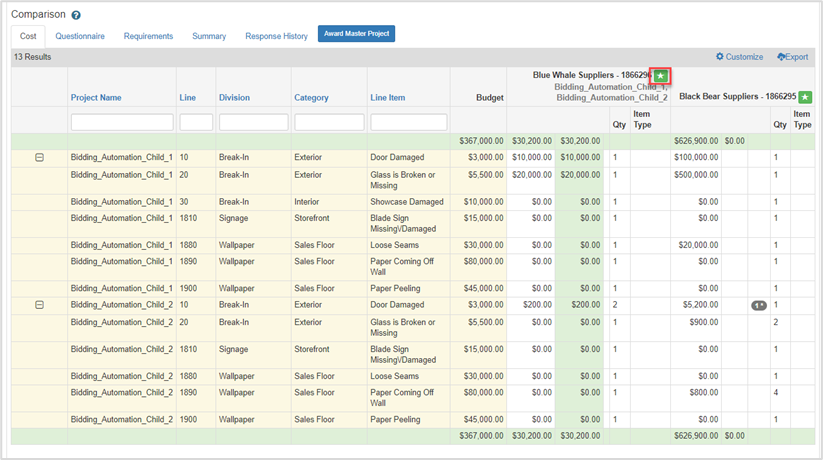
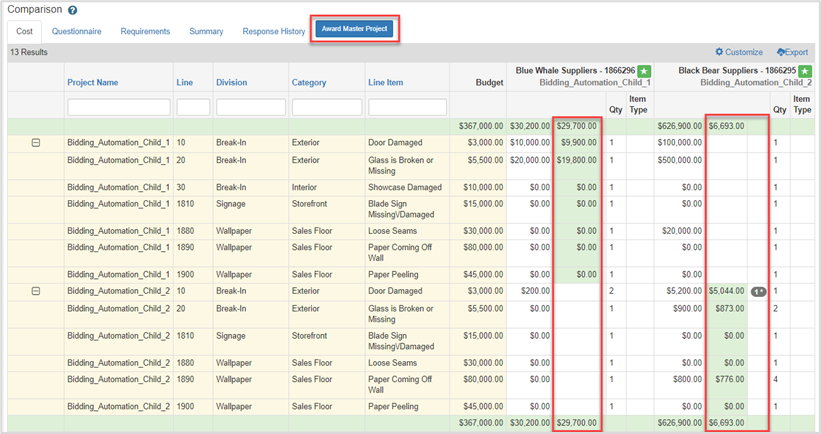
View the responses and compare with the budget.
|
| 4. |
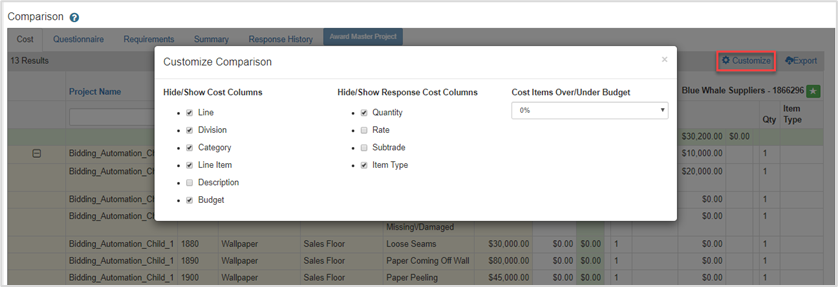
Click Customize then choose an over/under percentage in the Cost Items Over/Under Budget drop-down for the selected columns.
|
| 5. |
Review the cost line items and click the green star on the vendor’s name. Note: For a Master Project Bid, the Bid Manager can either assign Projects specifically to multiple Responders or they can assign all Projects to a single Responder.
|
| 6. |
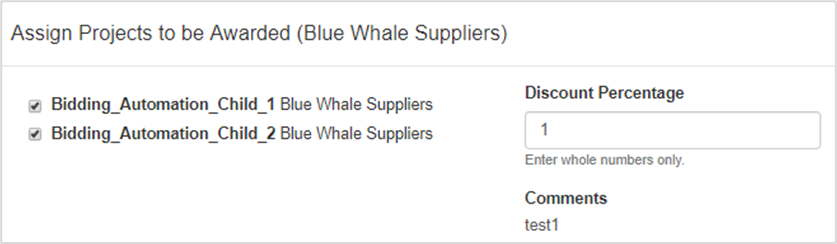
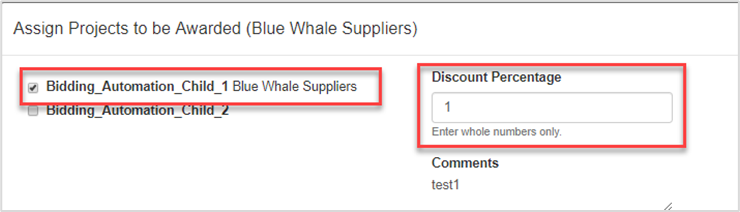
Select the project(s) to award and enter a discount percentage in the Discount Percentage field.
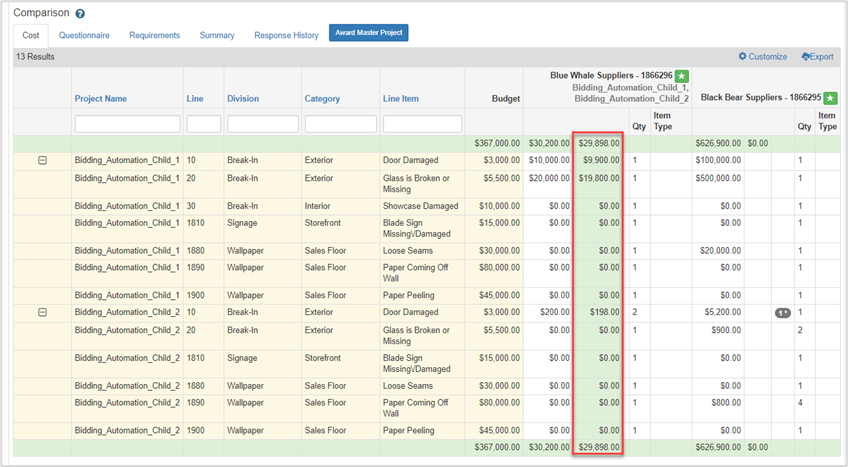
The awarded bid displays with any discount applied.
|
| 7. |
Optional: Award multiple vendors as follows:
The changes are auto-saved and display in the Comparison report.
|
| 8. |
Click Award Master Project.
|
| 9. |
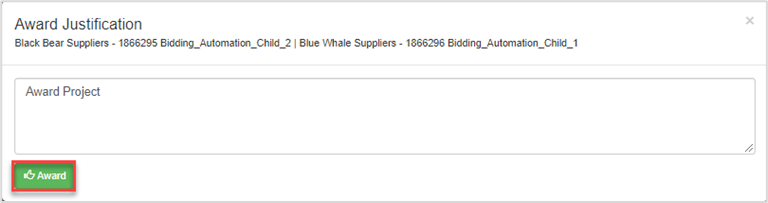
Add comments in the Award Justification pop-up, then click Award. Vendors are notified via email and the purchase order, with any discounts generates in the system.
|




Master Project Projects Module
| Step | Action |
|---|---|
| 1. |
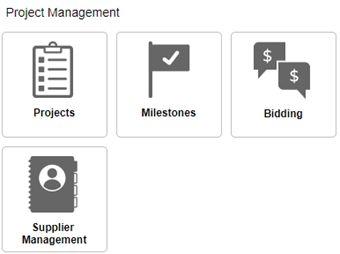
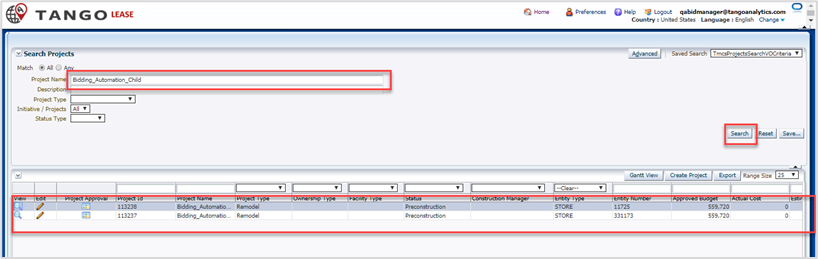
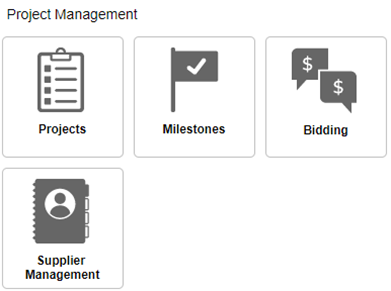
Navigate to the Function Dashboard, then click Projects.
|
| 2. |
|
| 3. |
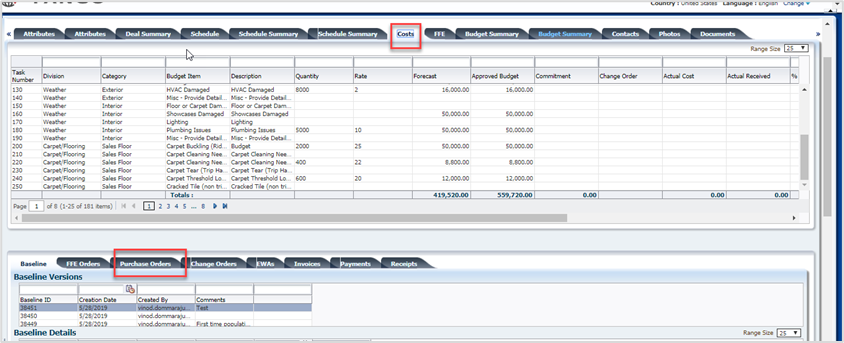
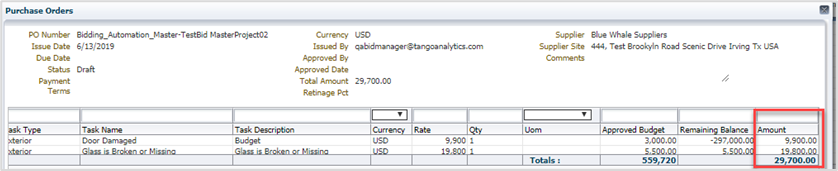
Click the Costs tab then select the Purchase Orders sub tab and view the discounted Purchase Order amount details. Example: Blue Whale Suppliers was awarded the project with a 1 percent discount.
|
| 4. |
Click the magnifying glass on the purchase order row to view details.
|

Project Manager
Project Manager access is like Bid Manager access except they cannot Create/Solicit the actual Draft Bid.
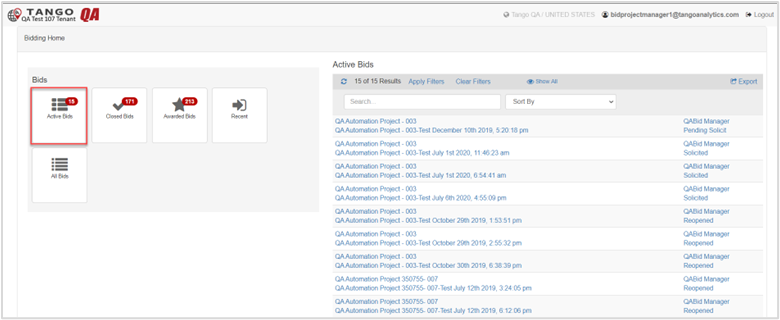
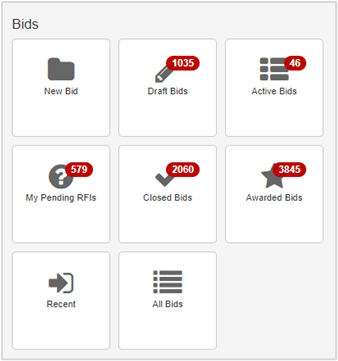
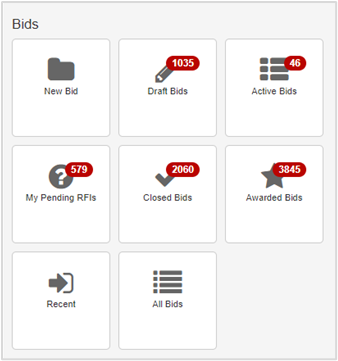
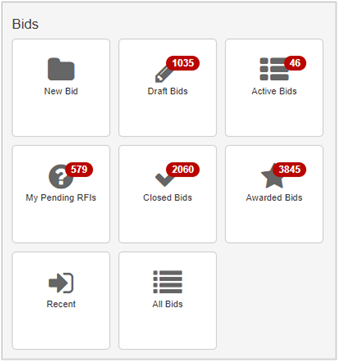
This is the Project Manager’s landing home page.
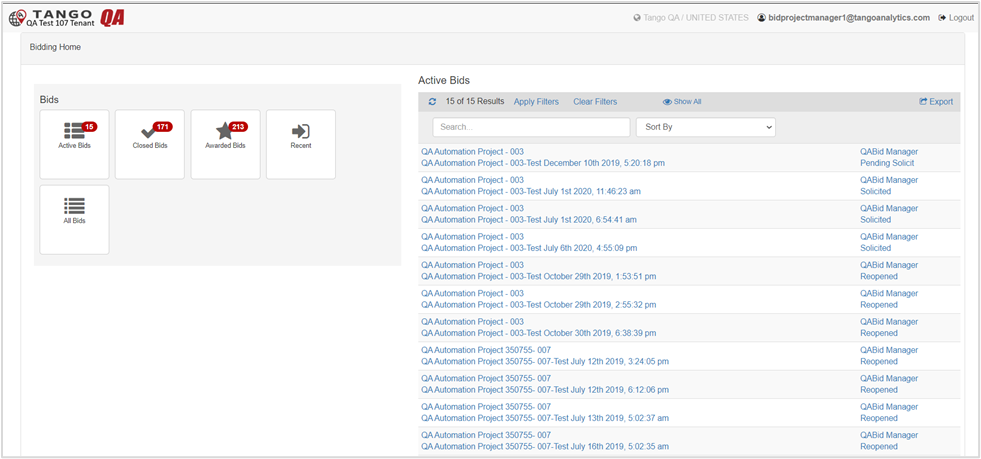
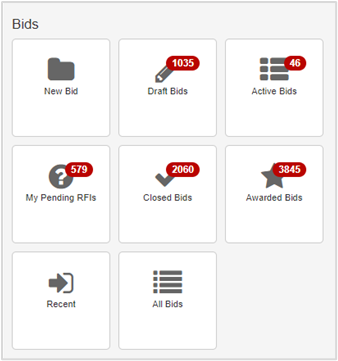
The Project Manager home page view contains all the Bidding tiles on the left side and an Active Bids report section in the right side for quick access to the current Bids.
The Project Manager will only see Bids where they are assigned to the Project Manager Role (or as an Additional Project Manager)
Open a Bid Record
| Step | Action |
|---|---|
| 1. |
Navigate to the Function Dashboard, then click Projects.
|
| 2. |
Click Active Bids tile.
|
| 3. |
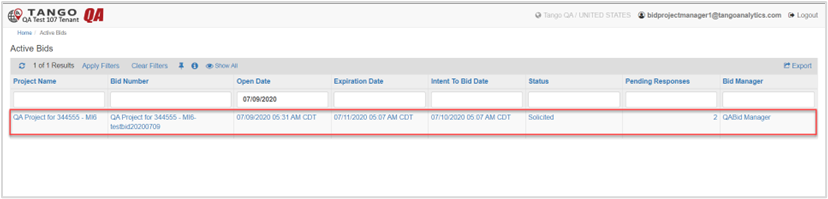
Click the bid in the Active Bids pane.
The Active bid displays. The following sections refer to the open active bid page. |
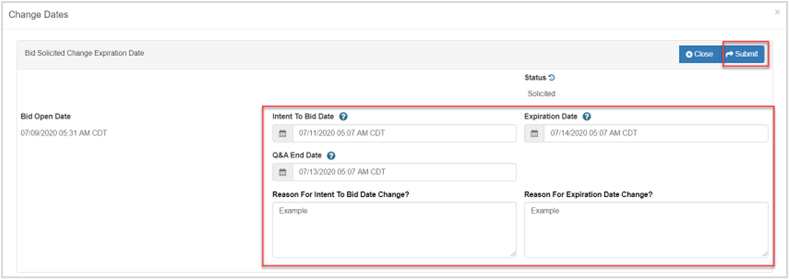
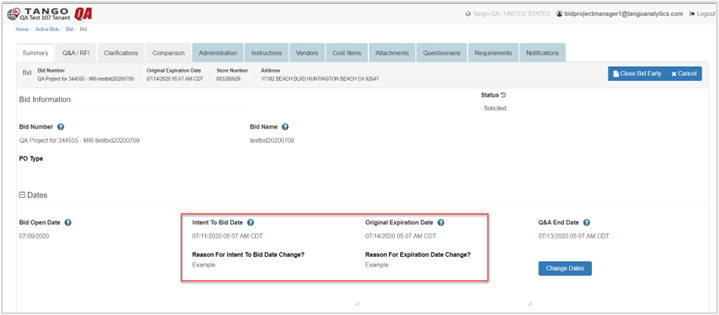
Change Dates
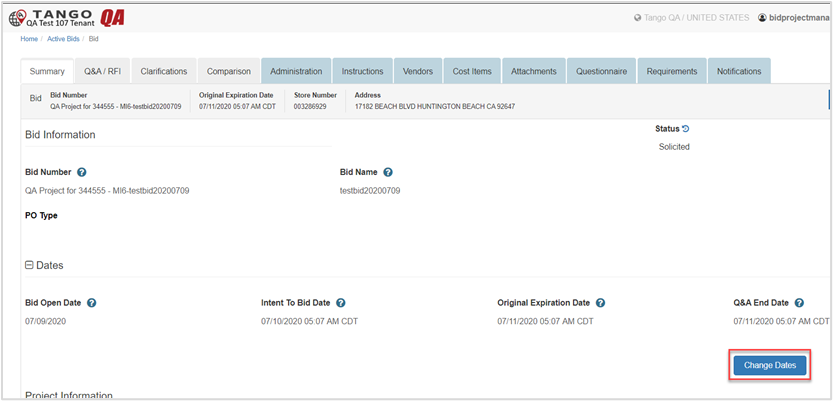
The Project Manager can change the dates of the active bid.
| Step | Action |
|---|---|
| 1. |
Click Change Dates in the Summary tab.
|
| 2. |
Complete the following, as applicable, then click Submit.
The new dates display on the Summary tab.
|
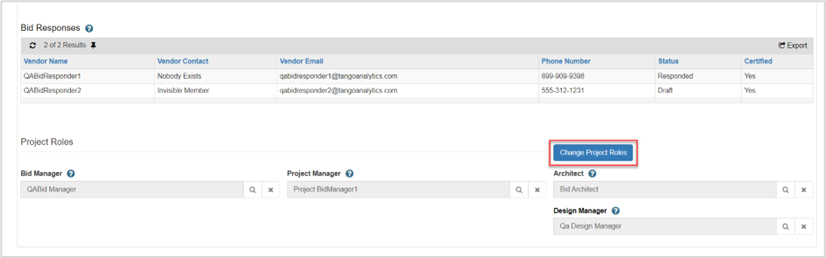
Change Project Roles
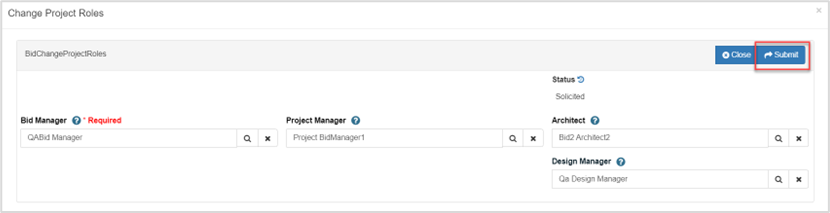
The Project Manager can change the bidding project roles.
| Step | Action |
|---|---|
| 1. |
Scroll to the Project Roles pane in the Summary tab, then click Change Project Roles.
|
| 2. |
Click the magnifying glass on the Bid Manager, Project Manager, Architect, or Design Manager fields and choose new roles, as applicable.
|
| 3. |
Click Submit.
The new roles display. |

Respond to a Question
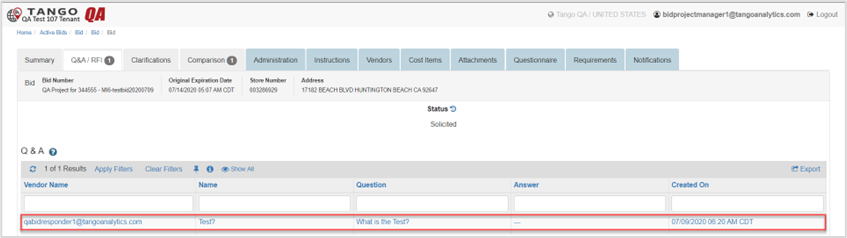
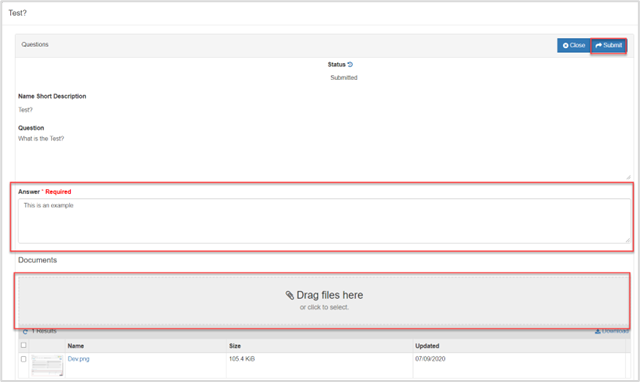
The Project Manager can respond to vendor questions, including adding supporting documents
| Step | Action |
|---|---|
| 1. |
Click the Q&A/RFI tab.
|
| 2. |
Perform the following:
|
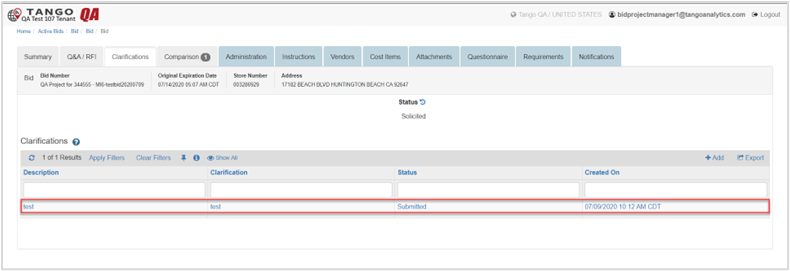
Bid Clarification
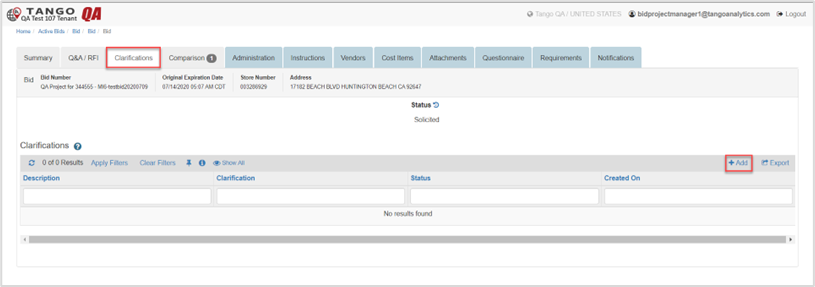
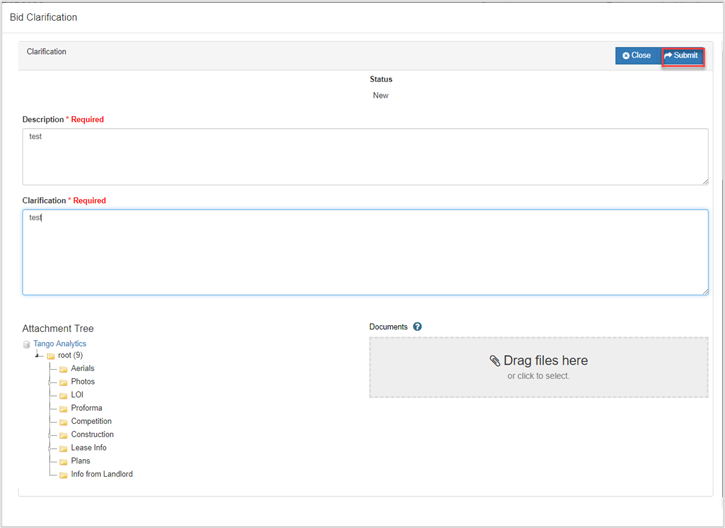
The Project Manager can add clarifications on this tab.
| Step | Action |
|---|---|
| 1. |
Click the Clarifications tab.
|
| 2. |
Click + Add in the Clarifications pane.
|
| 3. |
Complete the clarification page as follows:
|

Adding Vendors After the Bid is Solicited
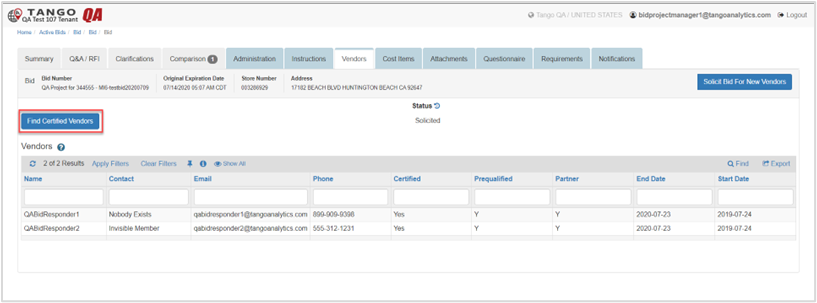
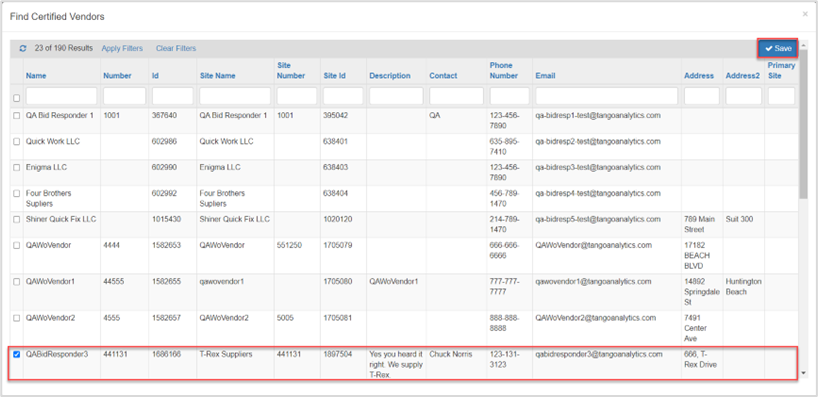
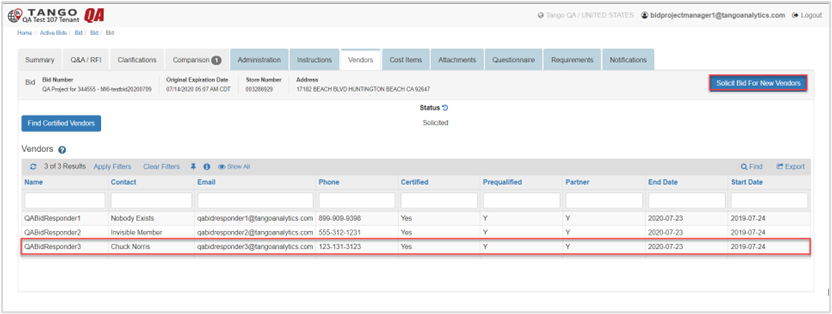
This section describes adding a certified vendor after the bid has been submitted.
| Step | Action |
|---|---|
| 1. |
Click the Vendors tab, then click Find Certified Vendors.
|
| 2. |
Check the box on the vendor row and click Save.
|
| 3. |
Click Solicit Bid for New Vendors.
The new vendor is sent an auto-generated email. |
Manually Closing a Bid (Close Bid Early)
For the normal business process, the System will close the Bid based on the Close date assigned during the creation process. This process will walk the user through manually closing the Bid.
| Step | Action |
|---|---|
| 1. |
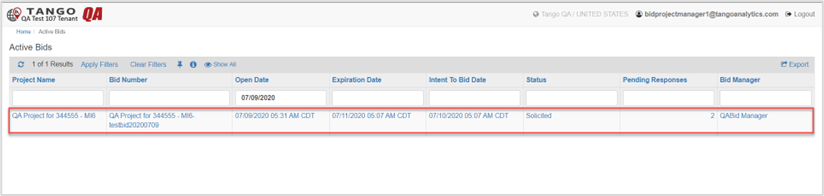
Click the active bid with the status Solicited.
|
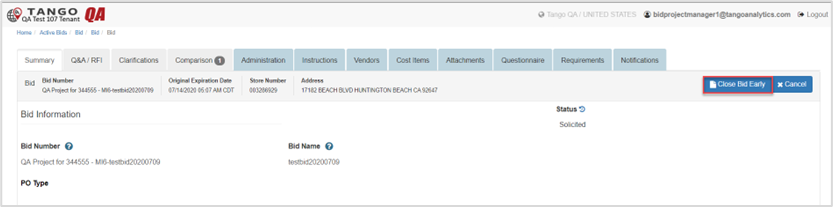
| 2. |
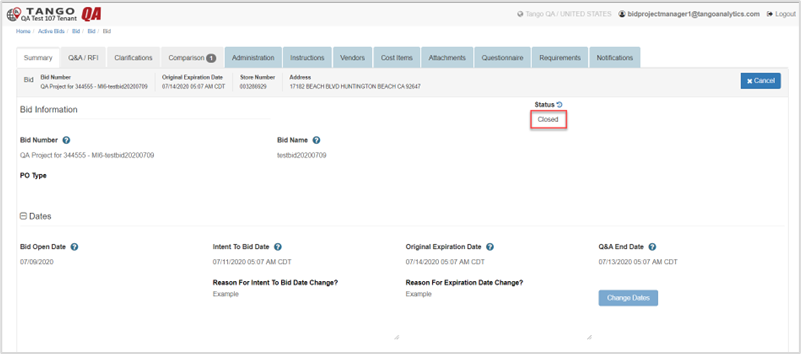
Click Close Bid Early.
The bid status is refreshed and is changed to Closed. The vendor is sent an auto-generated email.
|
Re-Open Closed Bid
After the Bid is Closed and before it is Awarded, the Bid can be re-opened through the following steps.
| Step | Action |
|---|---|
| 1. |
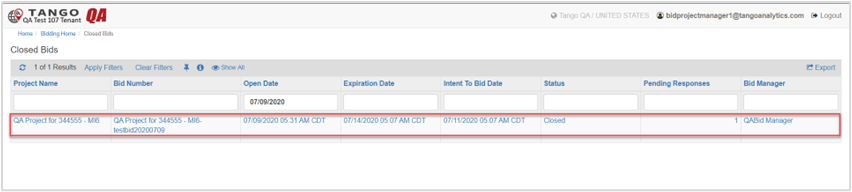
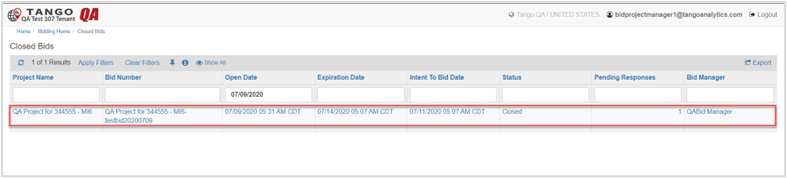
Navigate to the Project Manager page, then click Closed Bids.
|
| 2. |
Click the bid to re-open.
|
| 3. |
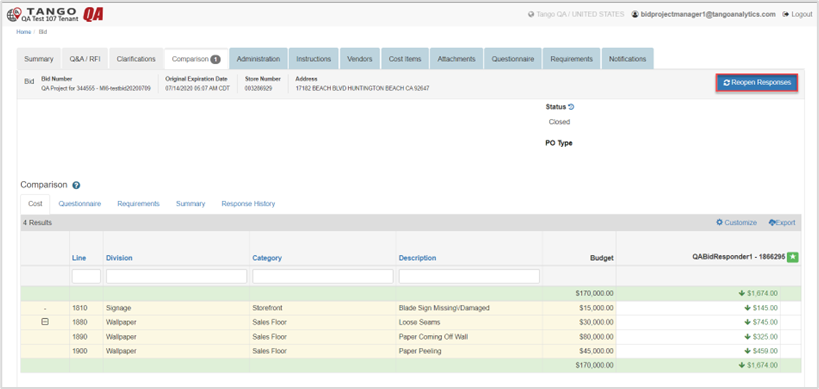
Click the Comparison tab then Reopen Responses.
|
| 4. |
Check the box next on the vendor(s) name then click Save.
|
| 5. |
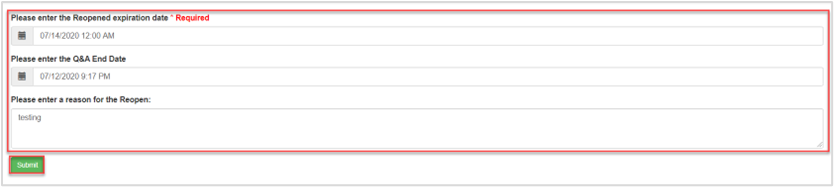
Choose new expiration and Q&A end dates, type a reopen reason in the field, then click Submit.
The vendor(s) receive an auto-generated email. |

Compare/Award Bid
Upon submission of Bid Information and closing of the Bid process, the Bids can be compared and awarded.
| Step | Action |
|---|---|
| 1. |
Navigate to the Project Manager page, then click Closed Bids.
|
| 2. |
Click to open the bid.
|
| 3. |
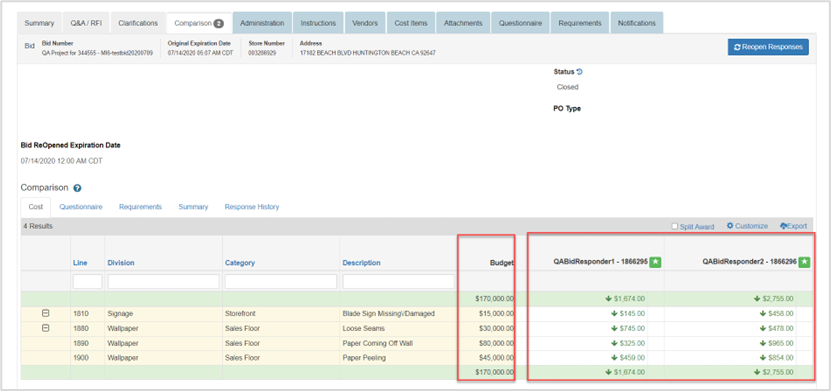
Click the Comparison tab.
|
| 4. |
Review the bids against the budgeted line items.
|
| 5. |
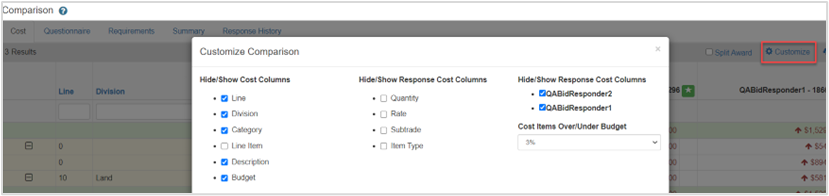
Click Customize then choose an over/under percentage in the Cost Items Over/Under Budget drop-down for the selected columns.
|
| 6. |
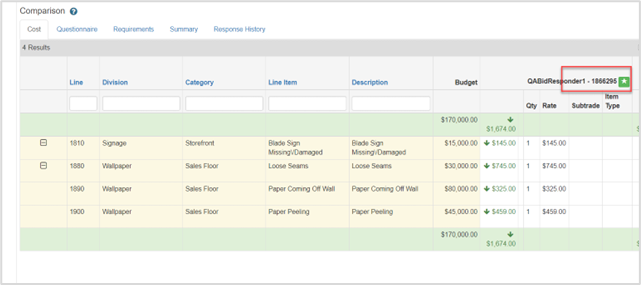
Click the green star next to the awardee name.
|
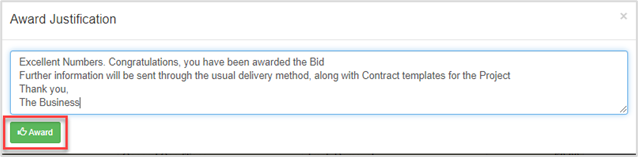
| 7. |
Type the award message, then click Award. The vendor receives an auto-generated email.
|

Split Award
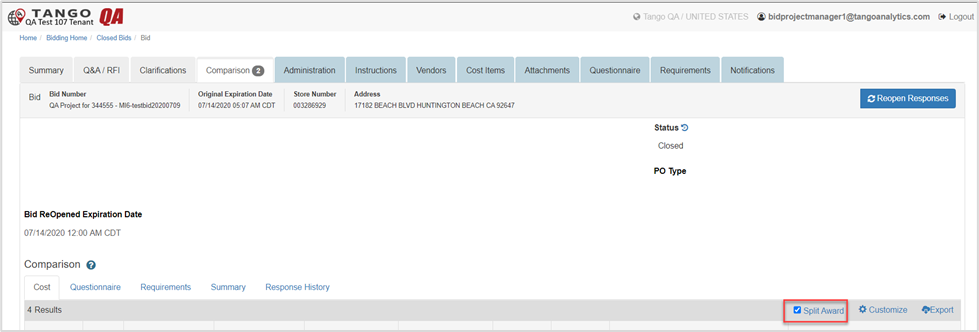
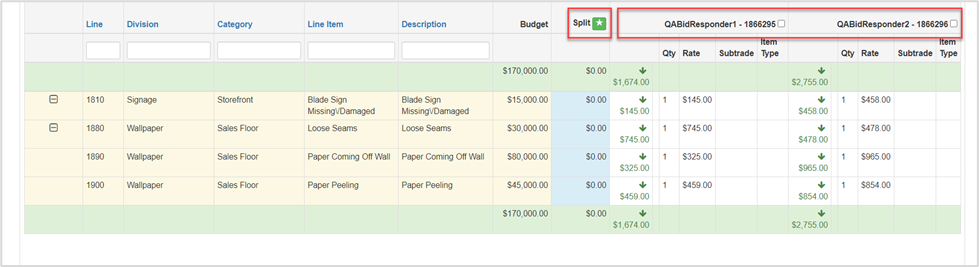
For bids that the Project Manager will award to more than one vendor, they will use the Split Award feature.
| Step | Action |
|---|---|
| 1. |
Click the Comparison tab on the closed bid, then click the checkbox Split Award.
|
| 2. |
Check the box next to the selected vendors, then click the green split star.
|
| 3. |
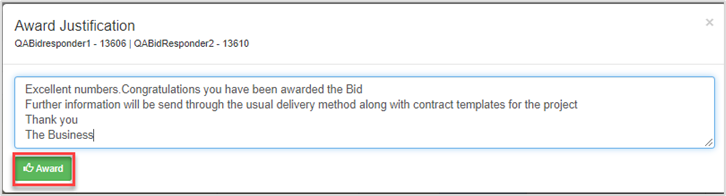
Type the award message, then click Award. The vendors receive an auto-generated email.
|
Cancel Bid
The Project Manager can close the bid at any time prior to the expiration date.
| Step | Action |
|---|---|
| 1. |
Navigate to the Project Manager page, then click Active Bids.
|
| 2. | Click to open the bid. |
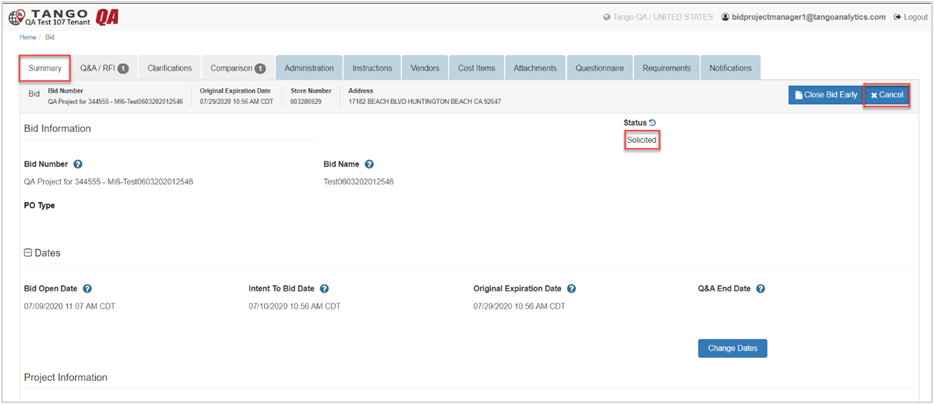
| 3. |
Click Cancel on the Summary tab.
|
| 4. |
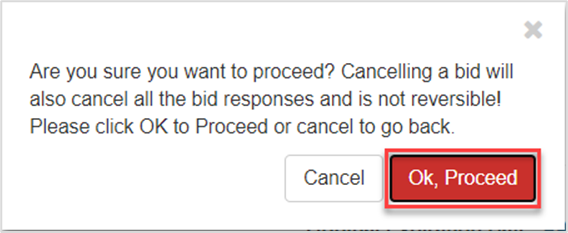
Click Ok, Proceed on the pop-up message.
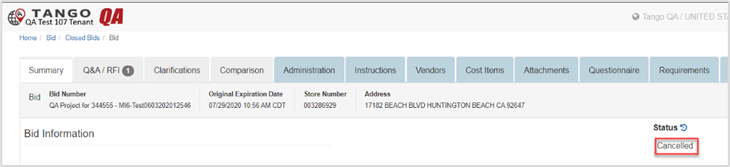
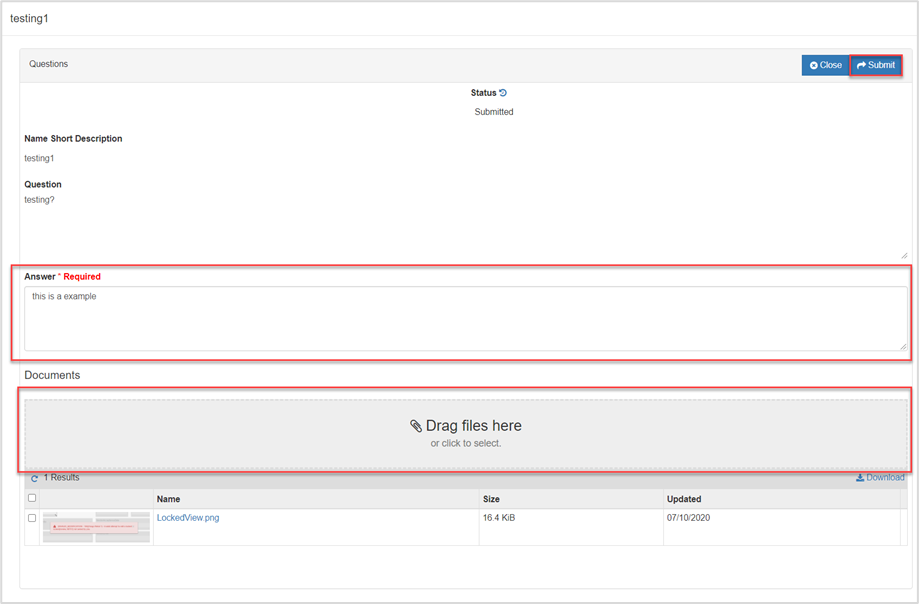
The bid status is set to Cancelled and the vendor(s) receive and auto-generated email.
|
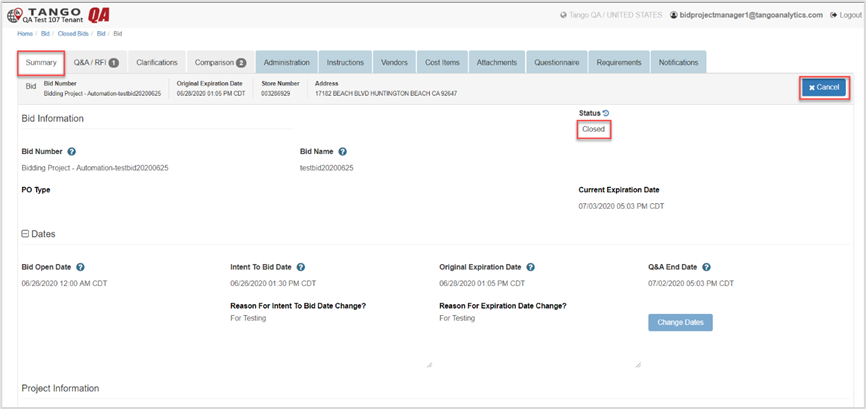
Cancel Bid (After Closing the Bid)
The Project Manager can cancel the bid after it is closed. This procedure will be performed if the project is cancelled or delayed, or the responses were not satisfactory.
| Step | Action |
|---|---|
| 1. |
Navigate to the Project Manager page, then click Closed Bids.
|
| 2. |
Open the bid, then click Cancel in the Summary tab.
|
| 3. |
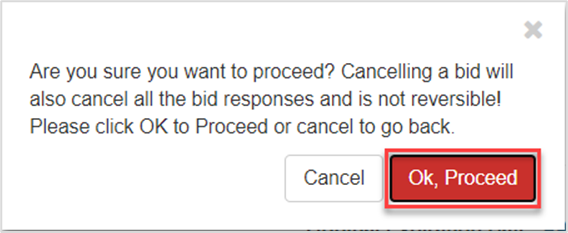
Click Ok, Proceed on the pop-up.
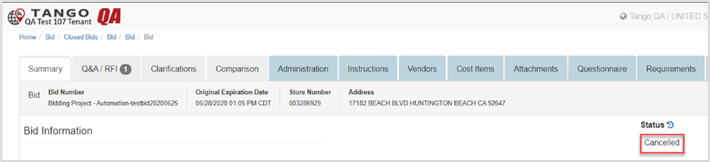
The bid status is set to Cancelled and the vendor(s) receive an auto-generated email.
|
Architect
The main system level responsibility of the Architect users is to answer Questions that the Bid Responders submit and the create and send out Clarifications.
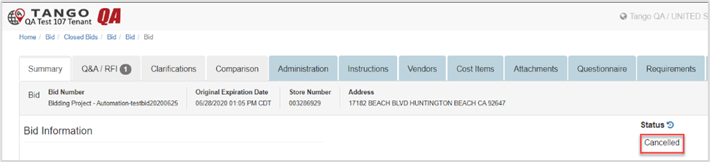
The Architect home page is below. The bidding tiles are in the left pane, and the active bid report is on the right.
The Architect sees only those bids assigned to them.
Respond to a Question
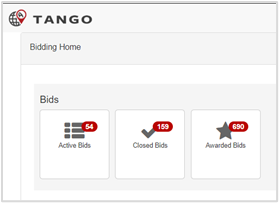
The Architect can answer Responder’s questions in the Q&A RFI tab.
| Step | Action |
|---|---|
| 1. |
Navigate to the Architect page, then click Active Bids.
|
| 2. |
Click the Q&A/RFI tab, then click to open the question.
|
| 3. |
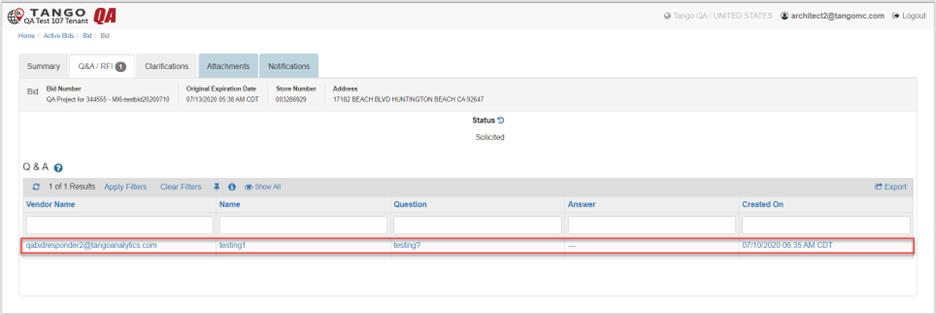
Type a response in the Answer field, upload documents or download responder documents, as applicable, then click Submit.
|
Bid Clarification
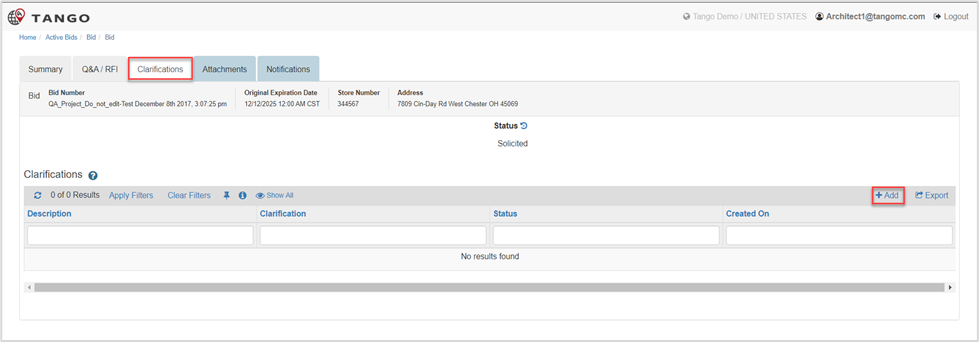
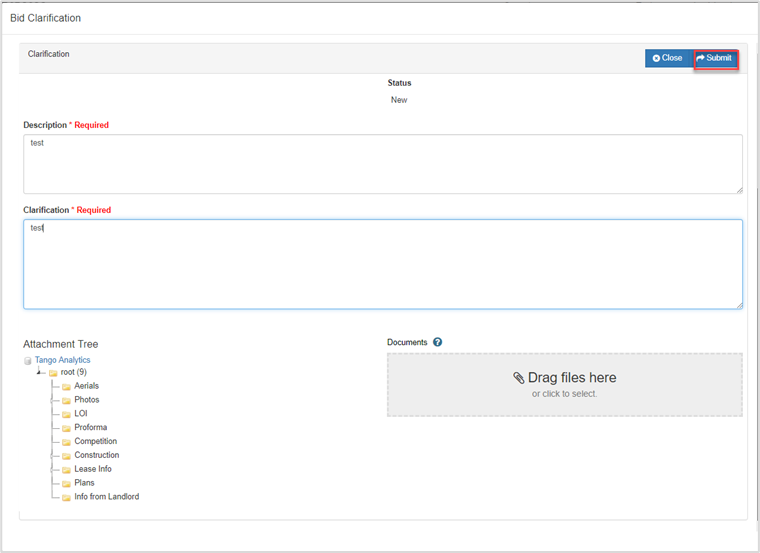
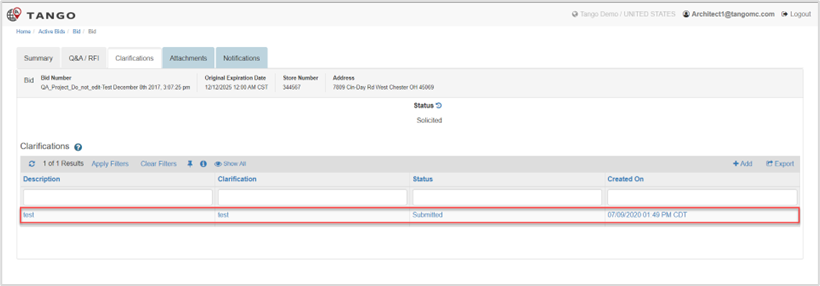
The Architect can add clarification to the bid if there are multiple questions, or questions that are similar.
| Step | Action |
|---|---|
| 1. |
Click the Clarification tab then click + Add.
|
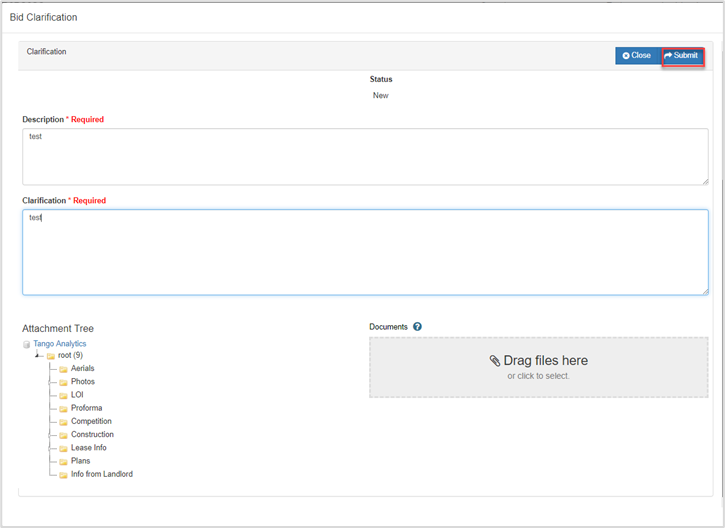
| 2. |
Type a Description and Clarification in the respective fields, choose documents or images from the Attachment Tree pane, as applicable, then click Submit.
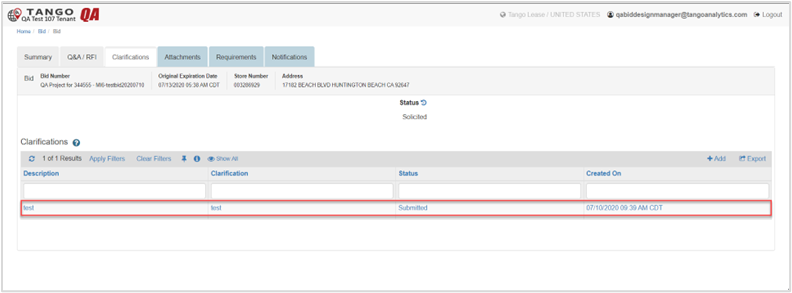
The response displays in the Clarifications pane.
|
Design Manager
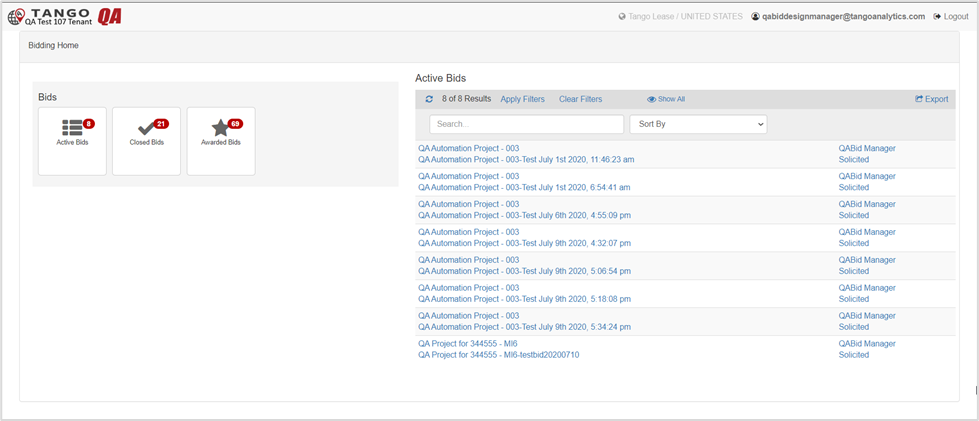
The Design Manager’s key role in the system is to answer questions that bid responders submit and provide clarification, as applicable.
The Design Manager home page is displayed below. The Design Manager home page view contains all the Bidding tiles on the left side and an Active Bids report section in the right side for quick access to the current bids.
Note: The Design Manager will see only those bids assigned to them.
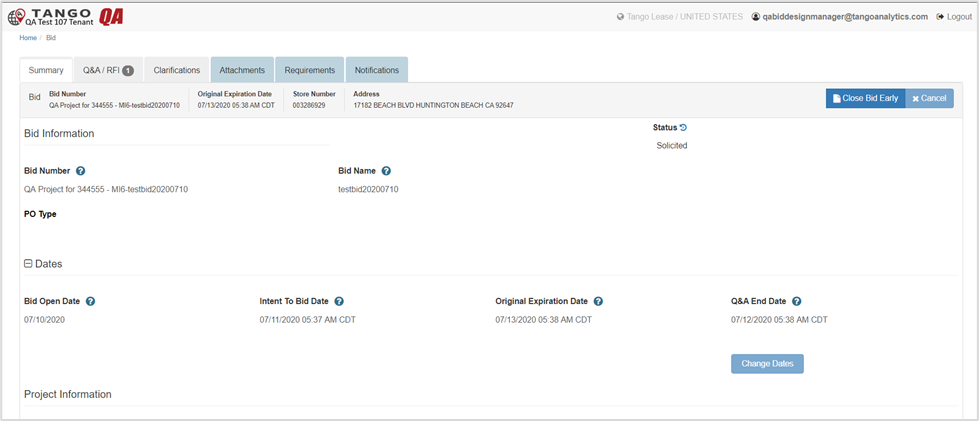
Respond to a Question
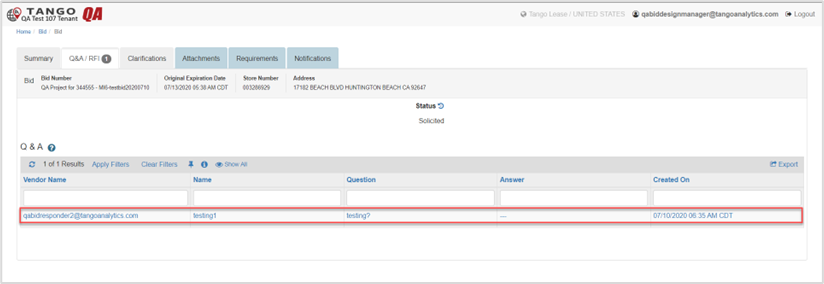
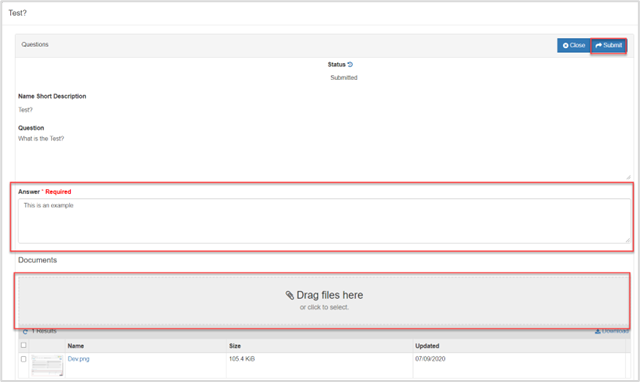
The Design Manager can answer Responder’s questions in the Q&A RFI tab.
| Step | Action |
|---|---|
| 1. |
Click the Q&A/RFI tab.
|
| 2. |
Perform the following:
|
Bid Clarification
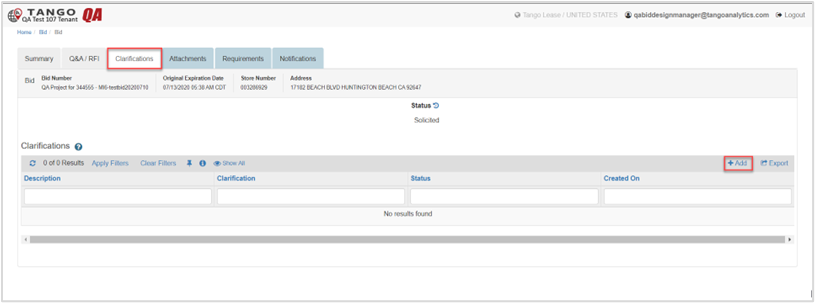
The Design Manager can add clarification.
| Step | Action |
|---|---|
| 1. |
Click the Clarifications tab.
|
| 2. |
Click + Add in the Clarifications pane.
|
| 3. |
Complete the clarification page as follows:
|

Was this article helpful?
That’s Great!
Thank you for your feedback
Sorry! We couldn't be helpful
Thank you for your feedback
Feedback sent
We appreciate your effort and will try to fix the article