Table of Contents
ADMINISTRATION
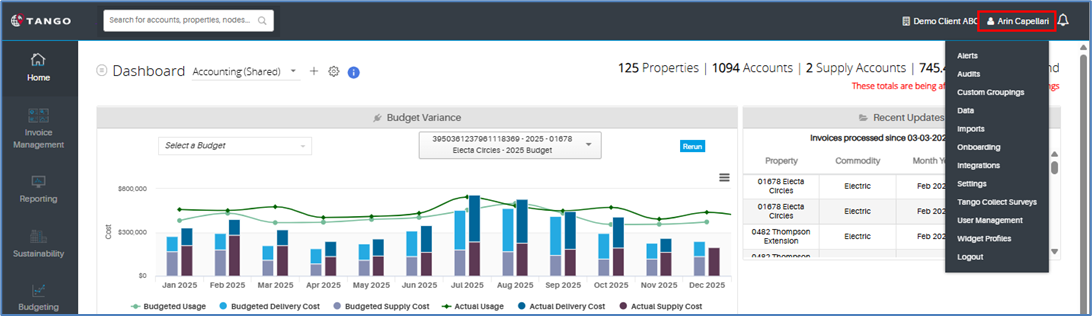
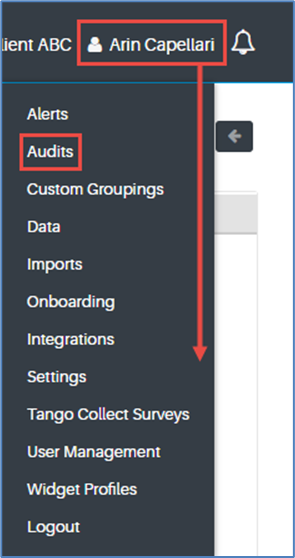
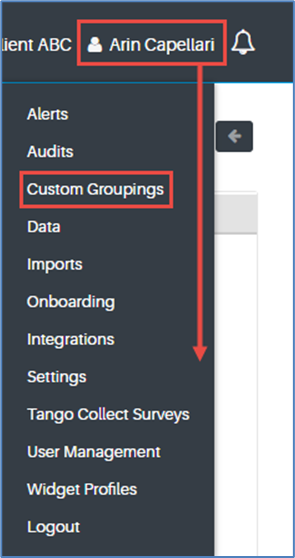
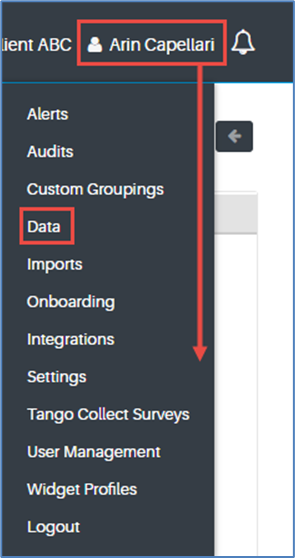
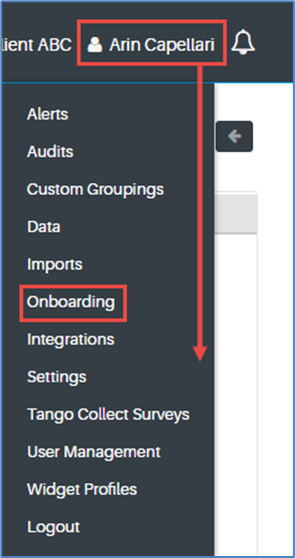
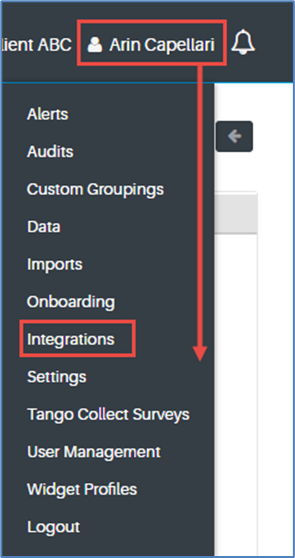
For all Administrative features of the Tango Energy & Sustainability (E&S) platform, hover over your name in the top-right corner of any screen to make the dropdown menu appear.
CREATING ALERTS
From the dropdown menu, select “Alerts.”
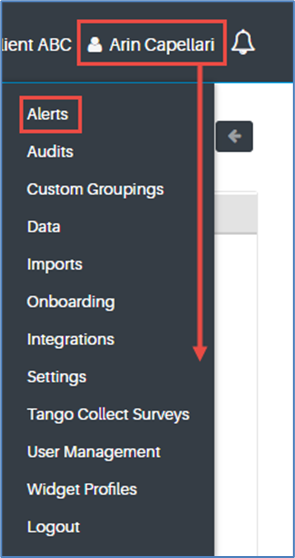
On the Alert Management page, click on the blue “Add New Alert” button.

On the ‘Create Alert’ window that pops up, enter a Name and Description for this alert (description is optional) and then select a type of alert from the dropdown menu.
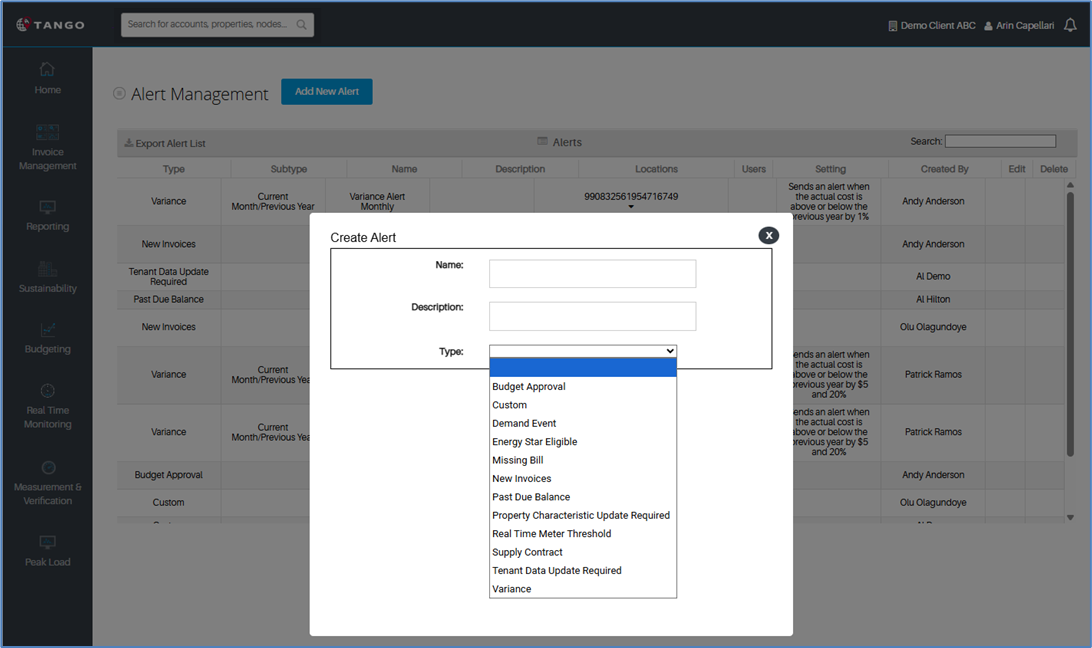
Alert Types include: Budget Approval, Custom, Demand Event, Energy Star Eligible, Missing Bill, New Invoices, Past Dure Balance, Property Characteristics Update Required, Real Time Meter Threshold, Supply Contract, Tenant Data Update Required, Variance.
After selecting the Type, additional fields and options will appear in this same window.
From the “Accounts” dropdown menu, select the utility accounts and/or properties you would like to set up this alert for.
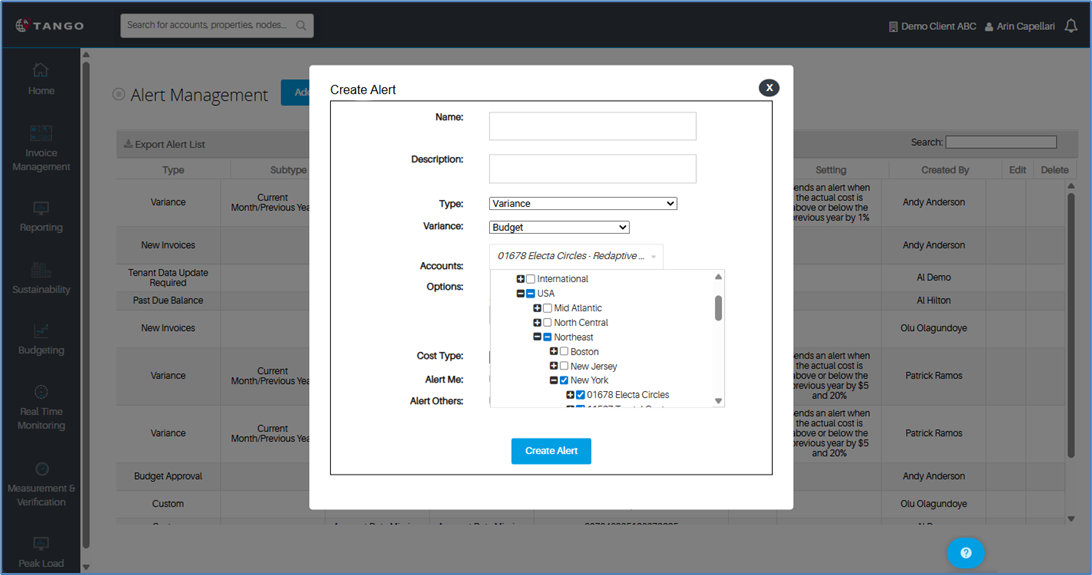
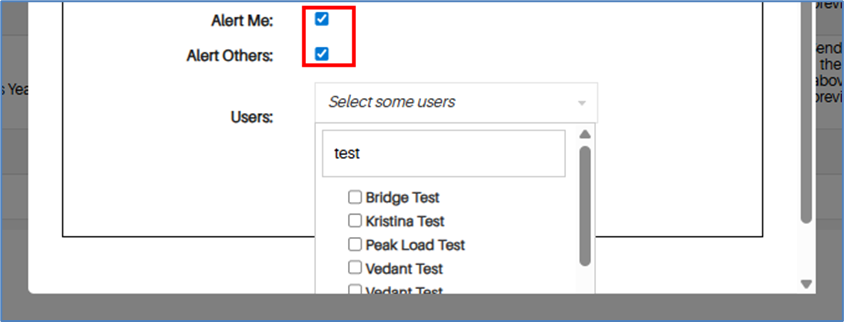
You can choose to notify yourself by clicking on the “Alert Me” checkbox.
Note: all users will have the option to set up an alert for themselves even if they are not an admin user.
Or you can choose to notify another user by clicking on the “Alert Others” checkbox. From the
“Users” dropdown menu that appears, select the users you are looking to notify.
Finally, click the blue “Create Alert” button at the bottom.
EDITING AUDIT THRESHOLDS
From the dropdown menu, select “Audits.”
Now on the “Audit Management” page, use the scrollbar to view the audit choices.
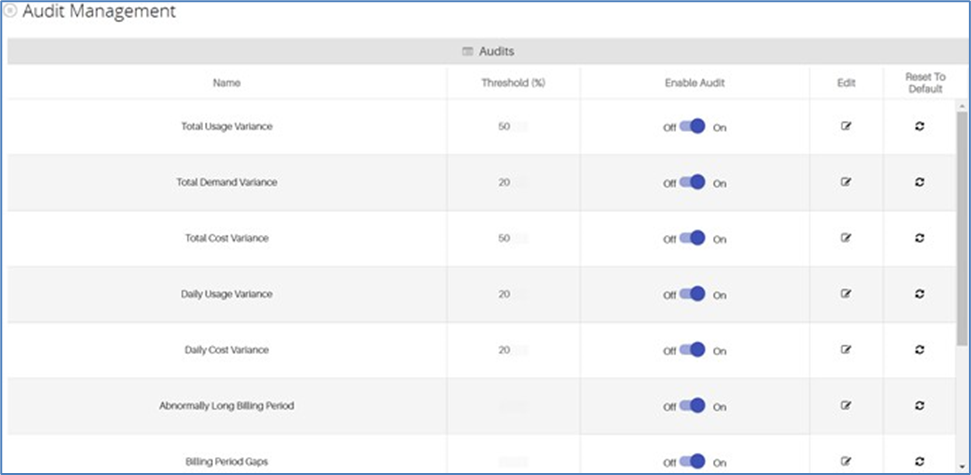
You can edit any audit by clicking on the pencil next to it under the “Edit” column.
To turn an audit on or off, click on the toggle next to that audit under the “Enable Audit” column.
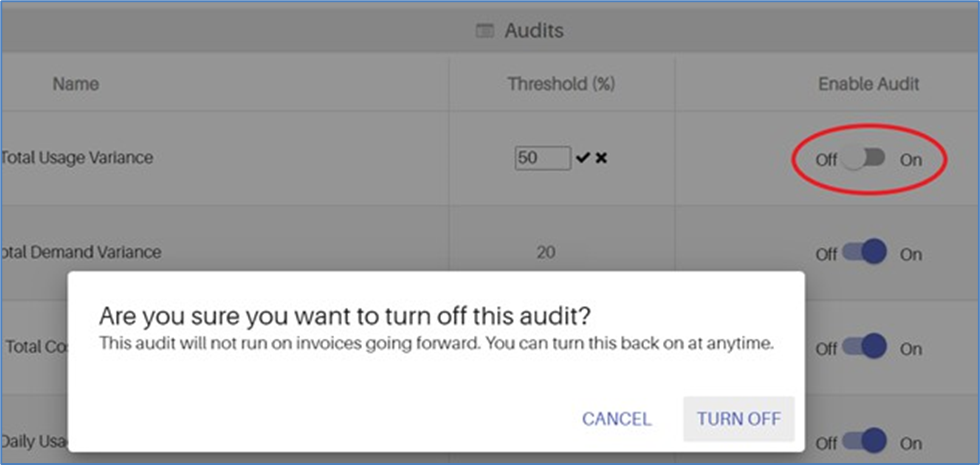
Then when the window pops up asking if you are sure, click “TURN OFF.”
To edit an audit’s variance threshold, type in a new number under the “Threshold (%)” column.
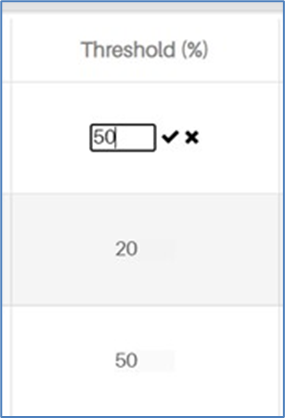
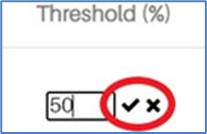
When you are done making changes, click on the checkmark in the “Threshold (%)” column. If you want to cancel the changes you made, click on the “x,” instead.
To reset any audit back to its default setting, click on the refresh icon next to it under the
“Reset to Default” column.
CREATING USERS
From the dropdown menu, select “User Management”
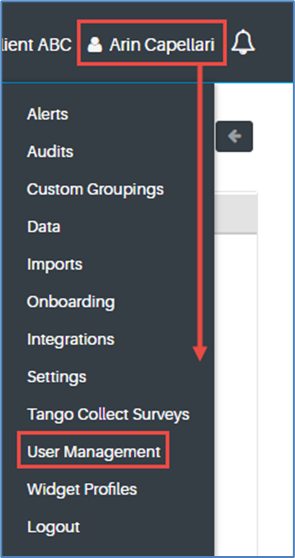
Once on the User Management page, click on the blue Add New User button.

The User Details window will appear, enter the user’s first name, last name, and e-mail address.
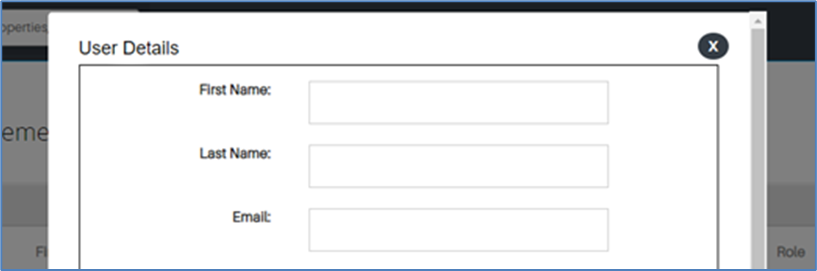
If this user should be accessing the platform using single sign-on, click on the “SSO Enabled” checkbox. (If your portfolio has not enabled this option, skip this step.)

In the “Default Password” text box, enter a temporary password that the user can use the first time that they sign in (after which, they will be prompted to change this password).

The characters you type here will be hidden for security measures, but if you want to make sure you type the password correctly, you can click on the eye icon on the right side of the textbox to reveal what you have typed.

Choose the locations this user should have access to from the “Locations” dropdown.
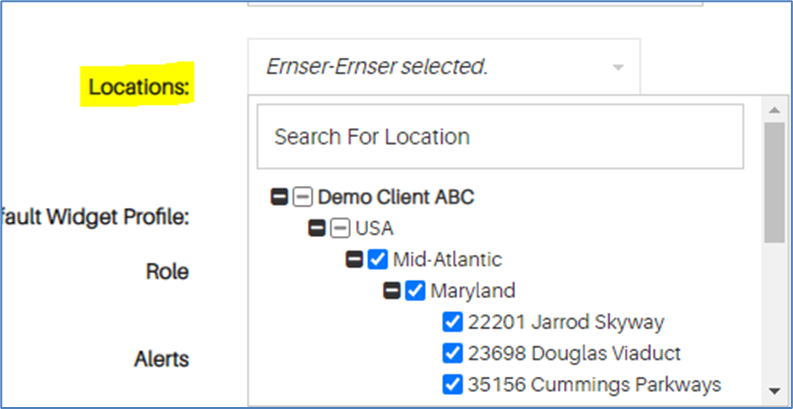
Click on the “Restrict Locations” checkbox if you want to give a user access to all properties that are currently within a region or category node, but do not want them to automatically get access to any other new properties that are added to that node.

If you would like to assign a specific widget profile view to this user’s dashboard, select the name of this profile from the “Default Widget Profile” dropdown.

Otherwise, just leave as “Default.”
Choose the role you would like to assign to this user from the “Role” dropdown menu.
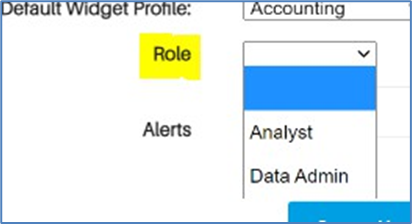
If you would like them to be an admin user that can edit data, select “Data Admin.” If you do not want them to have this capability, select “Analyst.”
If you would like to assign any alerts to this user, choose the alerts you would like them to receive from the “Alerts” dropdown menu. Otherwise, skip this step.
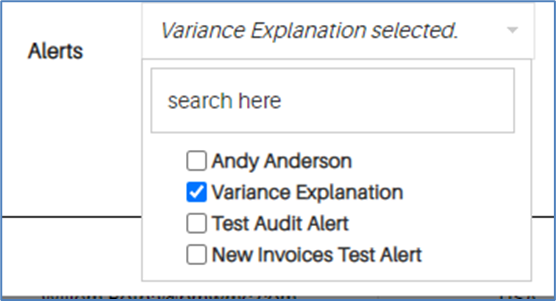
Finally, click the blue “Create User” button at the bottom.
CREATING CUSTOM GROUPINGS
From the dropdown menu, select “Custom Groupings.”
Now on the “Custom Groupings” page, click on the blue “Create New Grouping” button.

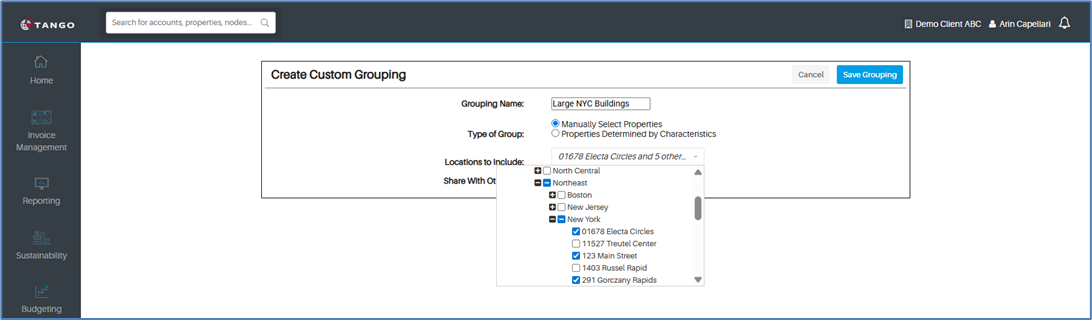
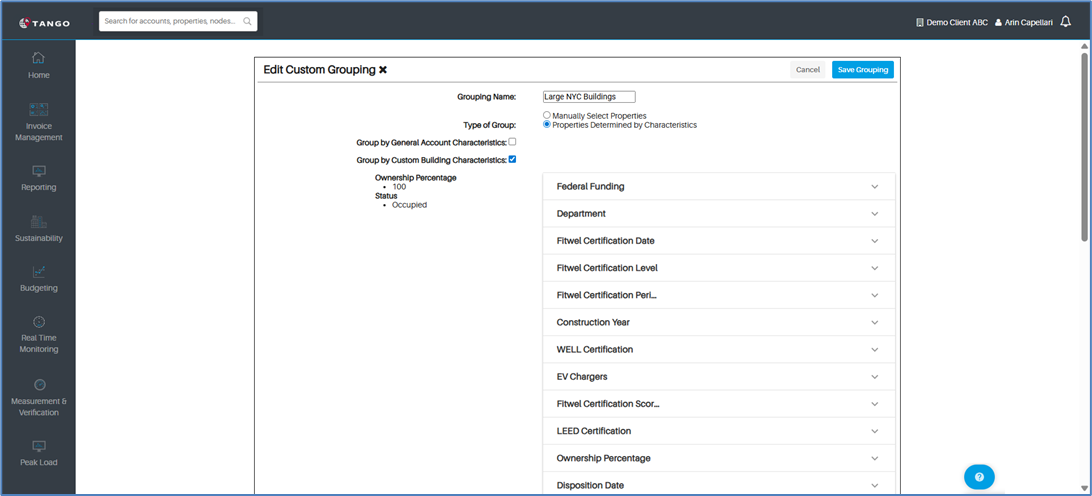
Type the name of your new grouping into the “Grouping Name” text box and then choose one option from “Type of Group.”

Choose one of the options from “Type of Group” by clicking on the bubble next to it.
To manually choose which properties to include, click on “Manually Select Properties” and then choose the properties from the “Locations to Include” dropdown.
To group properties together based on the characteristics of those properties, select “Properties Determined by Characteristics.”
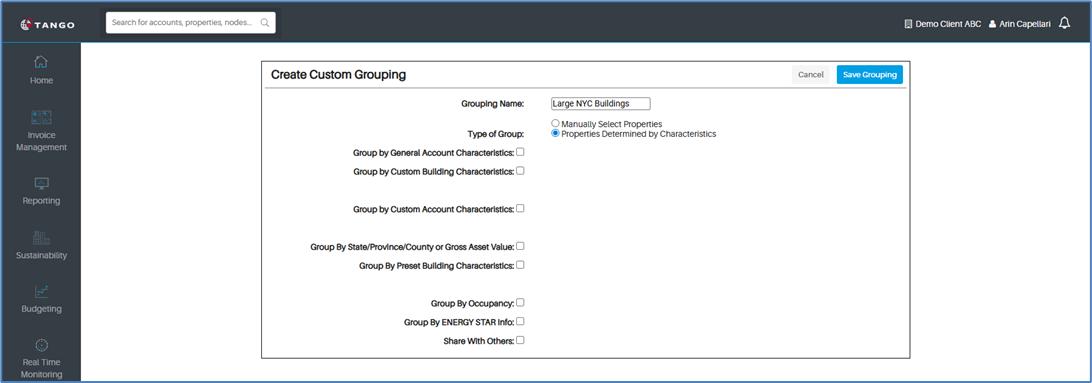
Then, select the checkbox next to the type of characteristic you would like to filter to open up a menu that will allow you to select the characteristic of your choice.
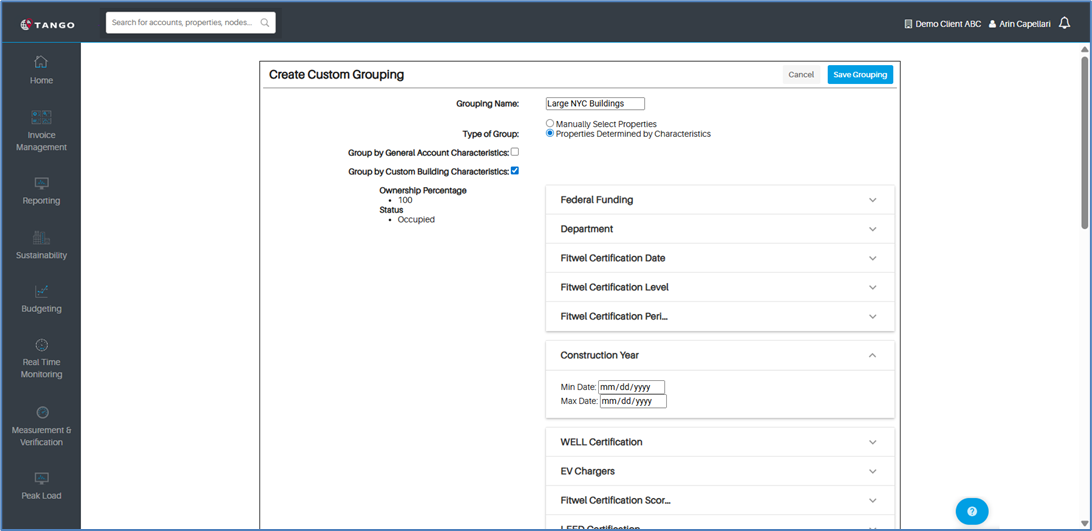
You can select one or multiple characteristics at one time for your grouping.
All users can create custom groupings, but only admin users can share ones they create with other users. To do this, click on the checkbox next to “Share With Others.”
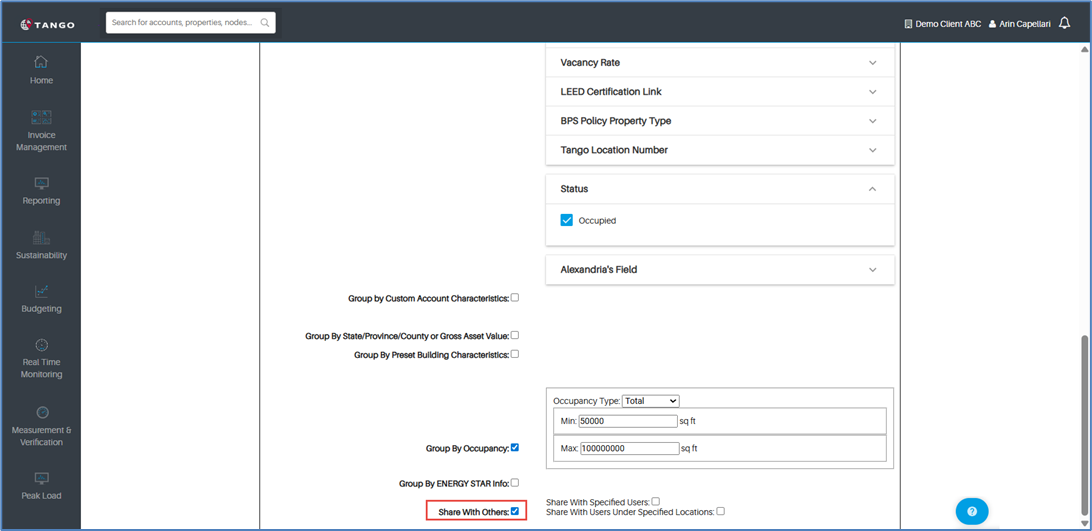
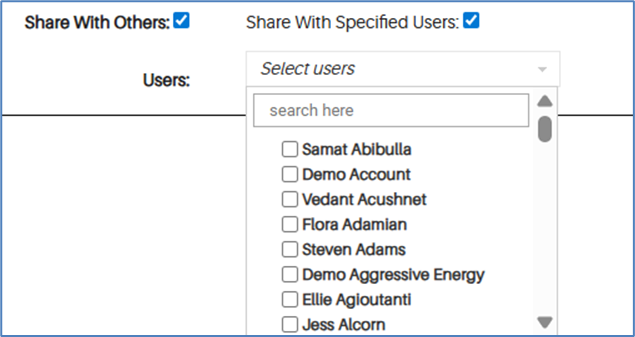
To share with specific users, click on the first checkbox option and then select the user(s) from the dropdown menu that appears.
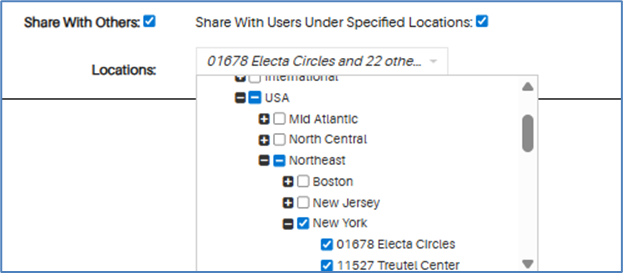
To share with all the users that have access to specific locations, click on the second checkbox options, and then select the location(s) from the dropdown menu that appears.
Finally, click on the blue “Save Grouping” button at the top-right of the page.

After saving, you will be redirected back to the Custom Groupings page where you will see your new grouping at the top. To edit any of your settings, including who your grouping is shared with, click on the pencil next to the grouping name.

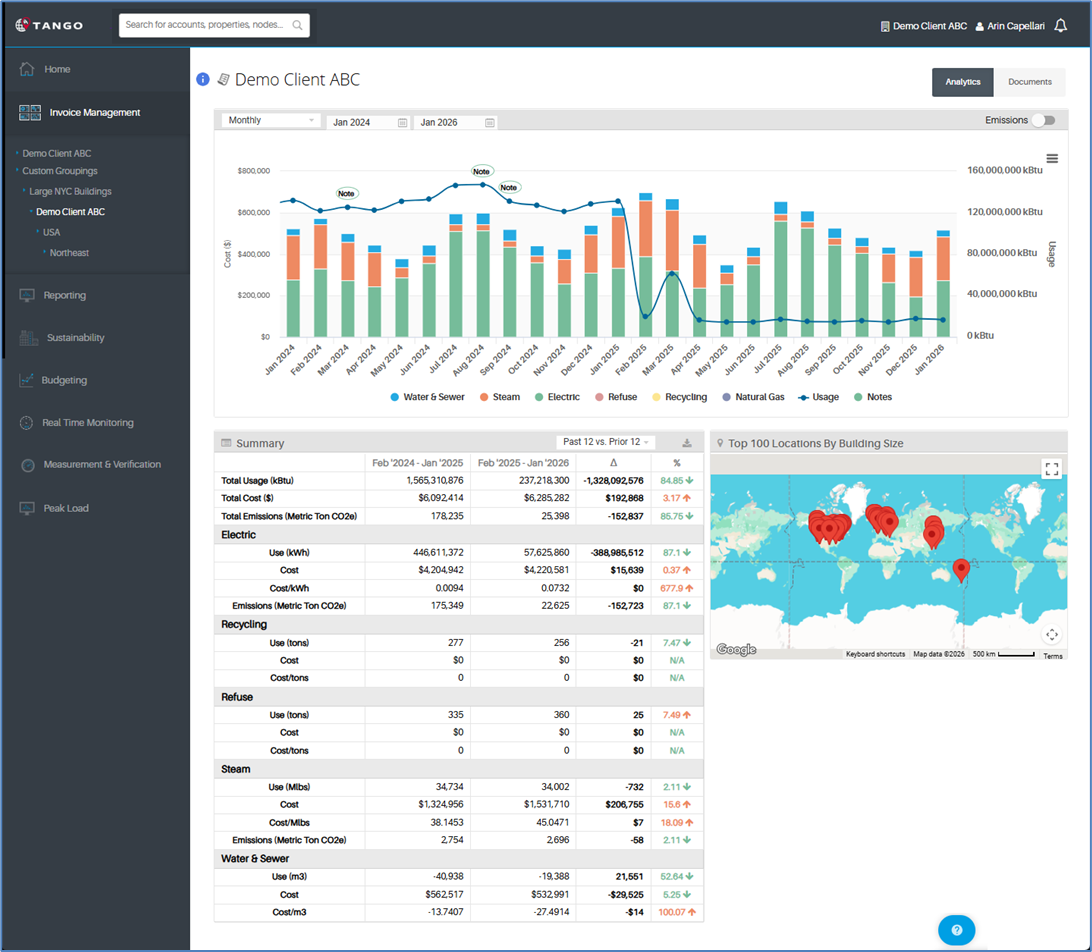
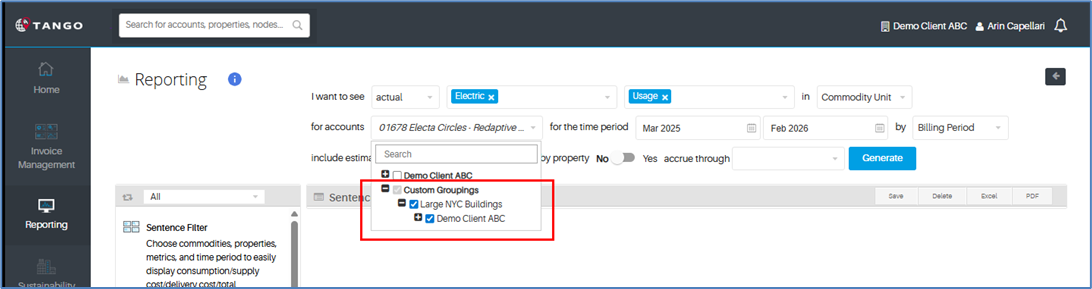
To analyze this new dataset, navigate to Invoice Management and find your grouping under “Custom Groupings” or navigate to the Reporting section and select your grouping from the properties and/or accounts filter at the top.
CREATING KPIS AND UPLOADING KPI DATA
From the dropdown menu, select “Data.”
Now on the “Data” page, select the blue “Go” button next to “KPI Metrics.”

Now on the “KPI Metric Management” page, click on the blue “Add New Metric” button near the title of the page.

On the window menu that appears, type a name for your new metric, add an optional description, and select a “Unit” from the dropdown menu.
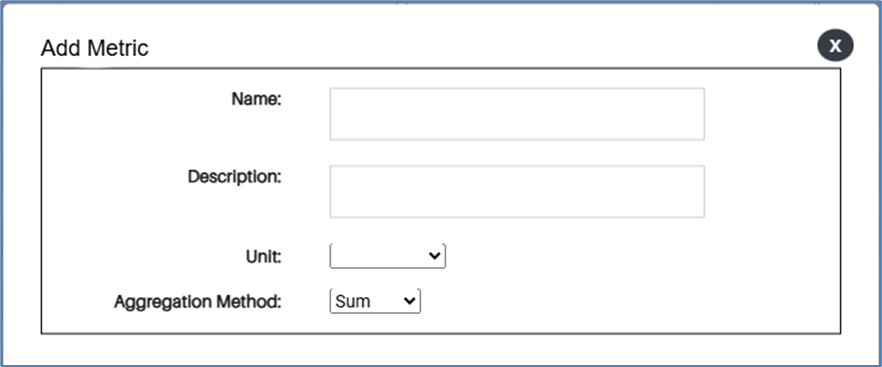
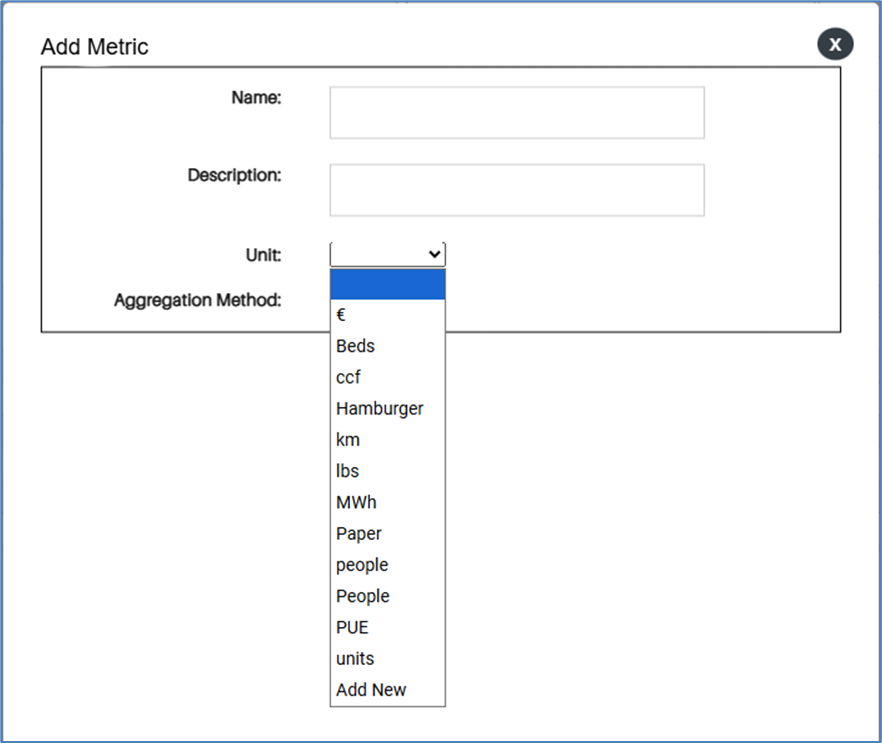
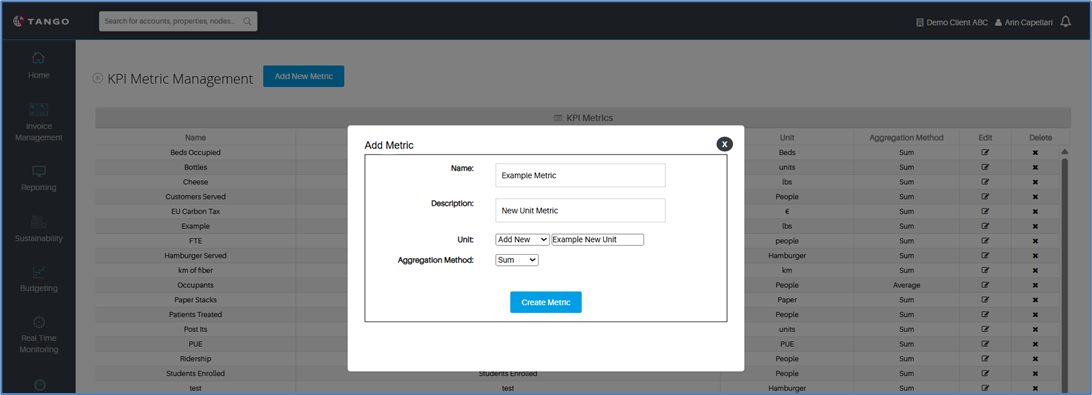
If your unit does not exist yet, select “Add New” and then type a unit name into the textbox that appears (i.e., if your metric is students enrolled, your unit is students).
From the “Aggregation Method,” choose either or Sum or Average from the dropdown menu. (i.e., for a beds occupied KPI metric, you would choose whether you wanted to analyze data based on the sum of beds occupied each month or based on the average of beds occupied each day within a particular month).
Finally, click the blue “Create Metric” button at the bottom of the window.
Creating the metric will take you back to the KPI Metric Management page where you will now see your new metric. From here, you can edit or delete any of your metrics by clicking on the pencil icon or “x” mark next to them.
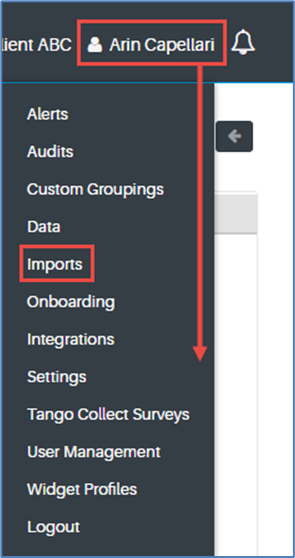
Now that your KPI metric has been created, you can import monthly data for your KPI. To do this, hover over your name in the top-right corner of the platform until you see the dropdown menu appear again. This time, click on “Imports.”
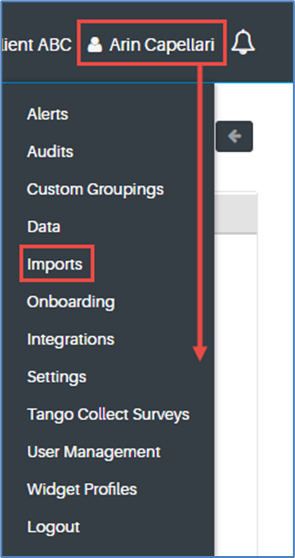
Now on the “Bulk Imports” page, click on “KPI” from the options that appear on the left.
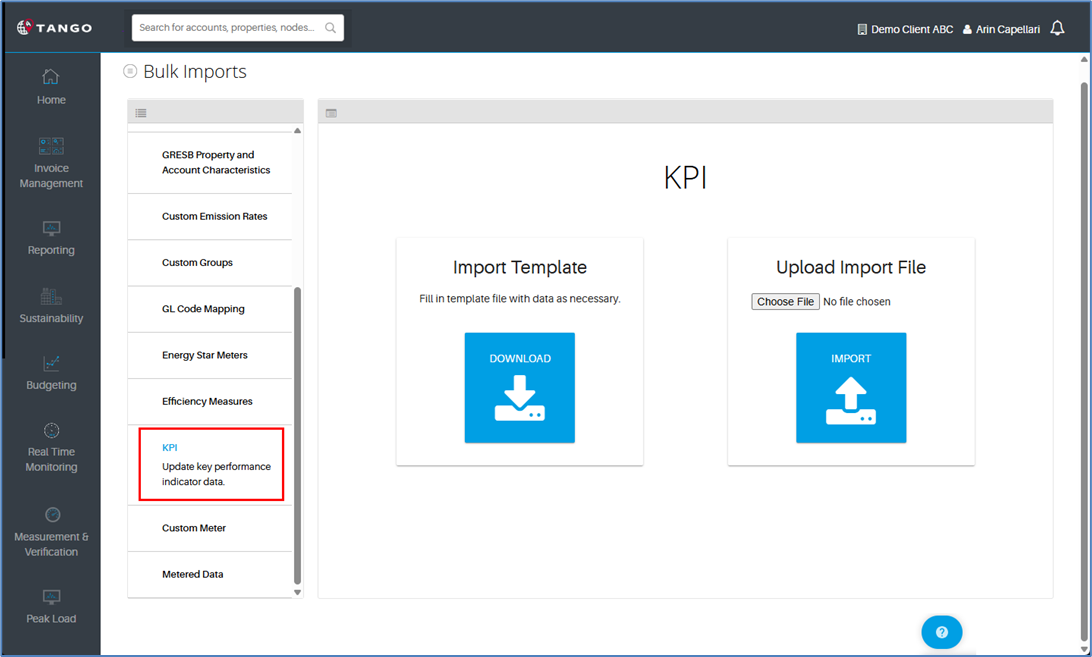
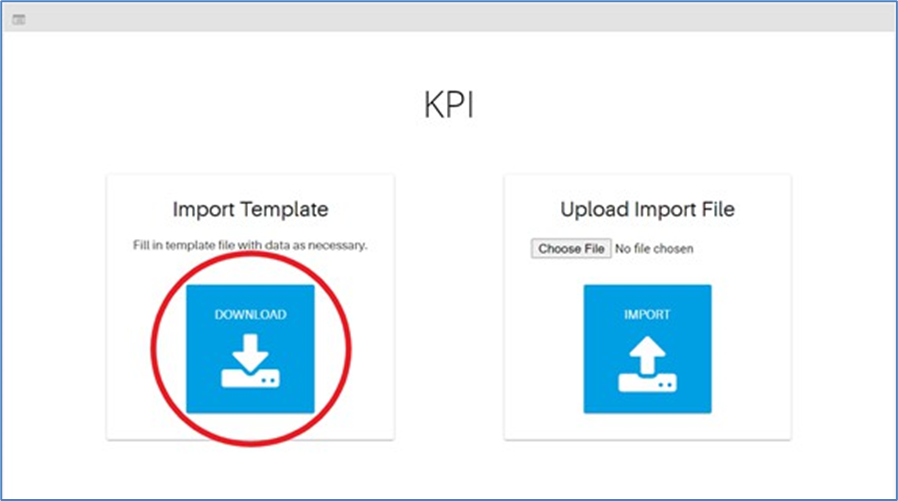
Next, click on the blue “DOWNLOAD” button under “Import Template.”
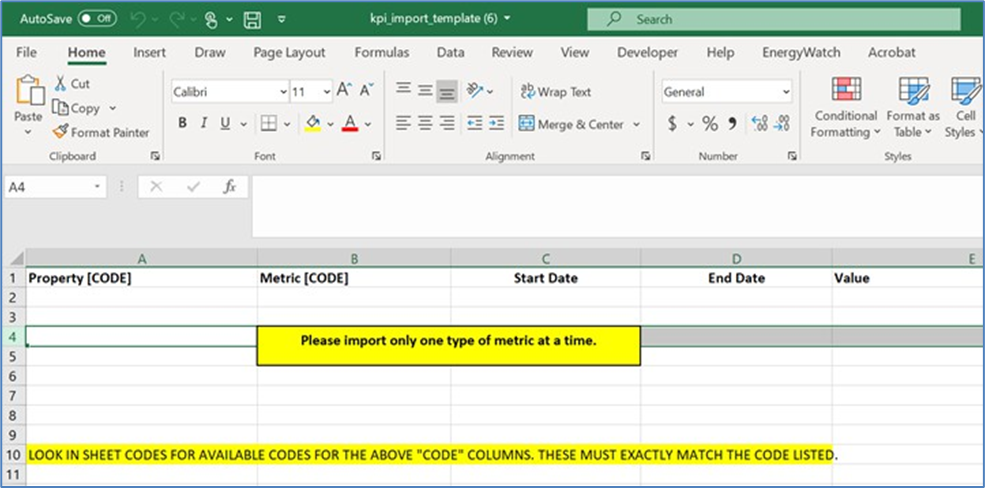
On the import template that was downloaded, delete the rows with the instructions in yellow.
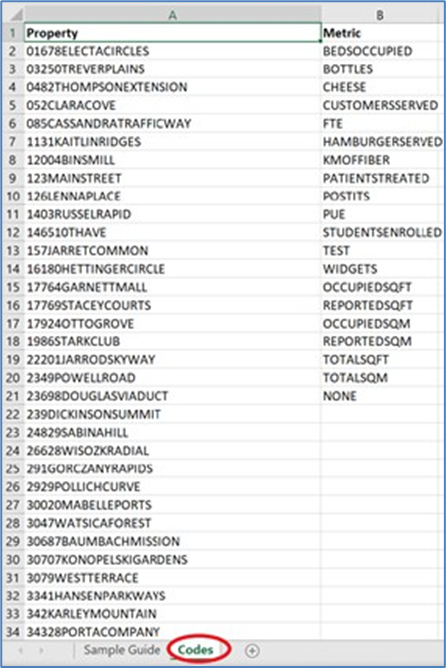
Click on the “Codes” tab and copy the names of the location(s) and metric(s) you would like to update onto the main “Sample Guide” tab under columns A (Property [CODE]) and B (Metric [CODE]).
Enter the start and end date for each period and the associated value.

Once the template is filled out, save a copy to your computer.
Back in the platform, click on the grey “Choose File” button under “Upload Import File” and select the version of the import template you saved.
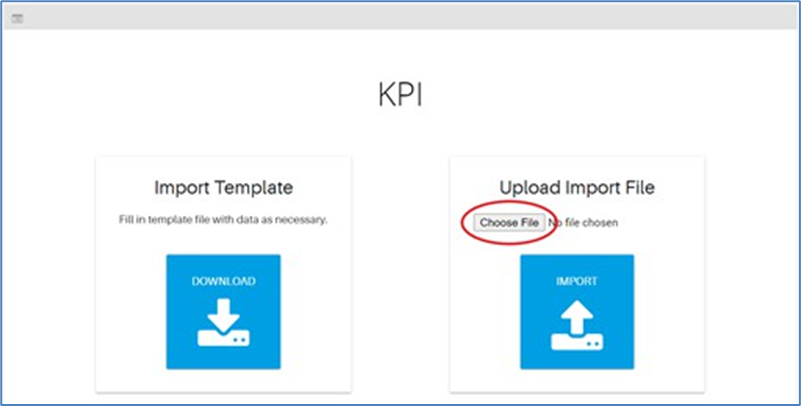
Finally, click the blue “IMPORT” button.
IMPORTING UTILITY BILL DATA
Similar to the above steps, from the dropdown menu, click on “Imports.”
SUMMARY UTILITY BILL DATA
Now on the “Bulk Imports” page, select “Invoice Data” from the options that appear on the left.
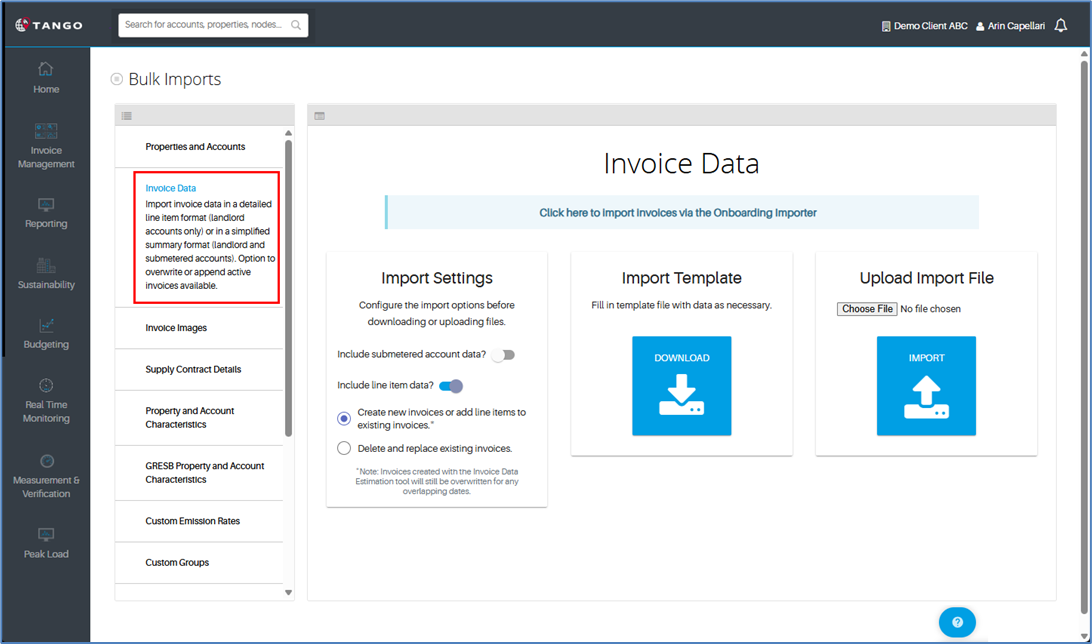
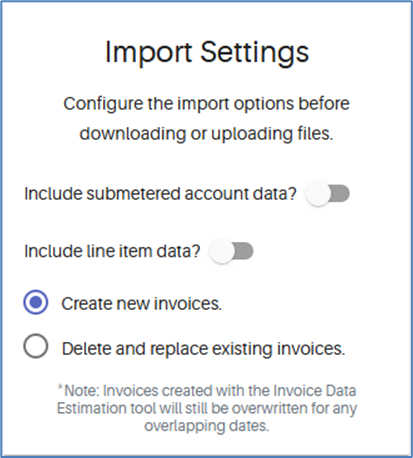
Configure the “Import Settings” as needed. In this example toggle off the button next to “Include line-item data?” for Summary Bills.
Under “Import Template,” click the blue “DOWNLOAD” button.
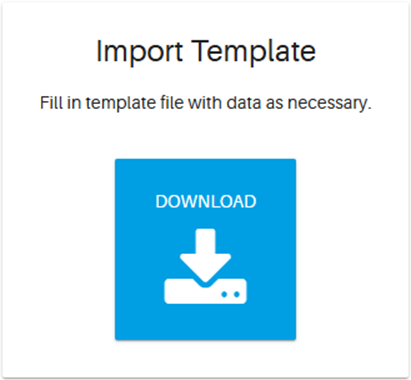
Once downloaded, fill in all columns labeled “Required” on the import template. Some of the columns will let you know when you should select the answer from the dropdown that appears in the cell. Each invoice goes on a separate row.
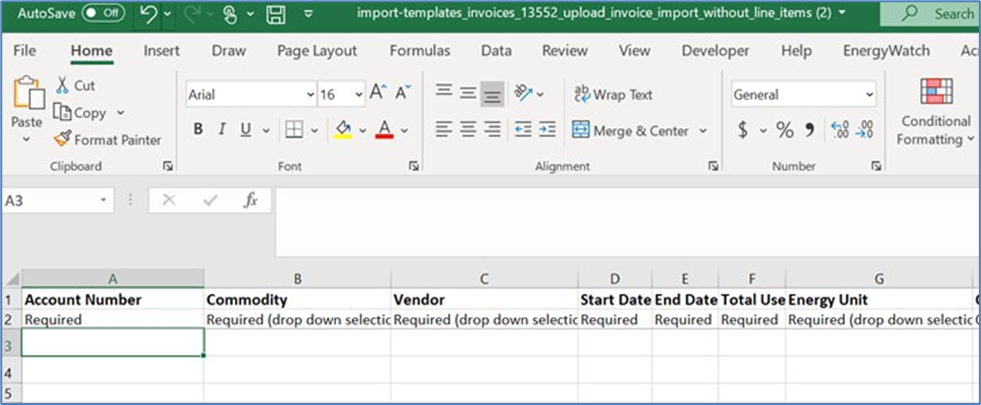
Fill in any optional columns that you want to. If you are going to add invoice images, you can:
Type the file names into each row under columns T (LDC invoice) and/or U (supply Invoice) and then proceed with the steps to upload utility bill images.

Add the invoice image URLs into each row under columns V (LDC invoice) and/or W (supply invoice).

Save the filled-out import template to your computer.
Back in the platform, click on the grey “Choose File” button under “Upload Import File” and select the version of the import template you saved.
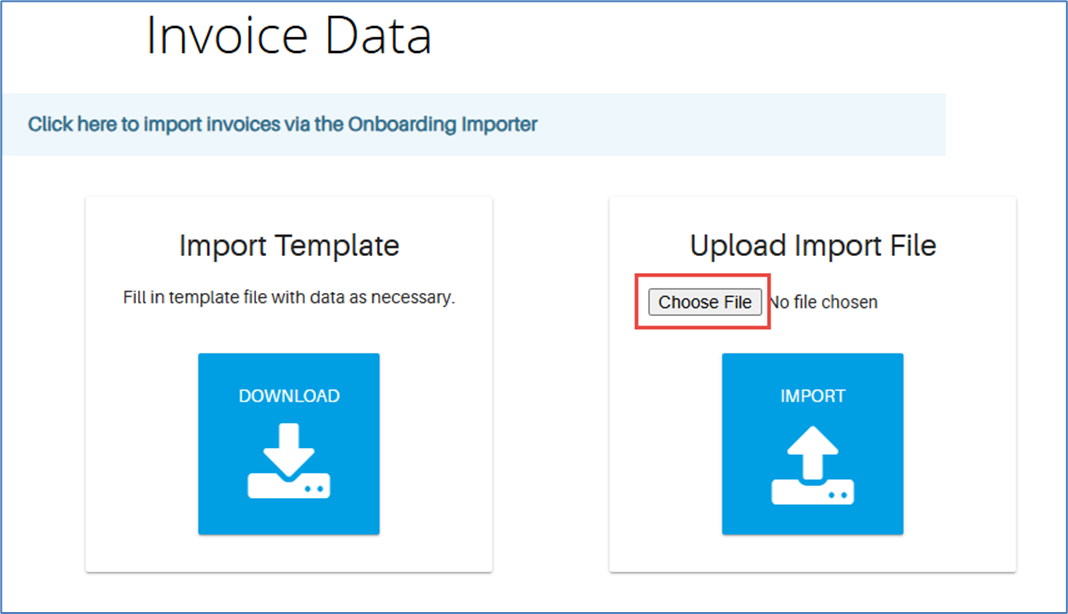
Finally, click the blue “IMPORT” button.
LINE-ITEM UTILITY BILL DATA
Now on the “Bulk Imports” page, select “Invoice Data” from the options that appear on the left.
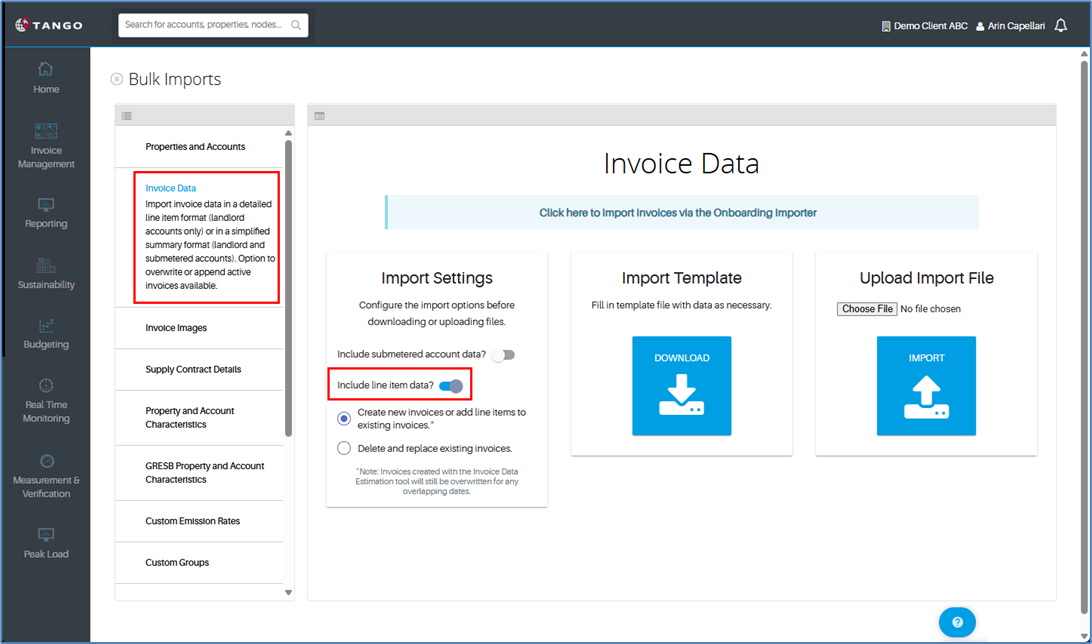
Under “Import Settings,” toggle on the button next to “Include line-item data?” (note: this is enabled by default).
Under “Import Template,” click the blue “DOWNLOAD” button.
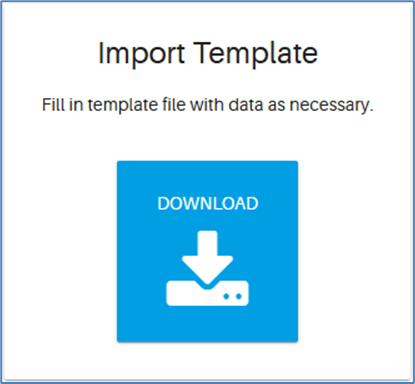
Once downloaded, fill in all columns labeled “Required” on the import template. Some of the columns will let you know when you should select the answer from the dropdown that appears in the cell. Each invoice goes on a separate row.
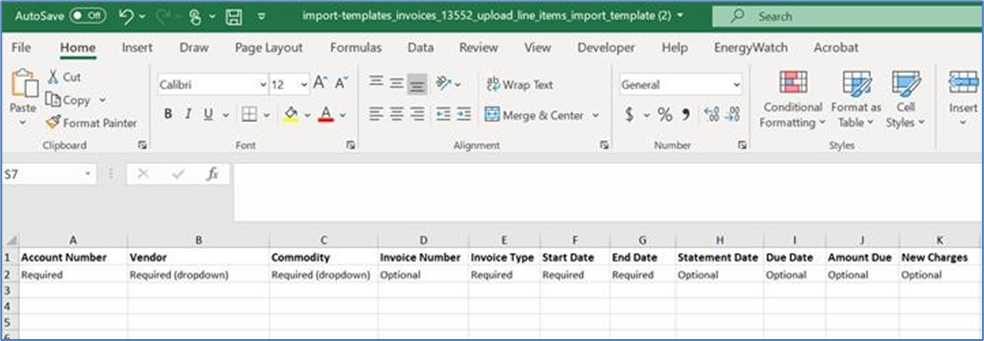
Fill in any optional columns that are available on the invoice that you would like to include. If you are going to add invoice images, you can:
Type the file names into each row under columns T (LDC invoice) and/or U (supply Invoice) and then proceed with the steps to upload utility bill images.

Add the invoice image URLs into each row under columns V (LDC invoice) and/or W (supply invoice).

Save the filled-out import template to your computer.
Back in the platform, click on the grey “Choose File” button under “Upload Import File” and select the version of the import template you saved.
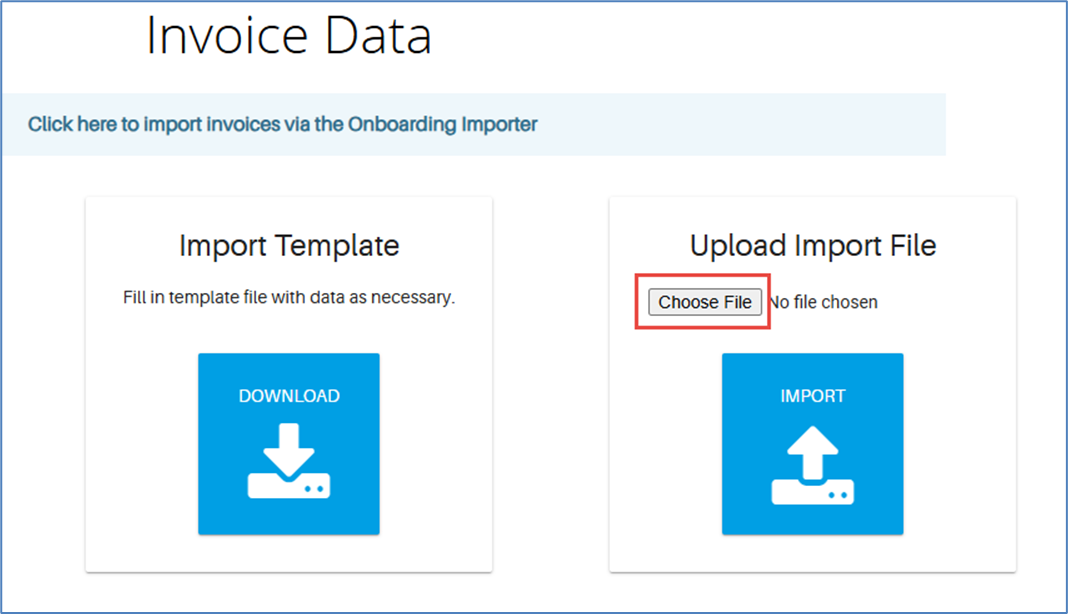
Then, click the blue “IMPORT” button.
UPLOADING UTILITY BILL IMAGES
Now on the “Bulk Imports” page, select “Invoice Images” from the options that appear on the left.
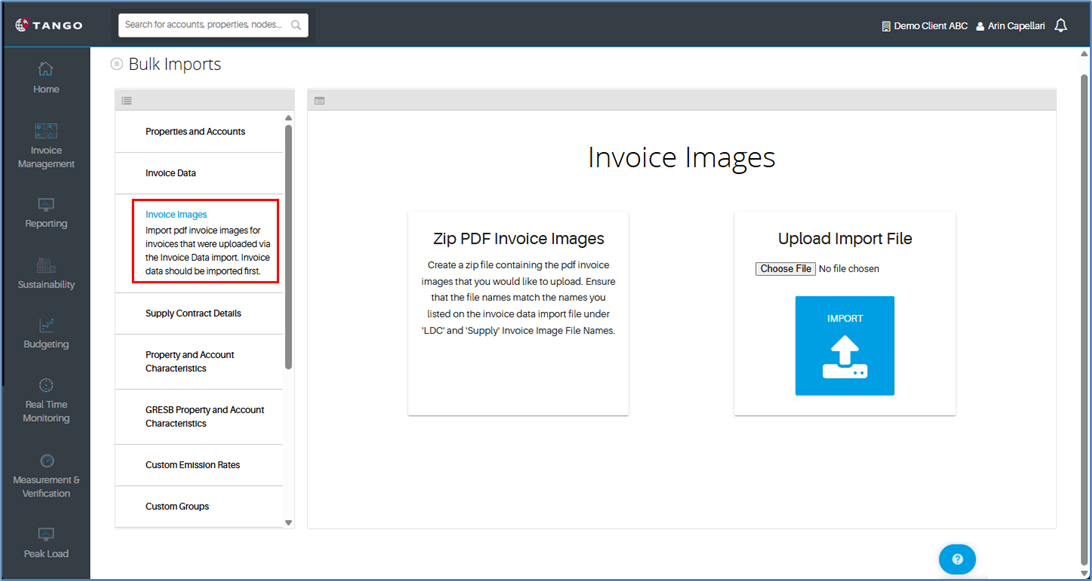
Note: you must add summary invoice data or line-item invoice data before importing the associated invoice images.
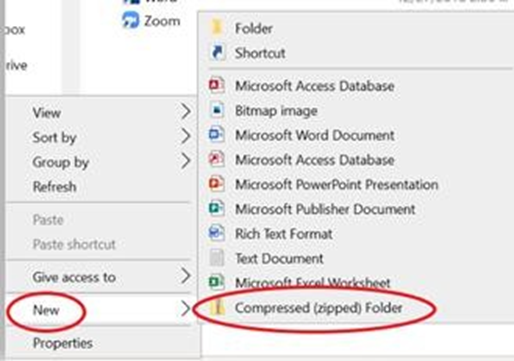
Create a zip file on your computer to hold all the PDF invoice images you wrote the names of on one of the invoice data import templates. To create a zip folder, right click inside the folder, select new, and select “Compressed (zipped) Folder.”
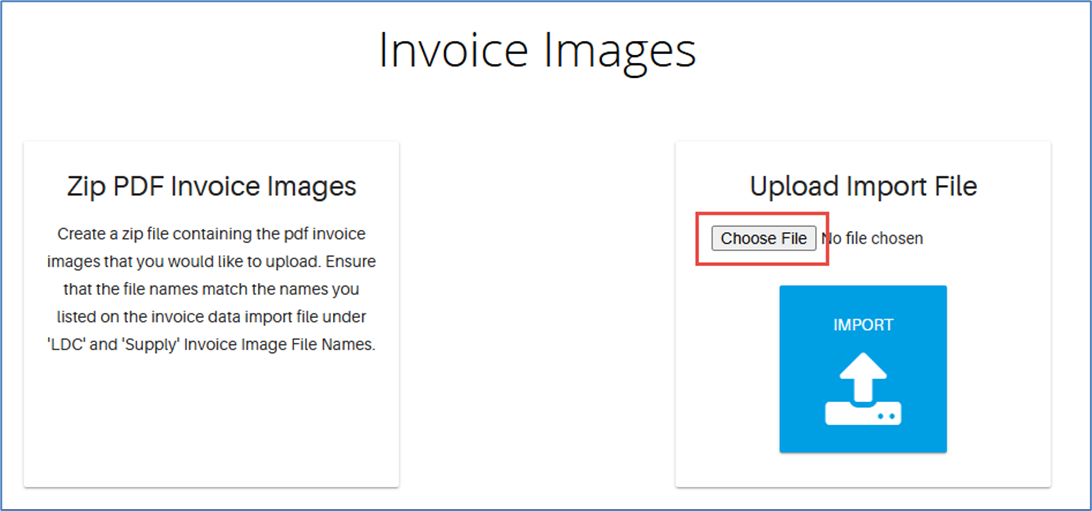
Back in the platform, click on the grey “Choose File” button under “Upload Import File” and select the zip folder you created.
Again, click the blue “IMPORT” button.
UPLOADING SUPPLY CONTRACT DETAILS
Now on the “Bulk Imports” page, select “Supply Contract Details” from the options that appear on the left.
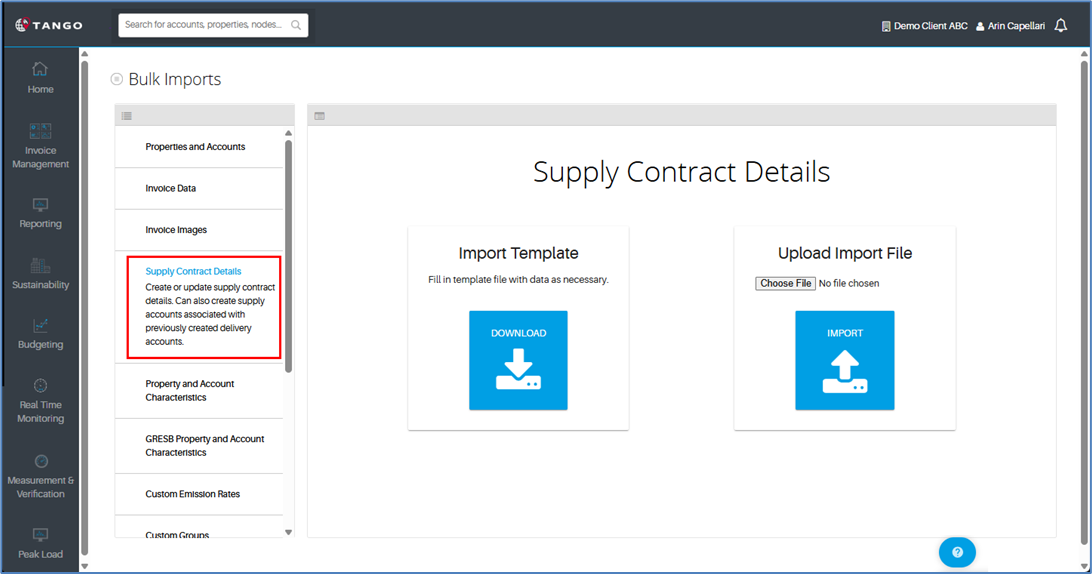
Under “Import Template,” click the blue “DOWNLOAD” button.
Once downloaded, fill in all columns on the “Electricity Contracts” and/or “Natural Gas
Contracts” tabs. Use the dropdown menu in the cells when available.

If applicable, fill out additional information on the “ELE Hedge Info” tab.
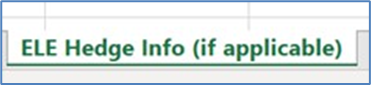
Save the filled-out import template to your computer.
Back in the platform, click on the grey “Choose File” button under “Upload Import File” and select the version of the import template you saved.
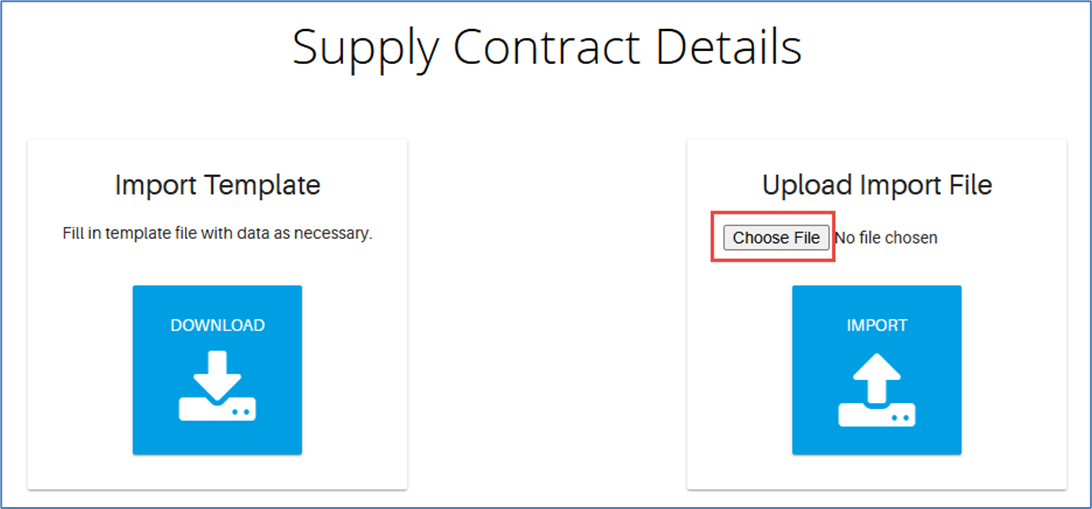
Click the blue “IMPORT” button to upload.
GL CODE MAPPING
Similar to the above steps, from the dropdown menu, click on “Imports.”
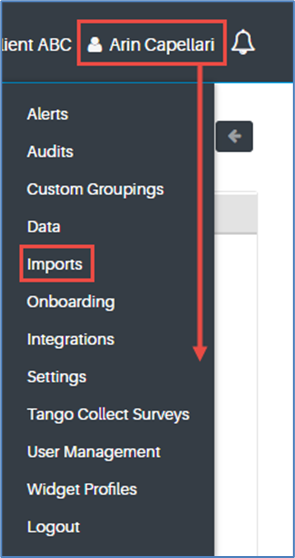
Now on the “Bulk Imports” page, select “GL Code Mapping” from the options that appear on the left.
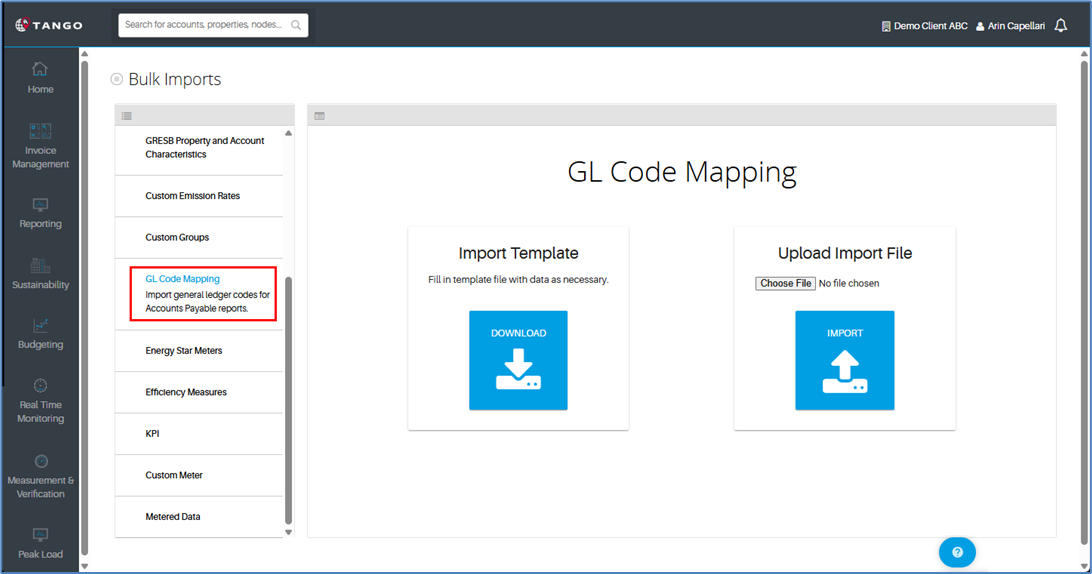
Under “Import Template,” click the blue “DOWNLOAD” button.
Once downloaded, fill in all columns on the template.
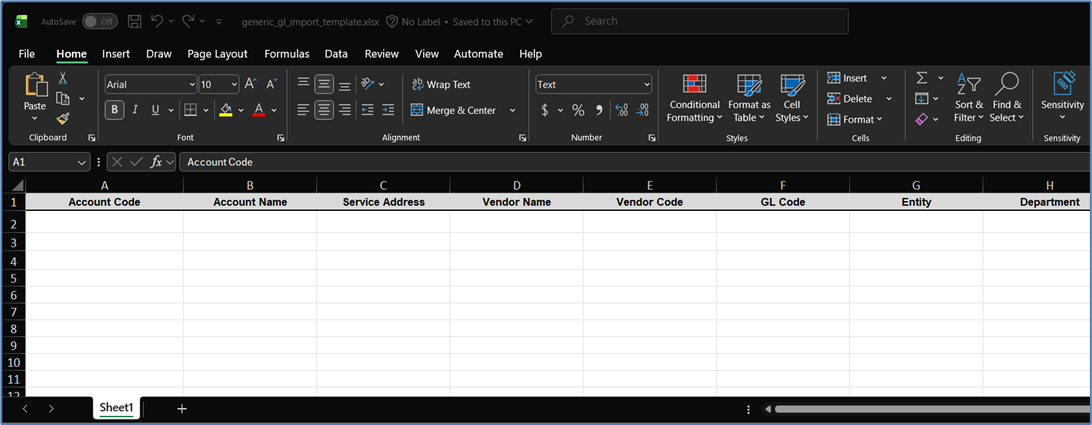
Save the filled-out import template to your computer.
Back in the platform, click on the grey “Choose File” button under “Upload Import File” and select the version of the import template you saved.
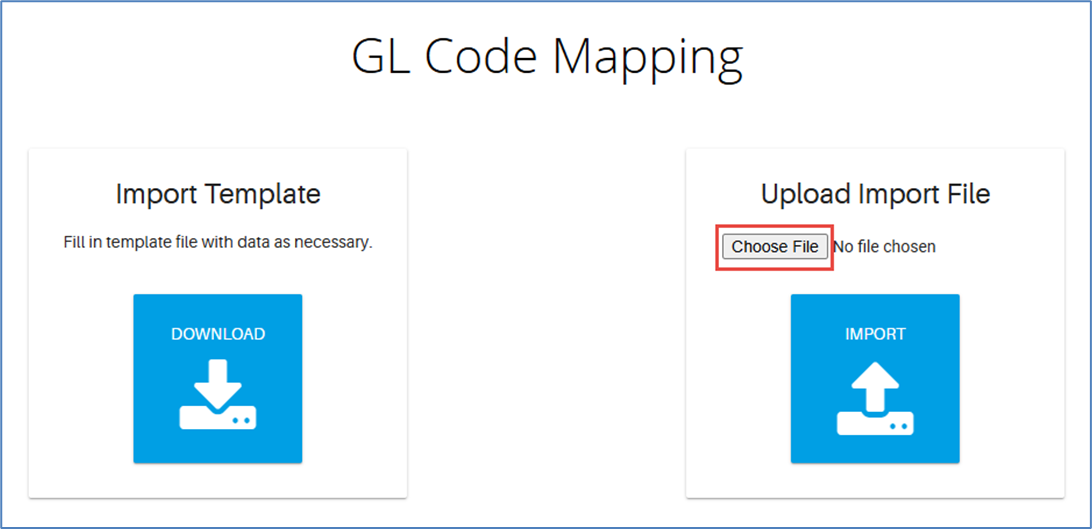
Click the blue “IMPORT” button to upload.
ADDITIONAL BULK IMPORTS
Properties and Accounts
Supply Contract Details
Property and Account Characteristics
GRESB Property and Account Characteristics
Custom Emission Rates
Custom Groups
Energy Star Meters
Efficiency Measures
Custom Meter
Metered Data
ONBOARDING
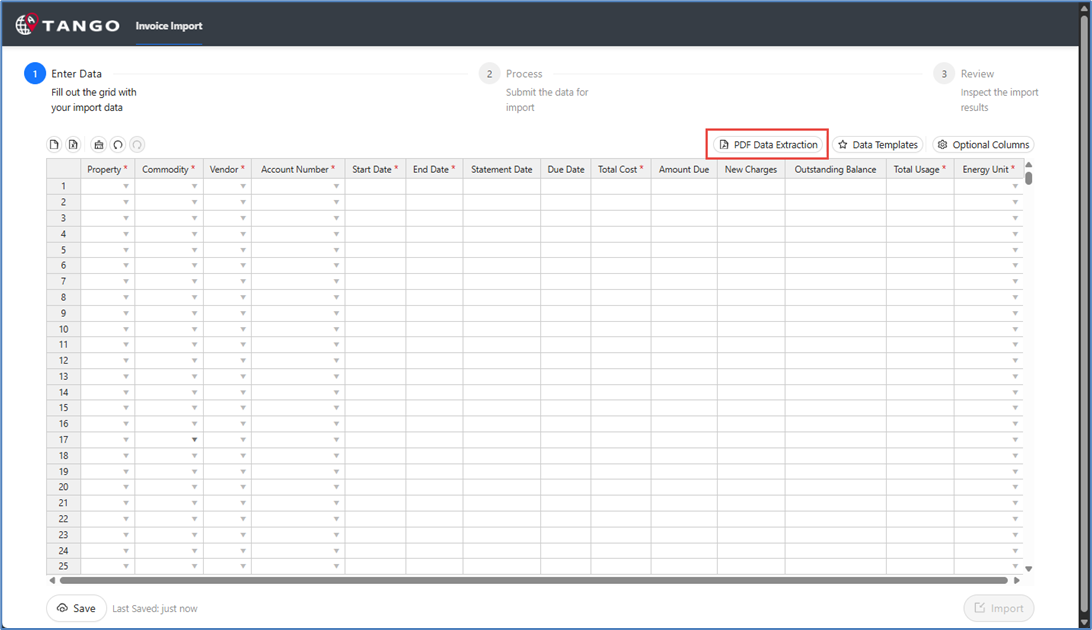
From the dropdown menu, select “Onboarding.”
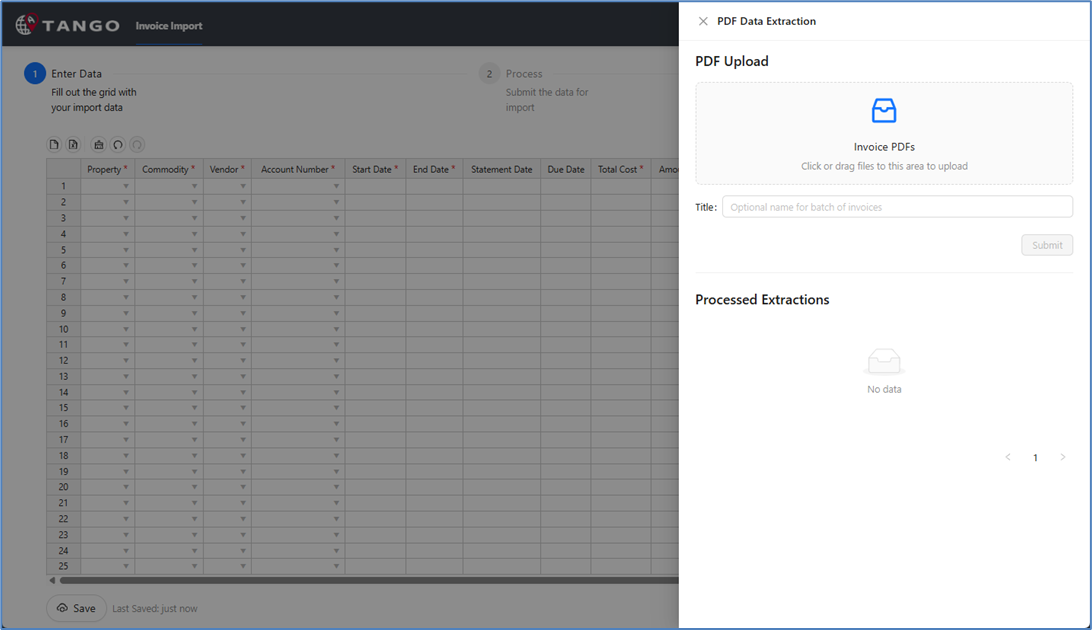
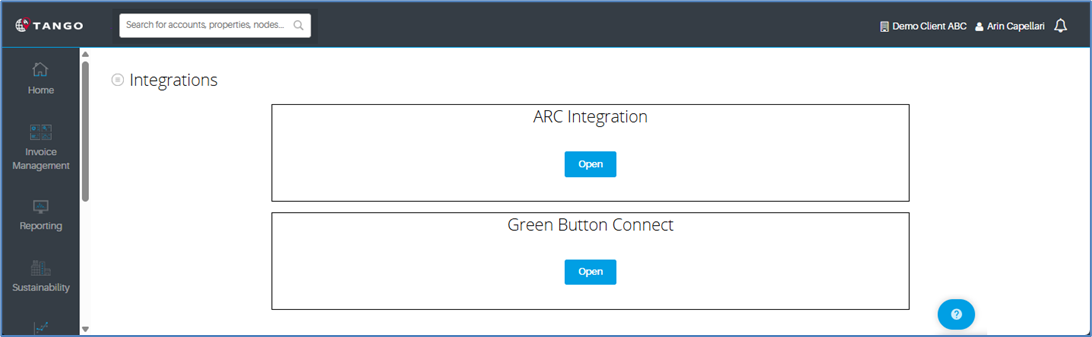
INTEGRATIONS
SYSTEM SETTINGS
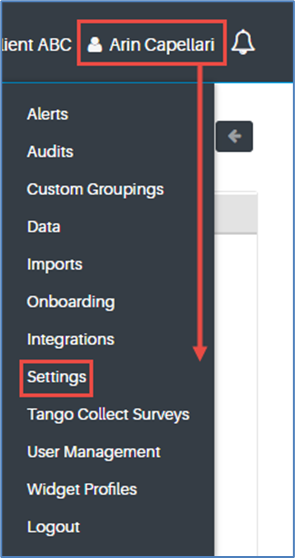
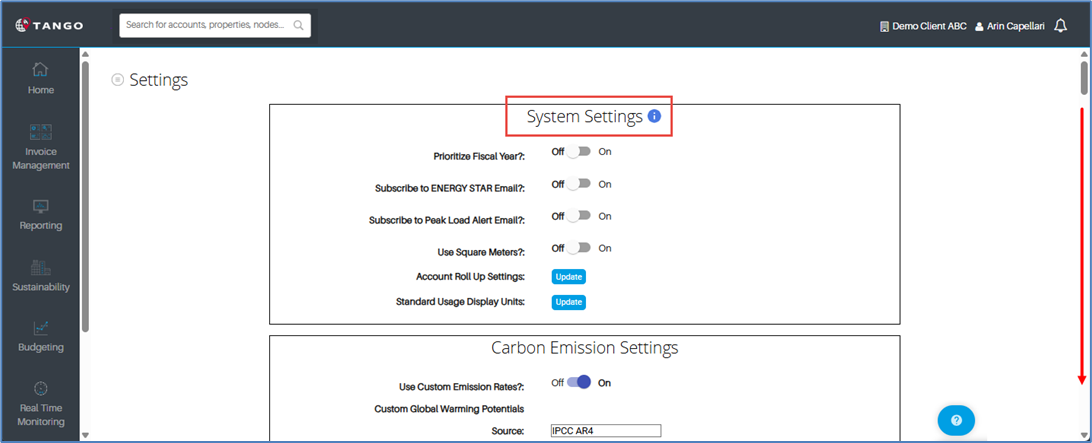
From the dropdown menu, select “Settings.”
Now on the settings page, you can configure the “System Settings” (these settings affect the entire system for all users in your organization) by toggling options on or off and/or clicking the blue “Update” buttons.
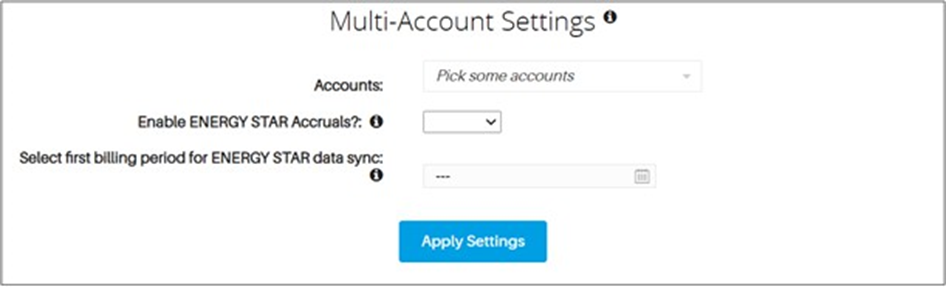
You can configure the “Multi-Account Settings” (these settings affect multiple utility accounts at once in bulk) by choosing the accounts you would like to apply these settings to from the dropdown, choosing from the remaining options, and then clicking the blue “Apply Settings” button.
You can configure the “Currency Settings” by choosing the accounts you would like to apply these settings to from the dropdown, choosing from the remaining options, and then clicking the blue “Apply Currency Changes” button.

Lastly, you can edit exchange rates by electing the currency you would like to convert from and to. Next to your client name, you can click on the blue plus button to choose the date ranges you would like this setting to apply to.

Once finished, click on the blue “Save Rates” button.
Additional System Settings
Note: There are other sections on the Settings record:
System Settings
Carbon Emission Settings
Energy Star Settings
Currency Settings (mentioned above in this chapter)
Edit Exchange Rates (mentioned above in this chapter)
GRESB Characteristics Settings
GRESB Default Values Settings
Real Time Secure API Credentials (mentioned above in Real Time Monitoring chapter)
Custom Commodities & Units
GRESB Custom Commodity Allocation
WIDGET PROFILES
To create a new widget view, navigate to the homepage “Dashboard” and click the plus button at the top left.
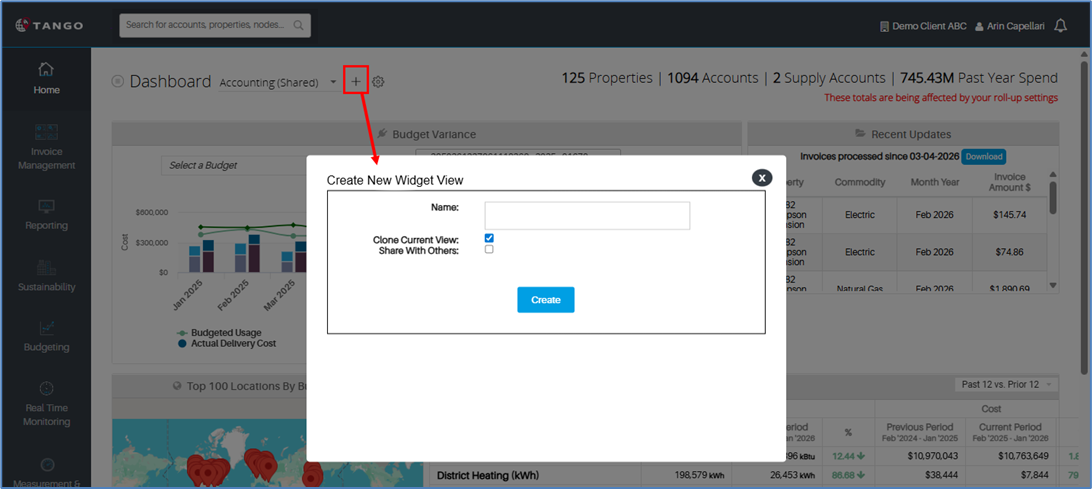
On the window that appears, type in the name of your new widget view and then clone your current dashboard view by leaving the “Clone Current View” checkbox selected or start from scratch by clicking that checkbox to deselect.
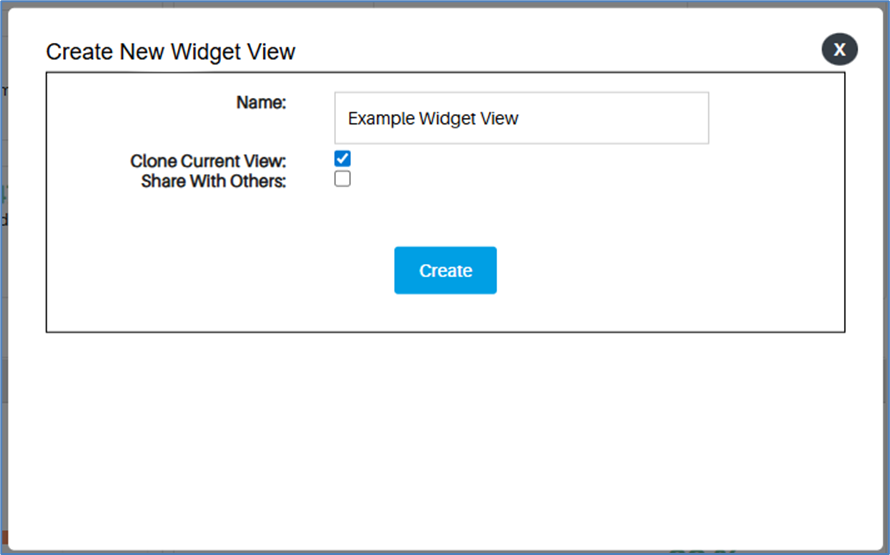
All users can create new widget views, but only admin users can share the views they create with other users. To do this, select the “Share With Others” checkbox.
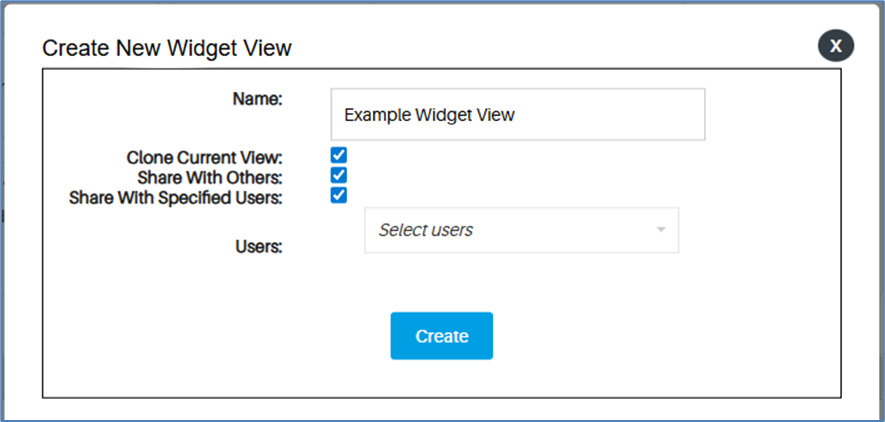
To share with specific users, click the checkbox next to “Share With Specified Users” and then select the user(s) from the dropdown menu that appears.
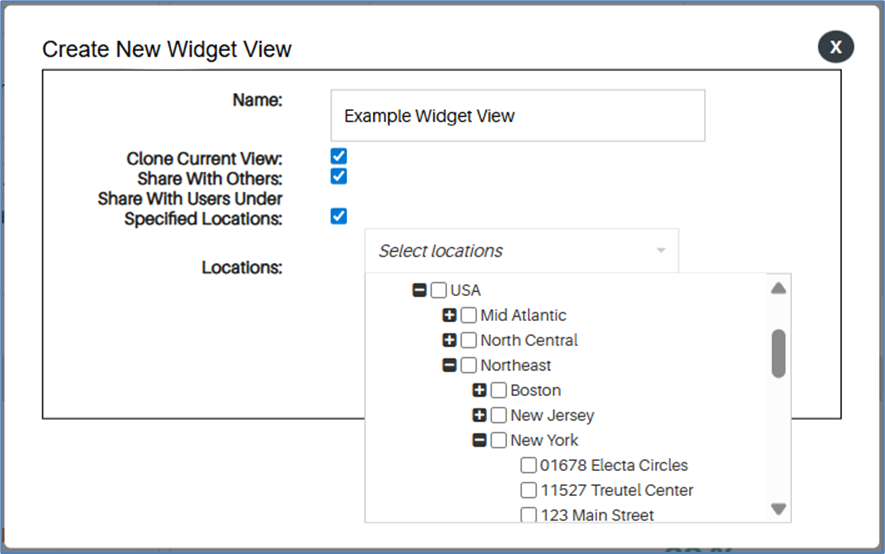
To share with all the users that have access to specific locations, click the checkbox next to “Share With Users Under Specified Locations” and then select the location(s) from the dropdown menu that appears.
Click the blue “Create” button.
If you did not clone your current dashboard view, you will be redirected to a new empty dashboard with plus icon buttons. To choose the widgets within this new view, click on any of the plus buttons to begin choosing your widgets.

If you did clone your current dashboard view, you will be redirected to your new copy of this view.
To switch back and forth between any of your dashboard views, click on the dropdown at the top-left and select any widget view you would like to see.

To edit or delete any of the widget views you have created, including who has access to them, click on the settings icon at the top left of the page. This will redirect you to the “Widget Profile Management” page where you can click on the pencil icon to edit or red “Delete Profile” button next to any widget view to edit/delete that profile you have created.

Note: you will not be able to delete a dashboard you are currently using on your homepage until you have switched to a different widget view.
Was this article helpful?
That’s Great!
Thank you for your feedback
Sorry! We couldn't be helpful
Thank you for your feedback
Feedback sent
We appreciate your effort and will try to fix the article