Table of Contents
- Create an Existing Store Project
- Project Details
- General Tab
- Attributes Tab
- Milestones/Schedule Tab
- Creating Milestones from a Template
- Rescheduling Specific Milestones
- Milestones Updating Entity Status
- Completing Milestones
- Budgets
- Budget Items
- Contacts Tab
- Photos Tab
- Documents Tab
- Vendors/Suppliers Tab
- Comments Tab
The Project Management module contains critical information about a capital project such as attributes, milestones and costs.
There are two ways to create a project in the System:
Site Approval Process: Once a site is approved, a construction project Can be created from Projects module screen (New Store Process).
Program and/or Existing Store Project: A construction project can also be created from a Store record (Refits, Remodels, Redesign, refresh, Closures etc.).
For further details on the systematic association of existing Store Projects, see Programs and Existing Store Projects
Create an Existing Store Project
This section provides the steps for creating an existing Store Project.
| Step | Action |
|---|---|
| 1. |
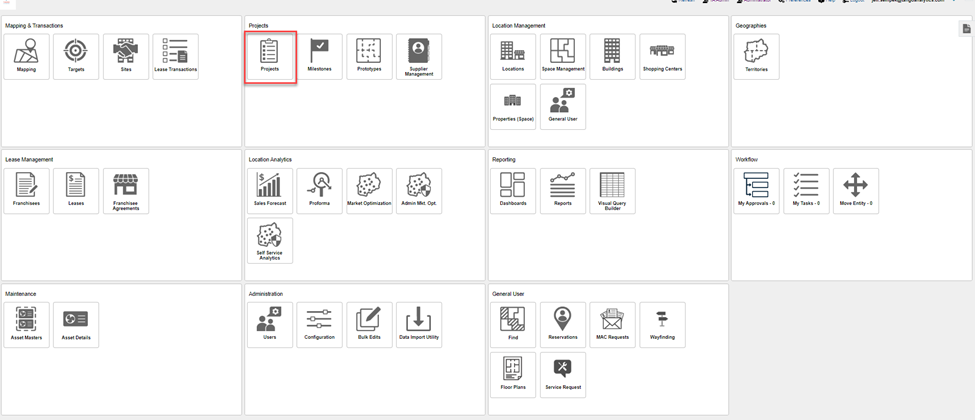
Navigate to the Function Dashboard, then click Projects.
|
| 2. |
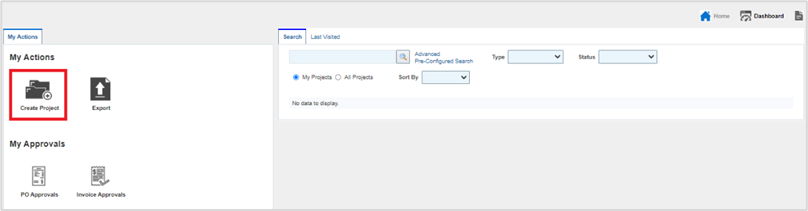
Click Create Project on the My Actions pane.
|
| 3. |
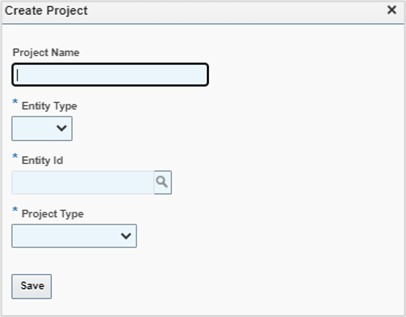
Complete the Create Project window as follows:
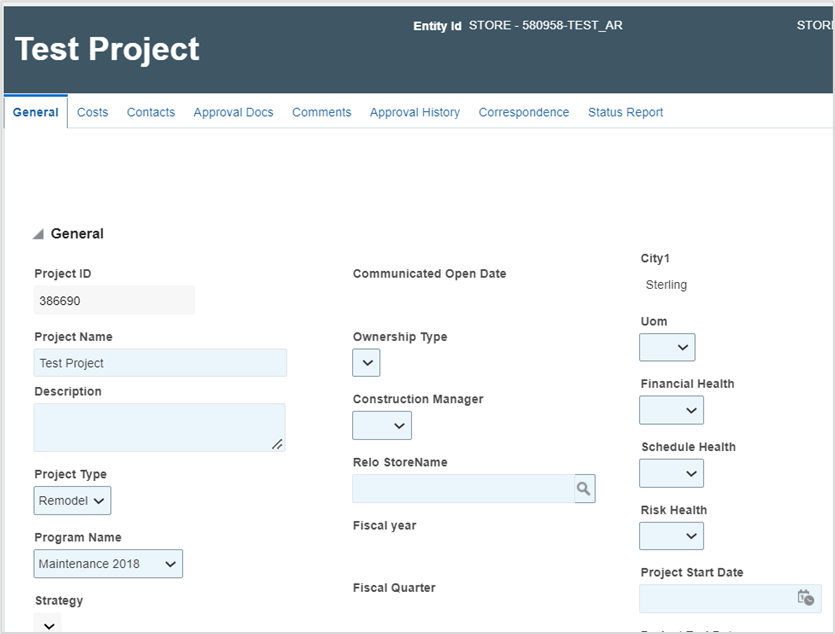
The Project details page displays.
|
Project Details
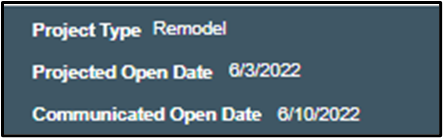
In the Project Details page, users can view specific attributes at the top of the page in the project header.
The user can view attributes such as Project Status, Project Type, hyperlink to the entity on which the project is created and the Communicated Open Date.
General Tab
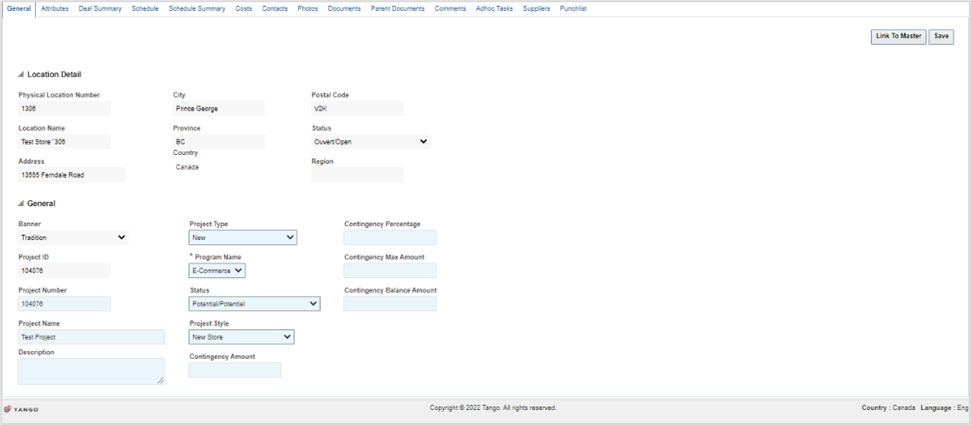
The General tab of the Project displays a summary of the location.
Attributes Tab
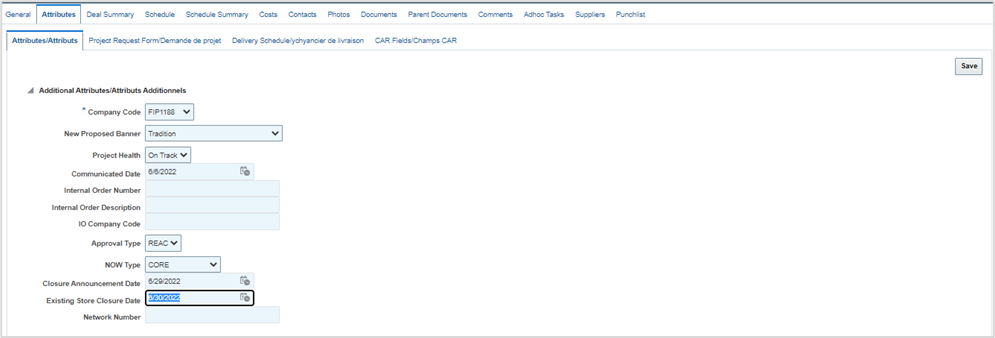
The Attributes tab will allow the user to manage characteristics of the Project:
Milestones/Schedule Tab
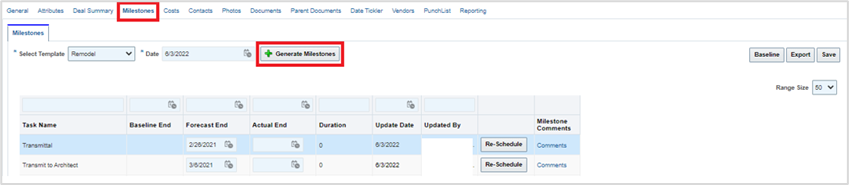
The Milestones/Schedule tab is used to track and maintain key dates on a Project. The Milestones templates that are available are dependent on the type of project (New, Remodel, Closures, etc.).
All features of this section are completed in Edit mode. Schedules are setup per the template provided by client according to their business process. Templates define:
Task Line Items
Checklists for each task
Milestone Type (Department)
Duration
Dependencies
Relationship (FS, SS, SF, FF)
Predecessors
Resources and the timing of notifications
Updates to the status from the completion of a milestone task
Updates needed to the milestone, to capture a workflow completion
Milestones can be defined to populate from a start date, or to be populated based on a location open date in the future. All tasks to open the location backward are calculated from this point.
Schedule management Tracks three key dates per task
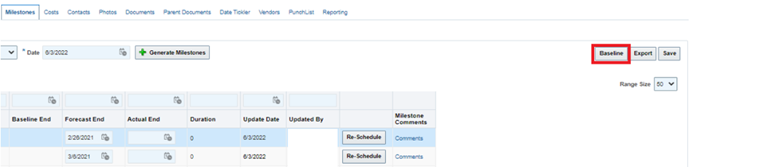
Baseline Date: A baseline is a memorialized forecast date at a certain point in time, as decided by a business process. A baseline is typically made, when the Project manager/Construction manager is comfortable with the overall project dates, and wants to memorialize that, to track what changed from that point in time.
Forecast Date: The estimated date for the completion of a task.
Actual Date: The actual date on which a given task is completed
This section will walk the user through management of critical information for Milestones. All features of this section are done in ‘Edit’ mode.
Creating Milestones from a Template
| Step | Action |
|---|---|
| 1. |
Click the Milestones tab.
|
| 2. |
Note: System Dashboards will not report information unless the schedule for the new Location is applied with the Projected Opening Date from the Milestones tab.
|
| 3. |
Click Baseline. Note: Milestones must be baselined for any rescheduling to occur.
|
| 4. |
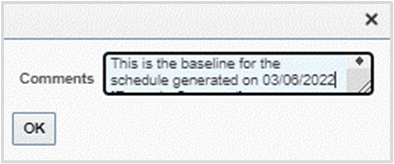
Type comments in the Comments field, then click OK.
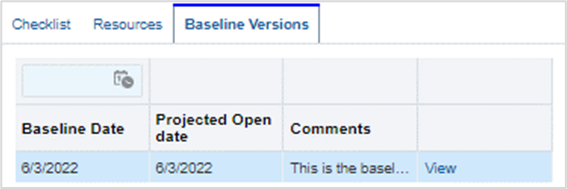
The baseline displays at the bottom of the main screen.
|
| 5. |
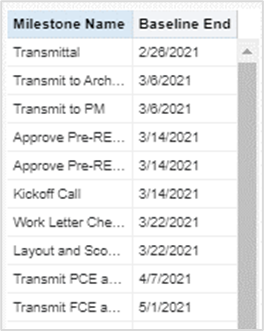
Click View on the baseline row, and view milestone details, as applicable.
|

Rescheduling Specific Milestones
The Forecast Start date field can be updated at any time to capture changes in real time. Dependent milestones will be updated using the Re-Schedule button.

Then upon review, the user with the permissions to ‘Reschedule’ can choose to adjust the whole schedule from a particular point in the process (a specific task #) onwards, and all the dates below will be updated based on the durations and dependencies.
Note: This will override any forecast dates previously entered as the user rescheduling is expected to review the whole schedule and decides to reschedule from a particular task onwards adjusting all the dependent tasks below.
Durations are advised to be kept as standard intervals and read only.
However, if client chooses that it needs to be editable, they can update durations on any task, but will have to reschedule before saving. This is intended for the schedule manager to be able to adjust standard intervals in addition to dates and reschedule as a part of the same process.
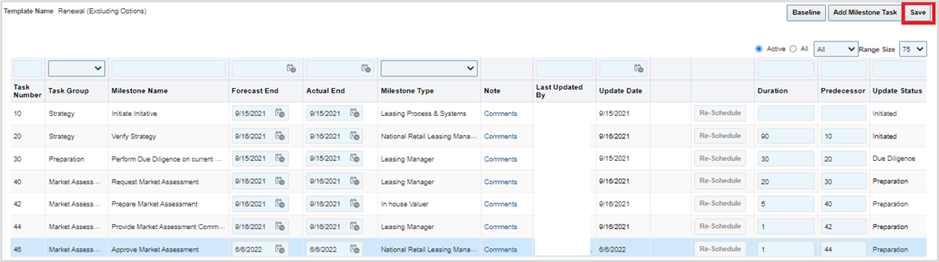
Milestones Updating Entity Status
The status on the Site and Project level updates is based on the Milestone progression.
This page can be managed using two options:
Option 1: This page can be manually updated with the status, as applicable.
Option 2: This page can be configured to automate status updates based upon critical milestone completion.



Completing Milestones
This section describes completing a milestone.
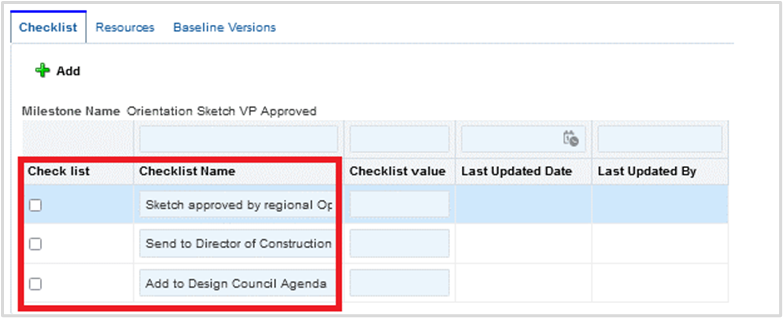
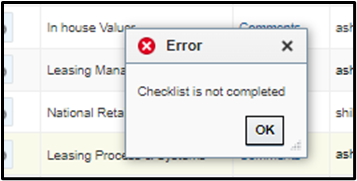
Note: Checklist items must be completed and checked off prior to entering an Actual Date. An error message on the TBD screen will display until the following step is performed.
| Step | Action | ||||||
|---|---|---|---|---|---|---|---|
| 1. |
Click the Checklist tab and check the box(es) next to the checklist item.
|
||||||
| 2. | Click Save. | ||||||
| 3. |
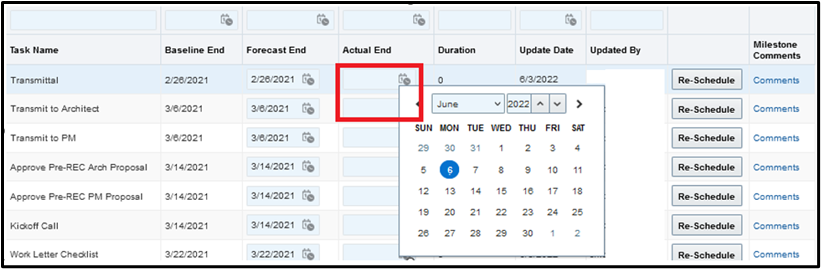
Complete the Actual Date using one of the following methods:
|


Budgets
Budgets can be created either on a Site or a Project level. If created at the Site level, Forecast Costs amounts will be transferred over to the Project level as approved amounts.
Existing location projects and any associated costs will be created on the projects tile.
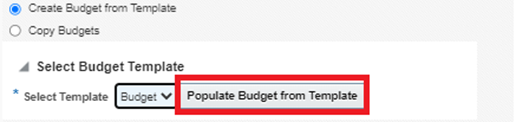
Create the Budget from an Existing Template
| Step | Action |
|---|---|
| 1. |
Click the Costs tab, then click Create Budget.
|
| 2. |
Select one of the following:
|
| 3. | Click Save. |

Copy Budgets from Existing Project
| Step | Action |
|---|---|
| 1. |
Click the Costs tab, then click Create Budget.
|
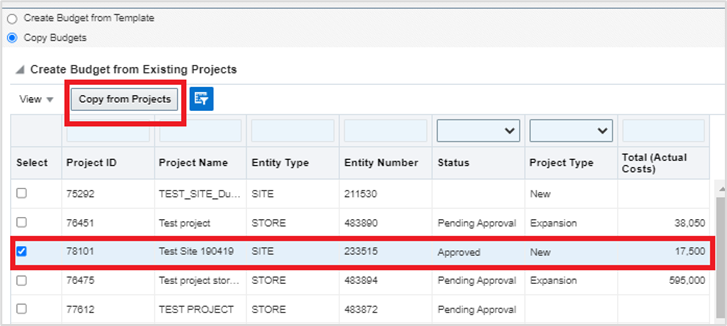
| 2. | From the dropdown menu of the Create Budget screen, select Copy Budgets. 
|
| 3. |
Check the box next to the associated project row, then click Copy from Projects.
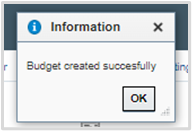
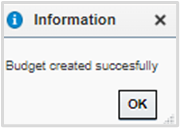
A Budget created successfully message displays. Click OK.
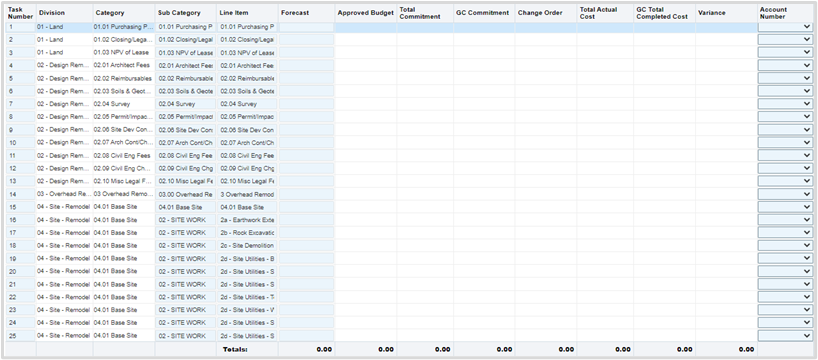
The budget displays with any initial forecast numbers from the copied project.
|
| 3. |
Optional: Click X to remove a budget line item.
|



Adding Budget Line Items
| Step | Action |
|---|---|
| 1. |
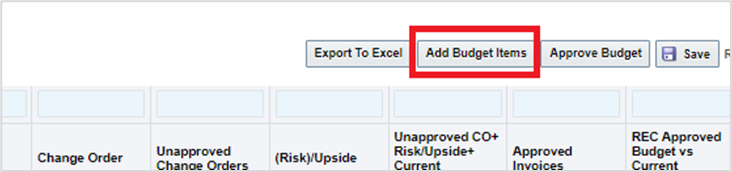
Click the Costs tab, then click Add Budget Items.
|
| 2. |
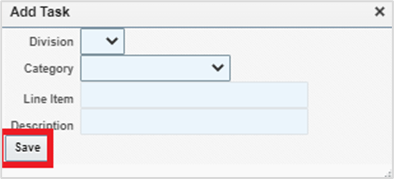
Complete the pop-up window fields, then click Save.
|
Approving the Budget – Remodels and Closure Projects
Use the following steps to approve the Budget on the Project level.
| Step | Action |
|---|---|
| 1. |
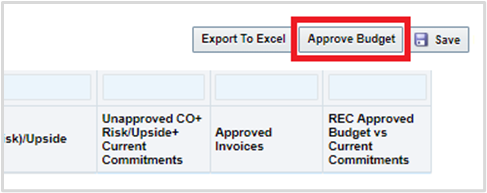
Click the Costs tab, then click Approve Budget.
|
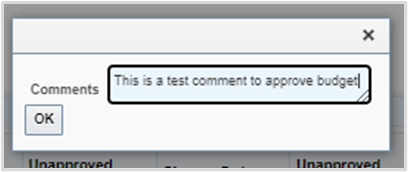
| 2. |
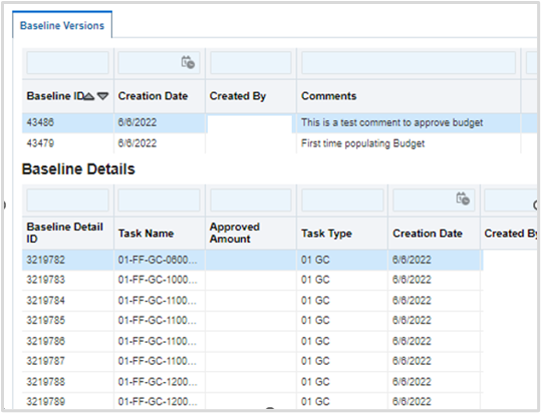
Type comments in the Comments pop-up, then click OK.
A baseline version will display at the bottom of the Costs tab.
|
Budget Items
Budgets allow users to manage creation and approvals of Purchase Orders (PO), Change Orders (CO), invoices, and receipts.
Purchase Orders
The prerequisites to create a PO is to associate the supplier with the project record in the suppliers tab.
| Step | Action |
|---|---|
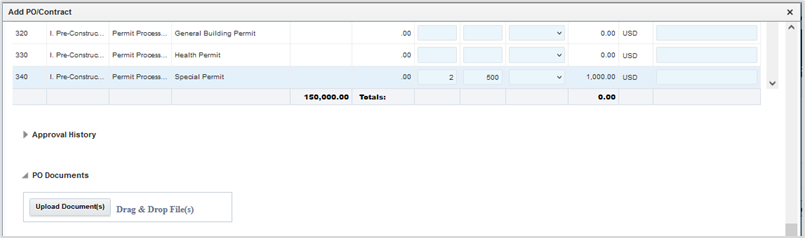
| 1. | Click ADD PO/Contract. |
| 2. |
Complete the line items:
|
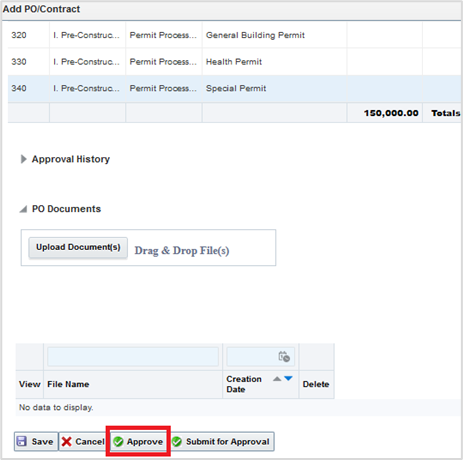
| 3. |
Click Approve.
The PO status is set to Approved and the PO amount is captured against the approved commitment column. Note: Approved POs and Cos account for the commitment.
|

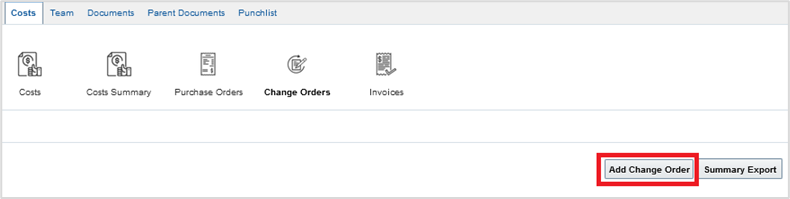
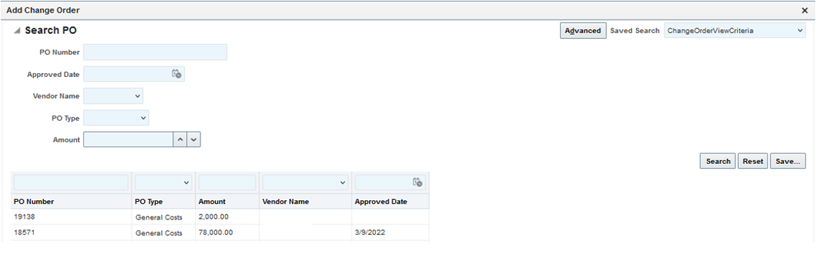
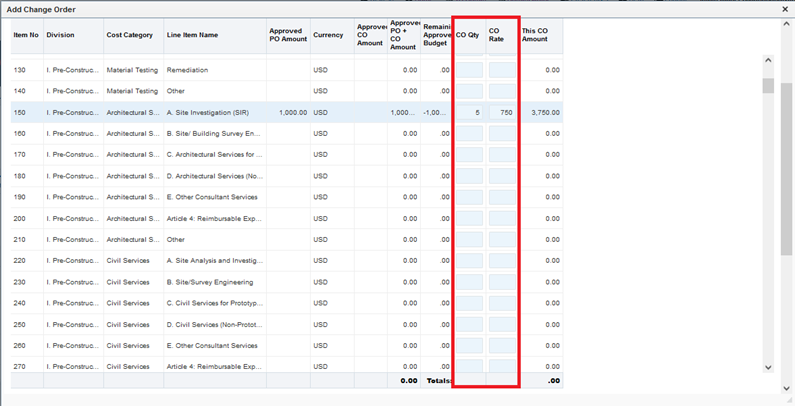
Adding a Change Order
Once a PO has been approved, it cannot be modified. A change order is needed a change a PO. This section describes adding a change order in the Costs tab.
| Step | Action |
|---|---|
| 1. |
Click Change Orders.
|
| 2. |
Click Add Change Order.
|
| 3. |
Click Search, then double-click to select the PO to associate with the change order.
|
| 4. |
Complete the CO QTY and CO Rate columns, then click Save.
A Change Order record is created for approval. |
| 5. |
Click Edit, then change status to Approved.
The amounts roll up to the commitment and displays in the Approved Commitment (PO+CO) column.
|



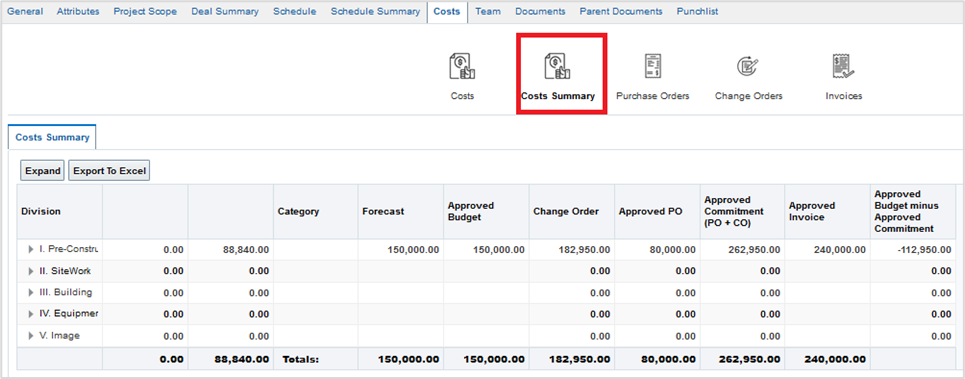
Budget Summary
The Summary tab where the costs are rolled up and can be viewed as a quick snapshot
Contacts Tab
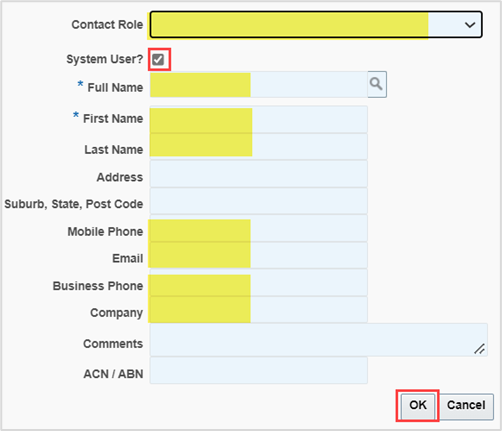
All the project contacts are listed in this tab. New contacts can be added as described in this section.
| Step | Action |
|---|---|
| 1. |
Click Contacts, then click New.
|
| 2. |
Complete the fields, then click OK. TIP: As a best practice, populate the fields that correspond to the existing contacts for a consistent contact list.
|

Photos Tab
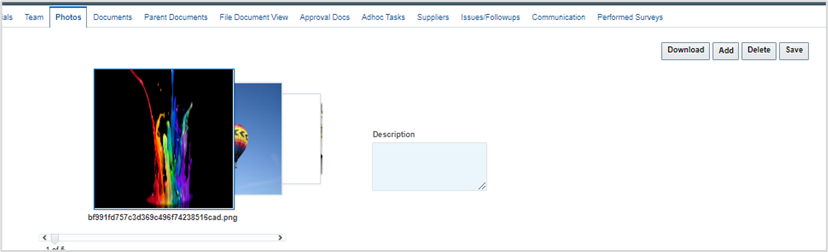
Photos can be useful as reference points, context, and overall project management.
The images display in a stacked format, meaning the slide bar can be rolled to the right and left to view images.
TIP: When saving images, use descriptive names so viewers are provided detailed information.
Note: Image files accepted are:
JPEG
GIF
TIF
PNG
| Step | Action |
|---|---|
| 1. |
Click Photos, then click Add.
|
| 2. |
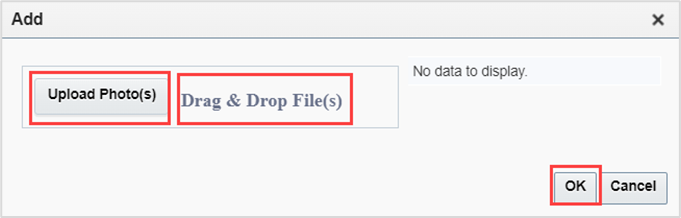
Click Upload Photo(s), else Drag, then Drop and click OK.
The image(s) display. |
| 3. |
Click Save.
|

Documents Tab
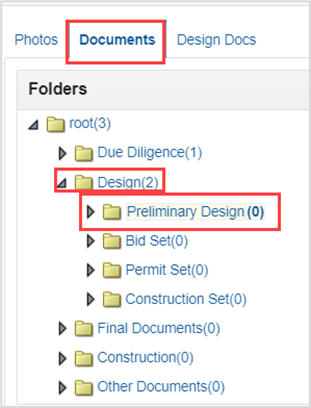
When a new record is created, they are added to the documents folders. Logic is applied to each file type, and folders are added when new documents are uploaded to Projects.
The Action drop-down includes the following folder features:
Add Subfolder – Select a parent folder and then the Add Subfolder option. A popup form will be displayed to allow entry of new folder name.
Update Folder – Select a parent folder and then the Update Folder option to permit changing the selected folder name.
Delete Folder – Select a folder and the Delete Folder to remove a folder and its current contents. A confirmation popup will be displayed.
Delete Document – Select the checkbox adjacent to the document and click Delete Document to remove a document. A confirmation popup will be displayed.
Download Selected – Select the checkbox adjacent to one or more documents and the Download Selected. A zip file containing all selected documents will be saved to the designated destination.
Notify Selected – Generates email notification to designated project contacts and system Users.
Binder – Permits the selection of multiple documents stored in the project and combines into a new pdf file. User determines sequence of documents.
Move To Folder – Selecting the document checkbox and the Move To Folder will display the folder hierarchy in a popup form. Select the target folder and the OK button to relocate a document to a new folder.
Upload Documents
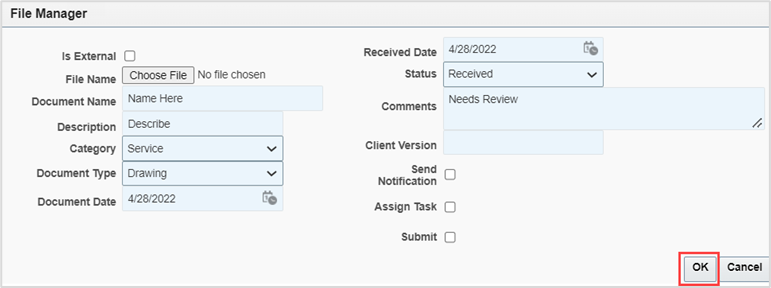
This section describes the steps to add a document, notify recipients, and assign a task.
Note: Steps in this section are dependent on the document requirements, therefore some steps are optional.
| Step | Action |
|---|---|
| 1. |
Click the Documents tab, then click to select a folder/sub-folder, as applicable.
|
| 2. |
Click +Add.
|
| 3. | Click Browse and locate, then attach the document from a local drive. |
| 4. |
Complete fields, as applicable, click OK, else proceed to next step.
|
| 5. |
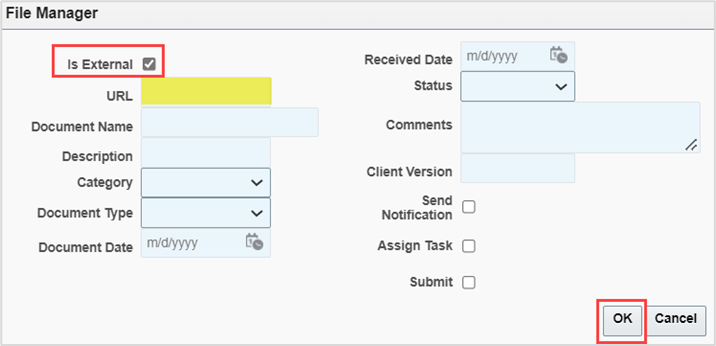
Add an external link as follows:
|
| 6. |
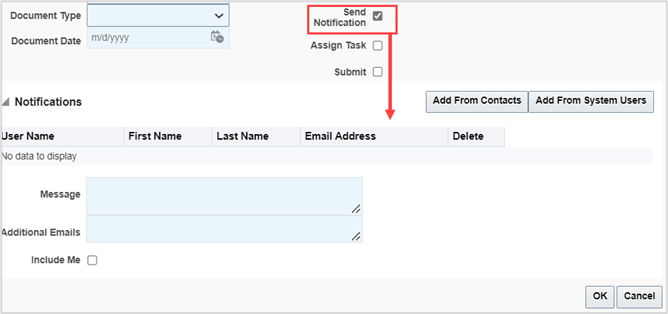
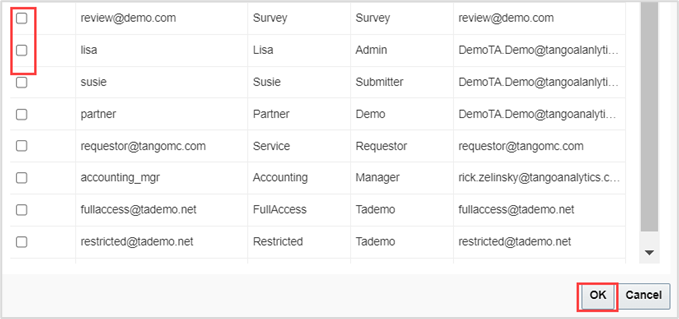
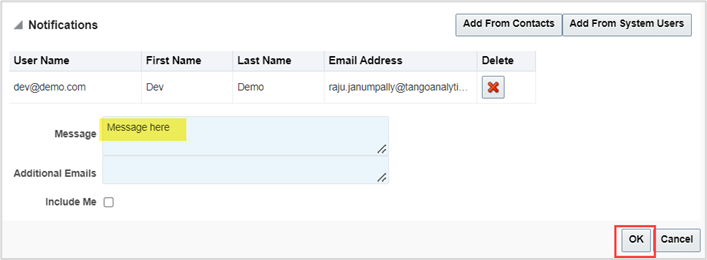
Email a new record as follows:
|
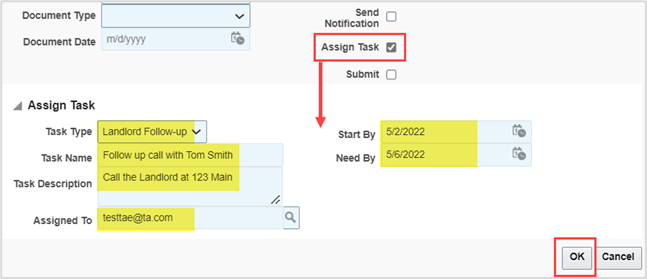
| 7. |
Assign the record as a task:
|
| 8. |
Click Submit. The approval workflow is initiated. |

Vendors/Suppliers Tab
This tab is used to add or remove the list of suppliers that are working on a particular project. A master list of suppliers will exist in the system, for the construction manager to add to this project, based on need.
| Step | Action |
|---|---|
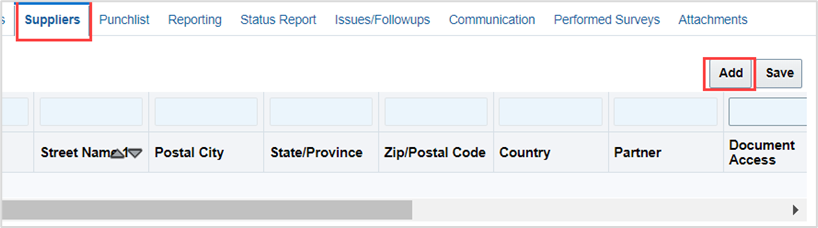
| 1. |
Click the Suppliers tab, then click Add.
|
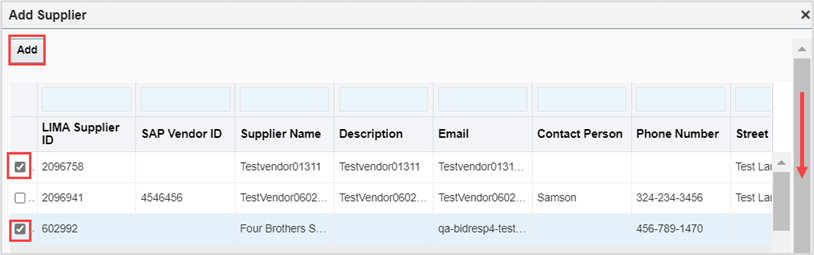
| 2. |
Check the box(es) in the supplier row, then click Add. Note: Use the scroll bar to the right to view all suppliers.
|
| 3. | Click Save. |
| 4. |
Optional: Click X to remove a supplier row, then click Save.
|

Comments Tab
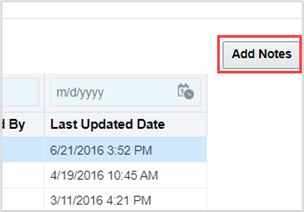
From this tab, users can view, add, edit and remove comments for the project.
| Step | Action |
|---|---|
| 1. |
Click the Comments tab. A list of comments display, if applicable.
|
| 2. |
Click Add Notes.
|
| 3. |
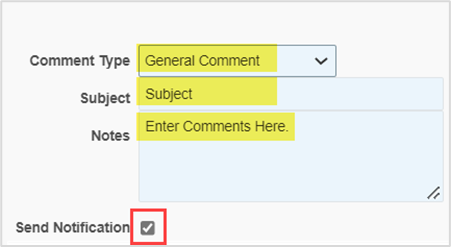
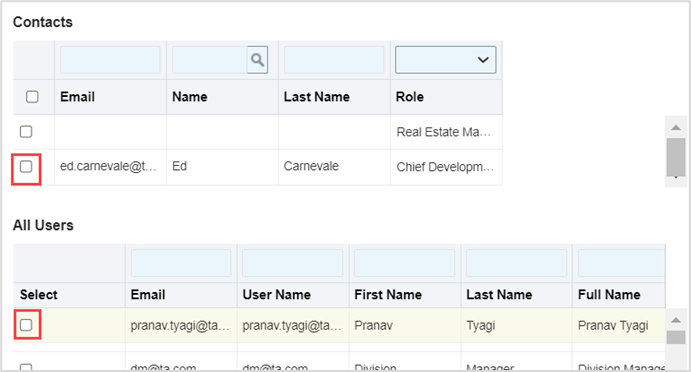
Complete the comment form as follows:
The comment displays with a date and user stamp.
|


Was this article helpful?
That’s Great!
Thank you for your feedback
Sorry! We couldn't be helpful
Thank you for your feedback
Feedback sent
We appreciate your effort and will try to fix the article