Table of Contents
Managing Contacts
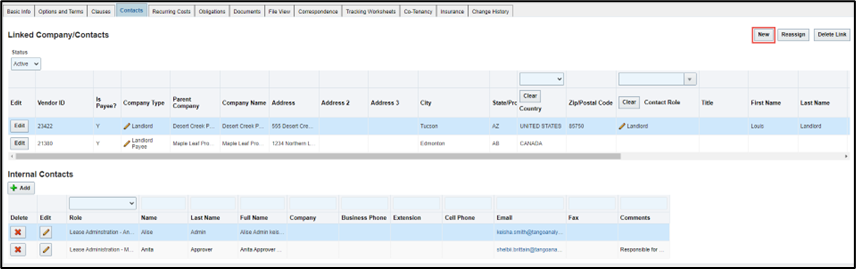
The Contacts form allows the end user to associate an existing Company or Contact, or to create a new Company or Contact:
Updating Parent Companies
Many organizations enter into lease agreements with major landlords, property REITs or other third parties that have considerable property holdings.
Often, the various legal entities for a particular building, mall, or center may be a child entity within a larger parent company. As a result of unique entities, vendor numbers or address and contact information, these companies and their respective contacts need to be setup as a unique company record for each lease.
Traditionally, this would be a problem when attempting to report across the portfolio trying to ascertain all leases with a particular major landlord. The Parent Company functionality within Tango Lease solves this problem.
Updating Existing Parent Companies
If you have a linked company that belongs to another parent company, the data can be updated to reflect this relationship. In fact, a parent company can have an unlimited number of child companies.
To update an existing record, take the following actions:
| Step | Action |
|---|---|
| 1. | Navigate to the Contacts tab in Lease. |
| 2. | Choose the Edit button to edit an existing Company. |
| 3. |
Choose the Update Parent Company button. NOTE: If you do not see the Update Parent Company or the button is disabled, contact Tango Support as this is controlled via security and this permission needs to be explicitly granted. |
| 4. |
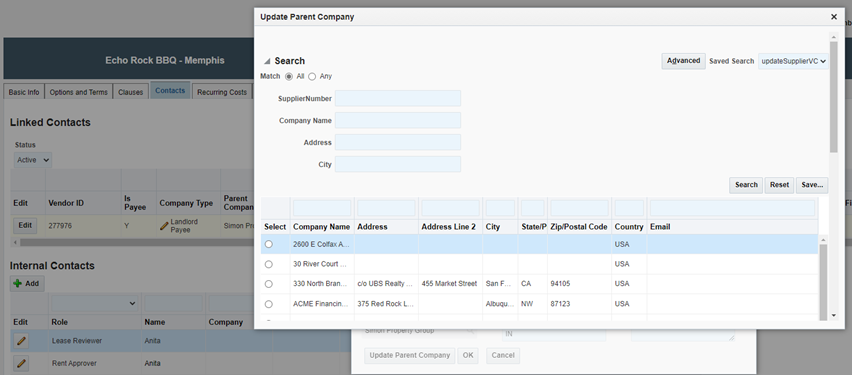
The below dialog box is displayed. Using the search fields, locate the appropriate parent company, the choose the Select icon in the left-most column.
|
| 5. |
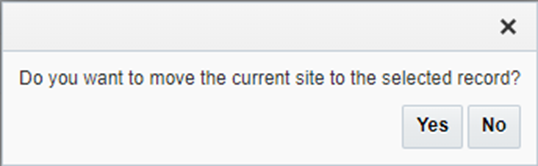
You will be prompted to move the existing company to the new parent, select Yes to complete the action.
|
Adding New Companies
When adding a new company in Tango Lease, the Add Company form is displayed like below:
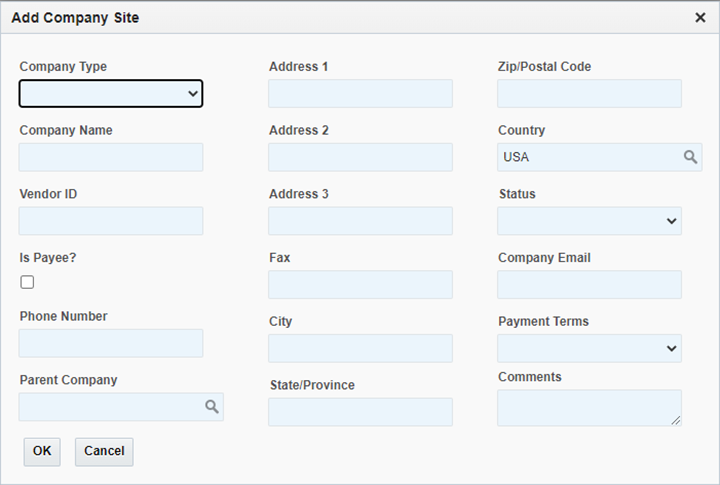
NOTE: The Parent Company field. If you do not populate this field (via the Search icon ( )), the system will automatically create a parent company with data from the Add dialog box, creating a 1-to-1 relationship between a company and its parent.
Visualizing Parent Company Information
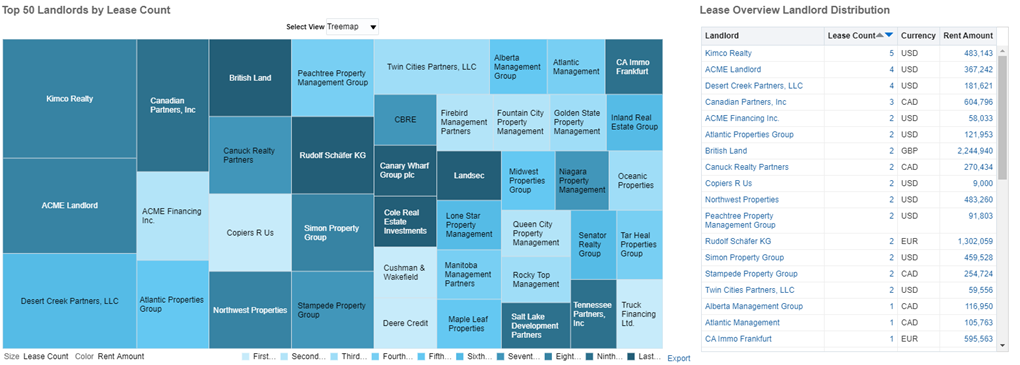
To visualize parent company information, the standard lease dashboard provides visibility into this information for Landlords. Below is an example of this dashboard object that can be found in the Portfolio dashboard, Landlord Distribution tab.
Associating an Existing Company
To associate an existing company / supplier site to a lease, proceed to carry out the following steps:
| Step | Action |
|---|---|
| 1. | Navigate to the Contacts tab in Lease. |
| 2. |
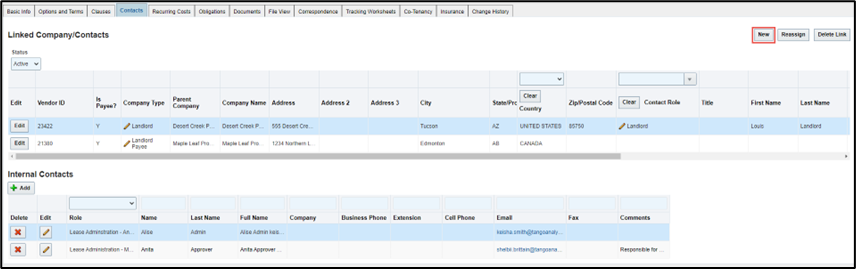
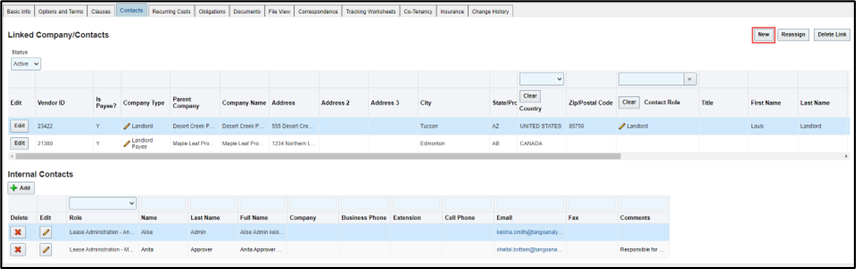
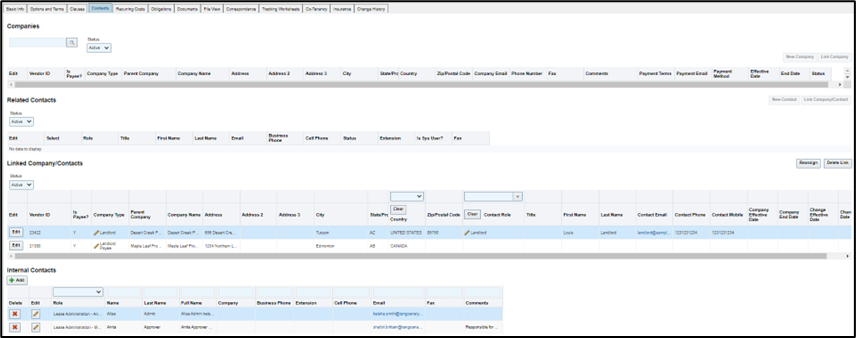
Click the New button. This will refresh and expand the screen to display the Companies, and Related Contacts sections.
|
| 3. |
Click the Search icon (
|
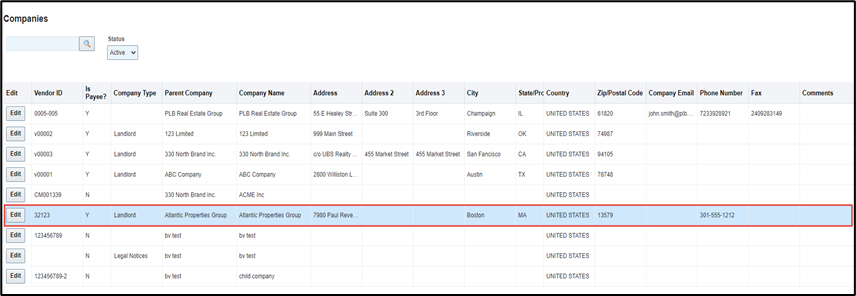
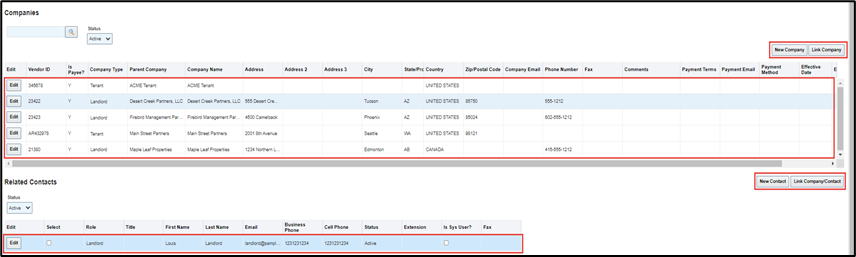
| 4. | Use the scroll feature in the Companies section to find the appropriate company. Alternately, enter full or partial criteria in the search field and click the Search icon 
|
| 5. |
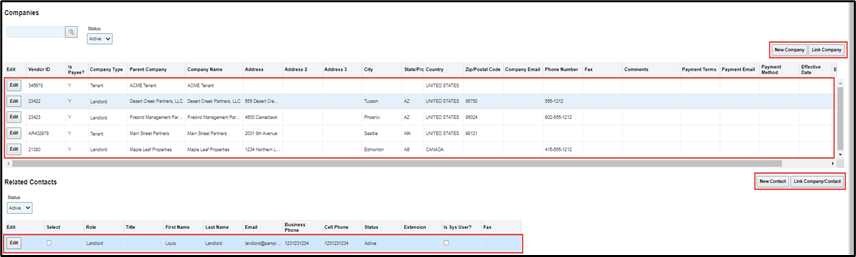
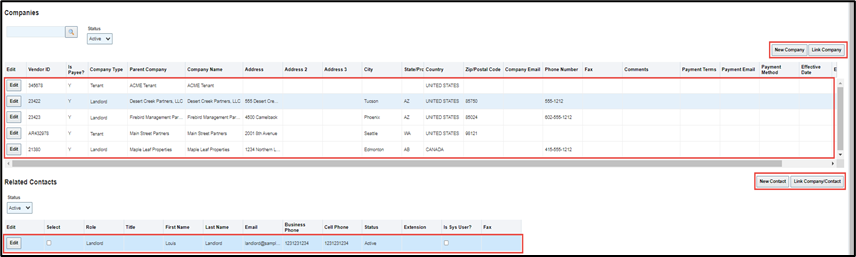
Highlight the row of the Company. This will refresh the list of associated contacts displayed in the Related Contacts section of the form.
NOTE:
|
| 6. |
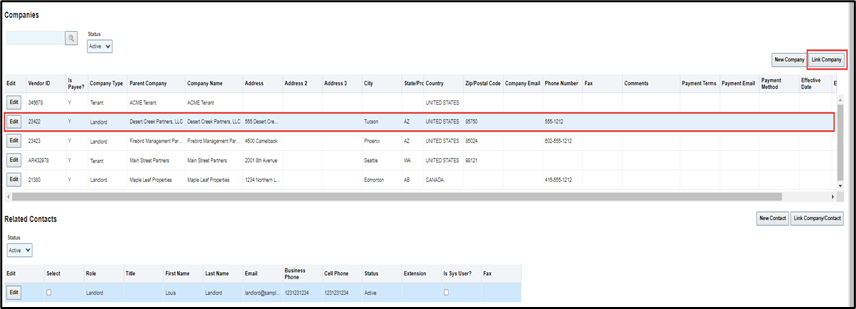
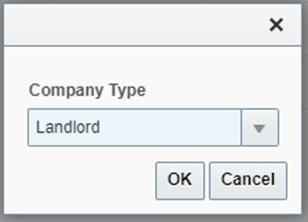
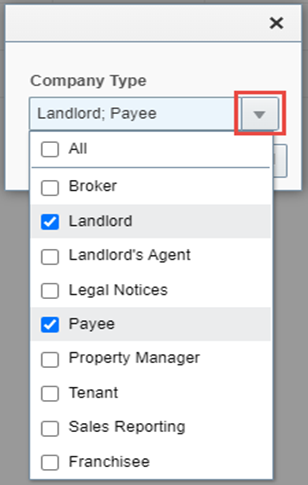
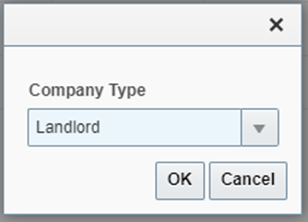
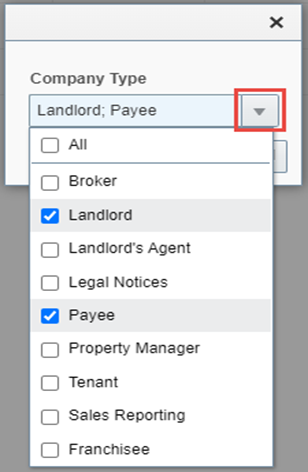
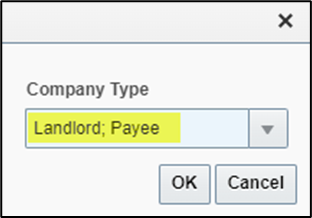
Click the Link Company button. From the dialog box that is displayed next, use the multi-select drop-down menu, by clicking on the inverted triangle, to select one or more company types.
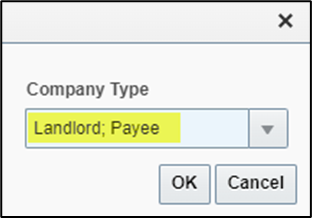
Once all the applicable company types have been selected, click the inverted triangle again or directly into the Company Type field to close the multi-select list and retain the selection.
|
| 7. |
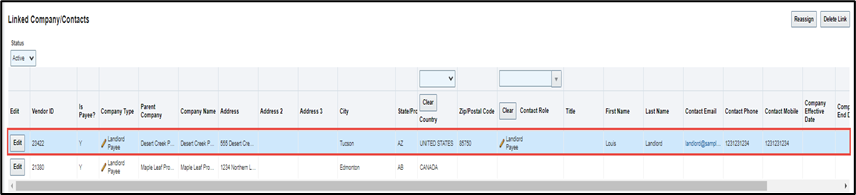
Click OK. This will insert the company selected into the Linked Company/Contacts table which is now deemed to be associated to the Lease record.
NOTE: All suppliers where the Is Payee flag is denoted as ‘Y’ will be not editable. This is to ensure that suppliers received through vendor interfaces are not updated/managed through the User Interface (UI). The source for updates will be through the Client’s external Enterprise Resource Planning (ERP) system. If an immediate update is required to be made within Tango, then only authorized users will have been granted access to do so via the Supplier Management module and as defined through security configuration. |
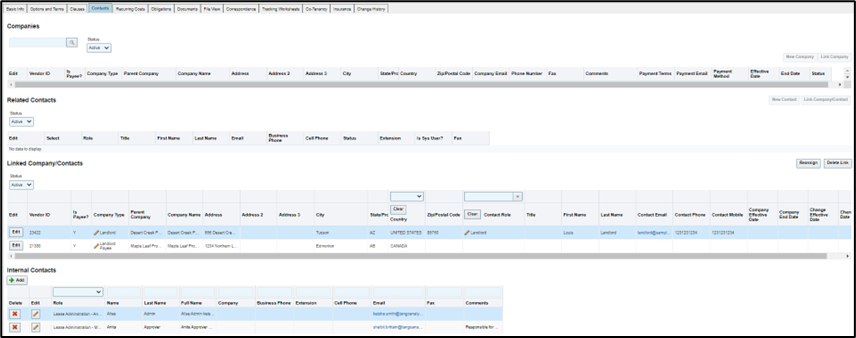
 ) leaving the search field blank in the Companies section. This will display the list of all companies that are available in the database. The New Company, Link Company, New Contact and Link Company/Contact command buttons will be enabled allowing the user to click on either one.
Creating a New Company
To create a new company / supplier site, proceed to carry out the following steps:
| Step | Action |
|---|---|
| 1. | Navigate to the Contacts tab in Lease. |
| 2. |
Click the New button. This will refresh and expand the screen to display the Companies, and Related Contacts sections.
|
| 3. |
Click the Search icon (
|
| 4. | Click on the New Company button if the company you are searching for is not found. |
| 5. |
From the Add Company Site dialog box enter all details on the form, where available, and click OK.
NOTE: The Parent Company field is designed as a search field to allow easier selection of the proper value. If a value is not selected (via the Search icon
The newly added company will appear in the company list on the screen and will be available for future selection.
|
| 6. |
Click the Link Company button. From the dialog box that is displayed next, use the multi-select drop-down menu, by clicking on the inverted triangle, to select one or more company types.
Once all the applicable types have been selected, click the reverted triangle again to close the multi-select list and retain the selection.
|
| 7. |
Click OK. This will insert the company selected into the Linked Company/Contacts table which is now considered associated to the Lease record.
NOTE: All suppliers where the Is Payee flag is denoted as ‘Y’ will be not editable. This is to ensure that suppliers received through vendor interfaces are not updated/managed through the User Interface (UI). The source for updates will be through the Client’s external Enterprise Resource Planning (ERP) system. If an immediate update is required to be made within Tango, then only authorized users will have been granted access to do so via the Supplier Management module and as defined through security configuration. |
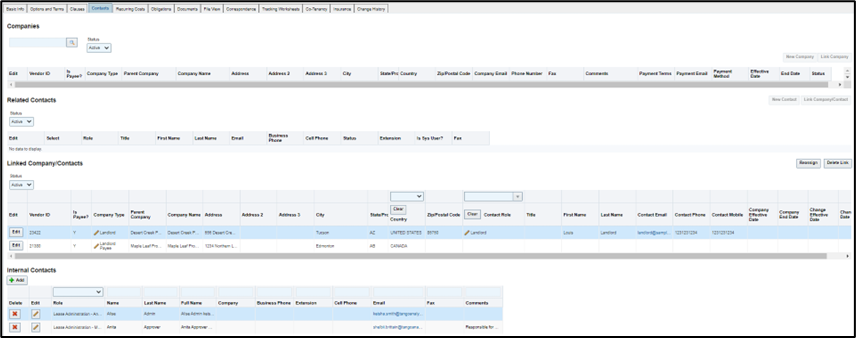
 ) leaving the search field blank in the Companies section. This will display the list of all companies that are available in the database. The New Company, Link Company, New Contact and Link Company/Contact command buttons will be enabled allowing the user to click on either one.
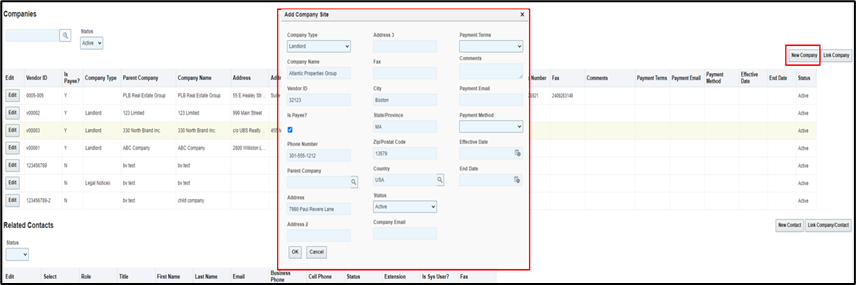
 ), the system will automatically create a parent company with data from the Add dialog box, creating a 1-to-1 relationship between a company and its parent.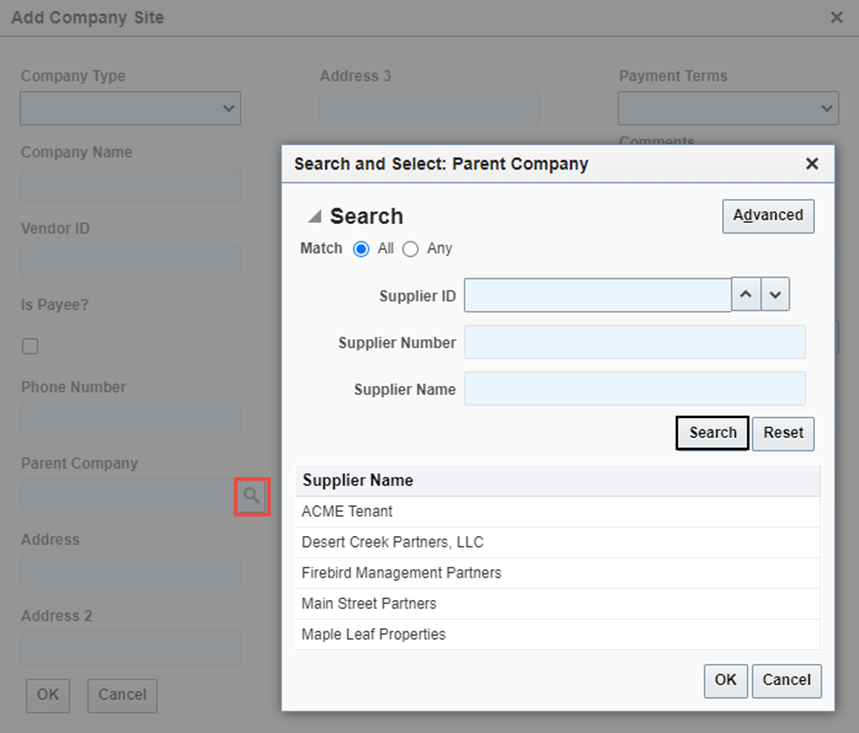

Associating an Existing Contact
To associate an existing contact to a lease, proceed to carry out the following steps:
| Step | Action |
|---|---|
| 1. | Navigate to the Contacts tab in Lease. |
| 2. |
Click the New button. This will refresh and expand the screen to display the Companies, and Related Contacts sections.
|
| 3. |
Click the Search icon (
|
| 4. | Use the scroll feature in the Companies section to find the appropriate company. Alternately, enter full or partial criteria in the search field and click the Search icon ( ). ). |
| 5. |
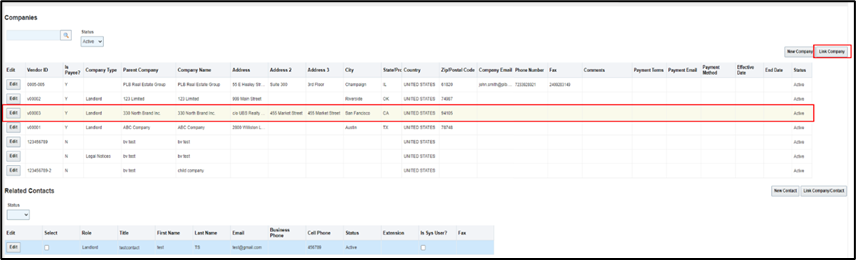
Highlight the row of the Company. This will refresh the list of associated contacts displayed in the Related Contacts section of the form.
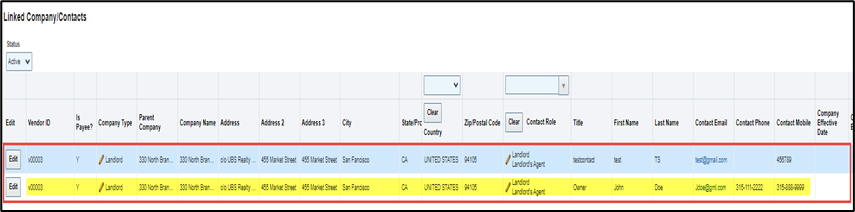
NOTE: To link the Company to the Lease at the contact level, a Related Contact record is required; hence, if there is no valid contact associated to the company as displayed in the figure below, a new contact will need to be created populating, at minimum, with one field (i.e., Title). |
| 6. |
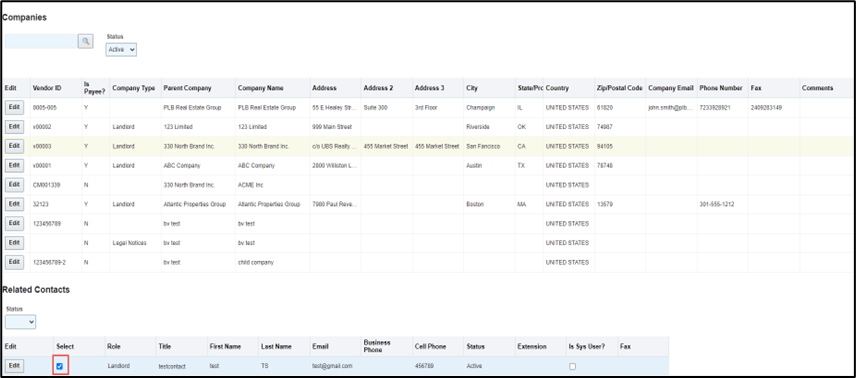
Select the contact by using the checkbox in the Select column.
|
| 7. |
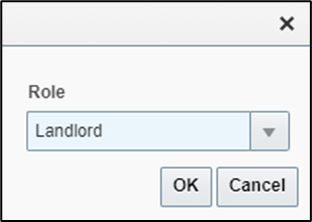
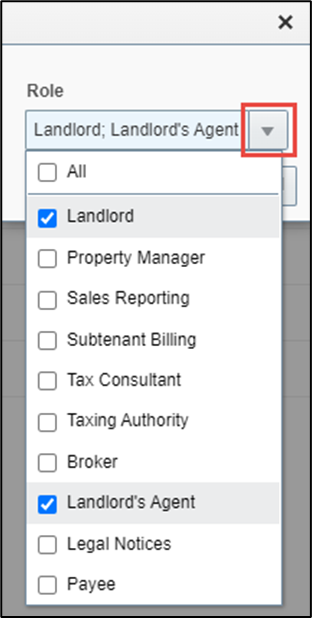
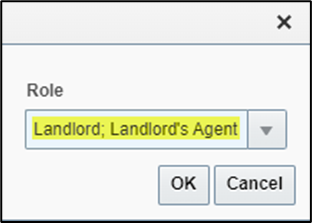
Click the Link Company/Contact button. From the dialog box that is displayed next, use the multi-select drop-down menu, by clicking on the inverted triangle, to select one or more roles.
Once all the applicable roles have been selected, click the reverted triangle again or directly into the Role field to close the multi-select list and retain the selection.
|
| 8. |
Click OK. NOTE:
|
 ) leaving the search field blank in the Companies section. This will display the list of all companies that are available in the database. The New Company, Link Company, New Contact and Link Company/Contact command buttons will be enabled allowing the user to click on either one.
Creating a New Contact
To create a new contact, proceed to carry out the following steps:
| Step | Action |
|---|---|
| 1. | Navigate to the Contacts tab in Lease. |
| 2. |
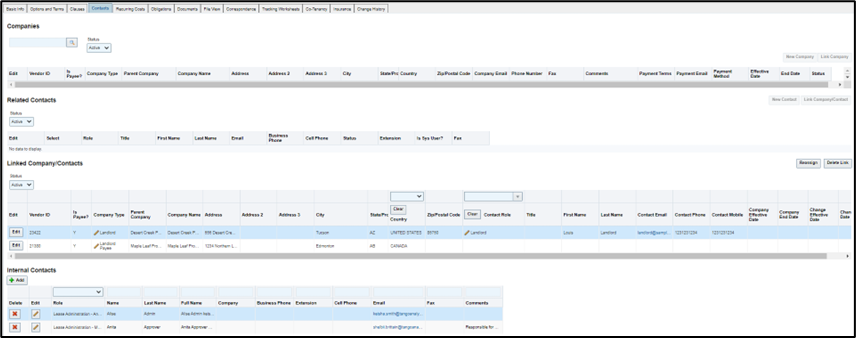
Click the New button. This will refresh and expand the screen to display the Companies, and Related Contacts sections.
|
| 3. |
Click the Search icon (
|
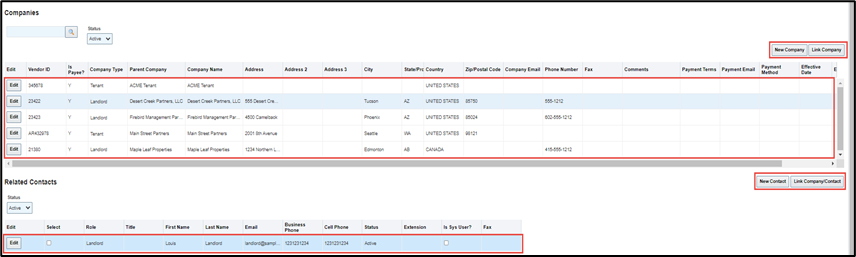
| 4. | Highlight the row of the Company currently linked to the Lease record in the Companies section. |
| 5. | Click on the New Contact button if the contact you are searching for is not found. |
| 6. |
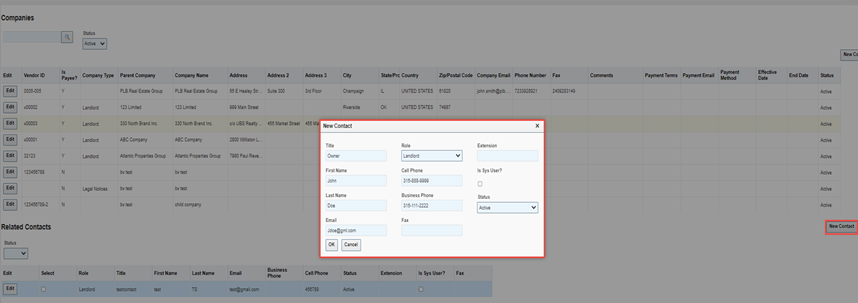
From the New Contact dialog box enter all details on the form, where available, and click OK. The newly added contact will appear in the contact list on the screen and will be available for future selection.
|
| 7. |
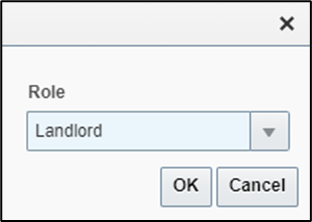
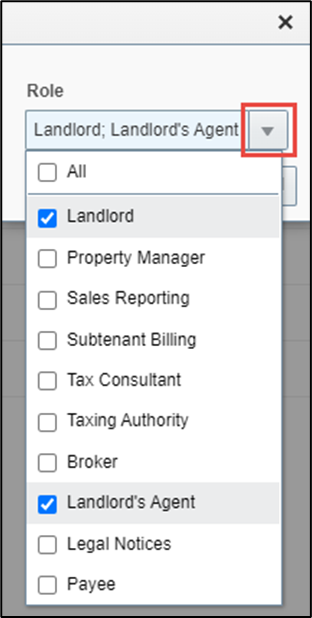
Click the Link Company button. From the dialog box that is displayed next, use the multi-select drop-down menu, by clicking on the inverted triangle, to select one or more roles.
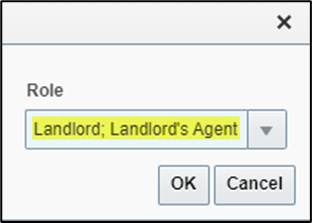
Once all the applicable roles have been selected, click the reverted triangle again or directly into the Role field to close the multi-select list and retain the selection.
|
| 8. |
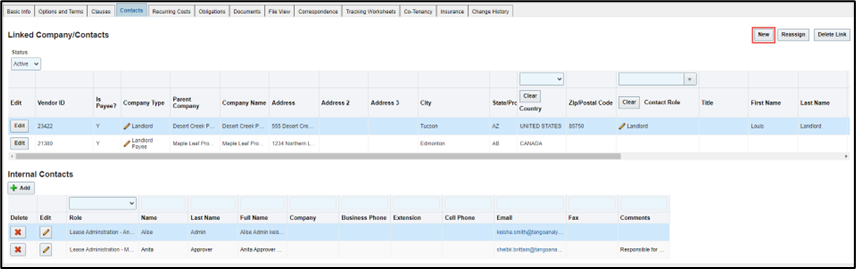
Click OK. This will insert the contact selected into the Linked Company/Contacts table which is now considered associated to the Lease record. NOTE: If the selected Company is currently linked to the Lease, with an existing contact, then the existing company will be inserted into the Linked Company/Contacts table in a separate row along with the newly selected Related Contact which is now deemed to be associated to the Lease record.
|
 ) leaving the search field blank in the Companies section. This will display the list of all companies that are available in the database. The New Company, Link Company, New Contact and Link Company/Contact command buttons will be enabled allowing the user to click on either one.

Adding a New Internal Contact
The Internal Contacts section allows for the following:
The end user to associate internal Tango users to a lease record for reference in terms in of knowing who to contact to obtain various information.
-
To specify the Tango user(s) which need controlling access to the Lease Abstract and the Batch Rent workflows. The workflows will not advance until a user selection is made.
NOTE:
At minimum, the contact role (e.g., Lease Reviewer, Payment Approver, etc.) in combination with the username, defined by the Client as required to systematically approve a workflow, must be selected.
A single person can be assigned to many roles in the Internal Contacts table. For instance, Joe Smith can be linked as both the ‘Lease Reviewer’ and the ‘Payment Approver’ if applicable but keep segregation of duties in mind when assigning roles to users for best practices.
If a specific role is associated to a workflow, it cannot be listed in the table more than once.
Within the Generate Rent Roll and Batch Rent functionality there is ‘My Leases’ concept to rent roll generation and rent batching. ‘My Leases’ are leases where a user is associated as an internal contact.
| Step | Action |
|---|---|
| 1. | Navigate to the Contacts tab in Lease. |
| 2. |
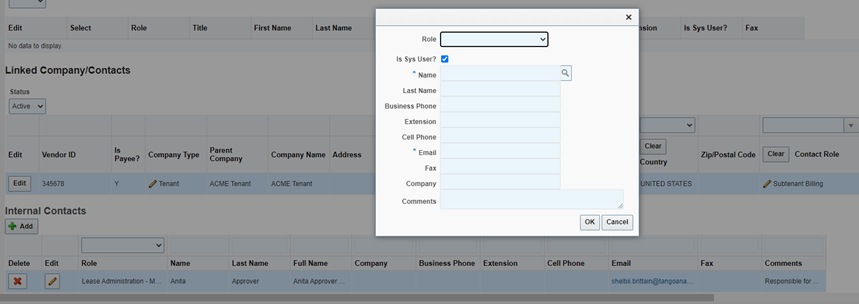
From the Contacts form click on the Add command button immediately below the Internal Contacts section.
|
| 3. |
From the dialog box enter all details on the form, where available, and click OK. The added contact will appear in the contact list on the screen.
|

Reassign Functionality in Contacts
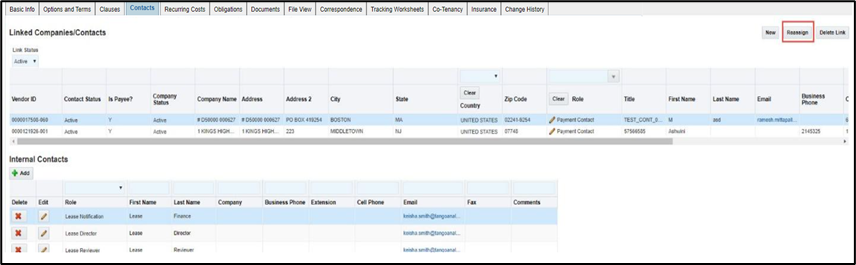
From time to time, you will need to change the vendor within a lease to a new payee. Tango has a functionality that allows you to easily change the existing vendor on a recurring cost to a new vendor. This functionality is within the Contacts tab with a button called Reassign.
| Step | Action |
|---|---|
| 1. |
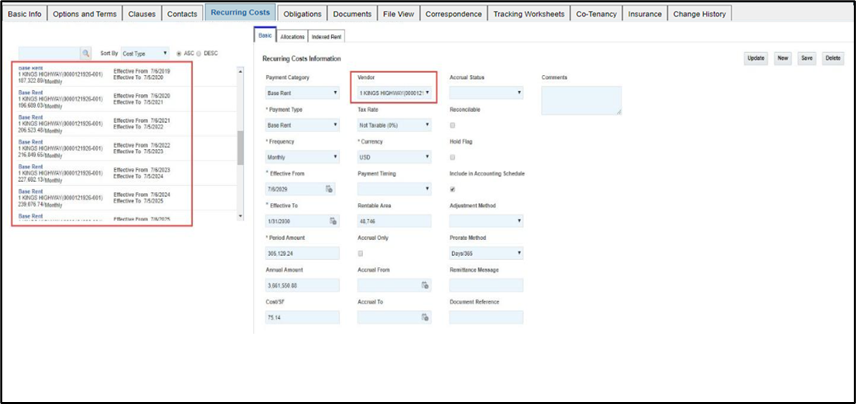
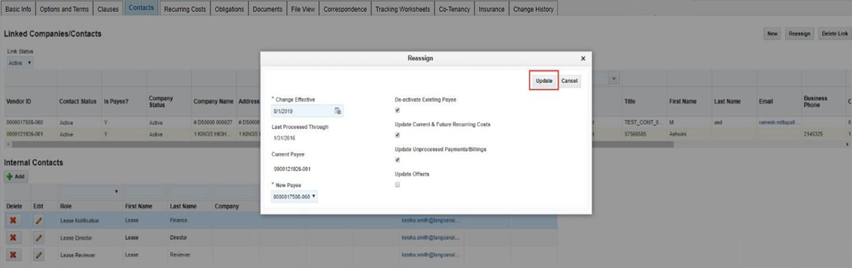
For this example, we will change a vendor for payments that begin on 08/01/2019. Notice the existing vendor is 1 KINGS HIGHWAY and there are multiple rent increases that go out several years.
Navigate to the Contacts tab in Lease. NOTE: The first thing you will need to do is link the new payee to the lease. Refer to the steps in the following sections of this user guide:
|
| 2. |
In this example: We want to change this effective 08/01/2019 to #D50000. We now switch to the Contacts tab and find the Reassign button.
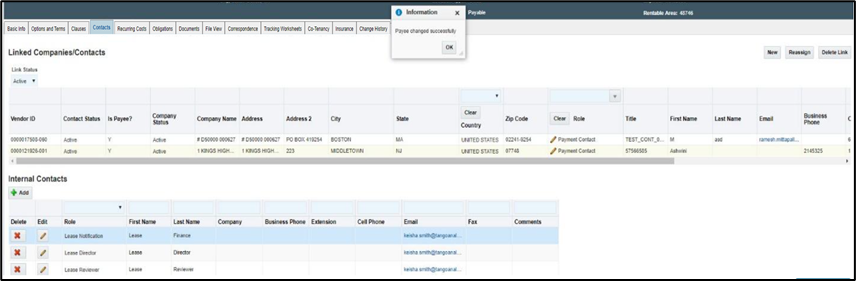
Making sure the vendor we want to change from is highlighted we now click the Reassign button. A dialog box displays, and we populate the Change Effective date as to when we want the change to happen. NOTE: You cannot have an effective date that is prior to the Last Processed Through date. Make sure that the payee you are switching from and to are correct. You can select any of the 4 checkboxes you wish and select update.
Once the process is complete you will receive a dialog box notifying you of the change.
|
| 3. |
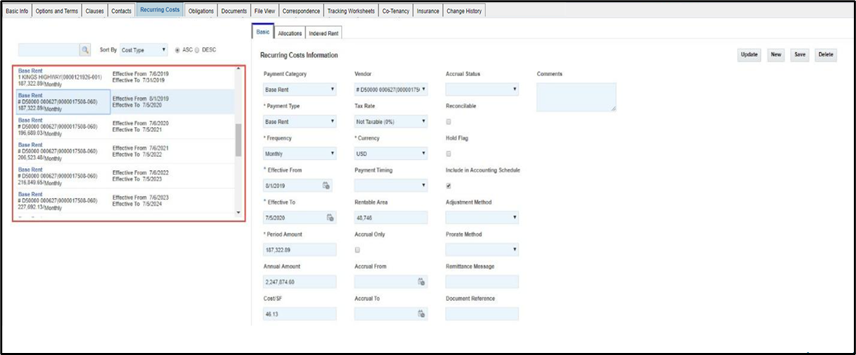
Now if you navigate back to the recurring cost screen you will see that the system created a new payment that is effective 08/01/2019 and changed the vendor on the future payments like we indicated to do through the checkbox that was labeled. Update Current & Future Recurring Cost.
NOTE: The changes can also be seen on the Lease Payments tab, the Receivables tab, and the Offsets, Credits tab depending on which boxes you checked. |
Was this article helpful?
That’s Great!
Thank you for your feedback
Sorry! We couldn't be helpful
Thank you for your feedback
Feedback sent
We appreciate your effort and will try to fix the article