Table of Contents

You can create a new lease or copy from an existing lease using the following features.
| Feature | Navigation | Usage |
|---|---|---|
| Create New Lease | Lease Home Page | Select to create a payables or receivables lease. |
| Lease Clone | Lease Details > Basic Info tab | Select to copy from an existing payables or receivables lease. |
Create New Lease Wizard
This feature is designed to use six predefined templates which cover the same tabs where the end user will be further managing their data once the Lease record is created and approved. Each template consists of a few of the same labels that are captured throughout each of the respective tabs found throughout the module.
To create a new Lease, proceed to carry out the following steps:
| Step | Action |
|---|---|
| 1. |
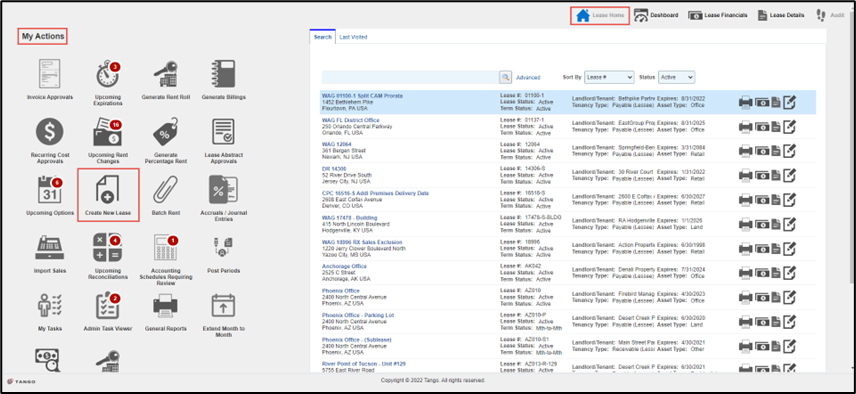
Navigate to the Lease Home page. From the My Actions section on the left side of the Lease Home page, click on the Create New Lease widget.
|
| 2. |
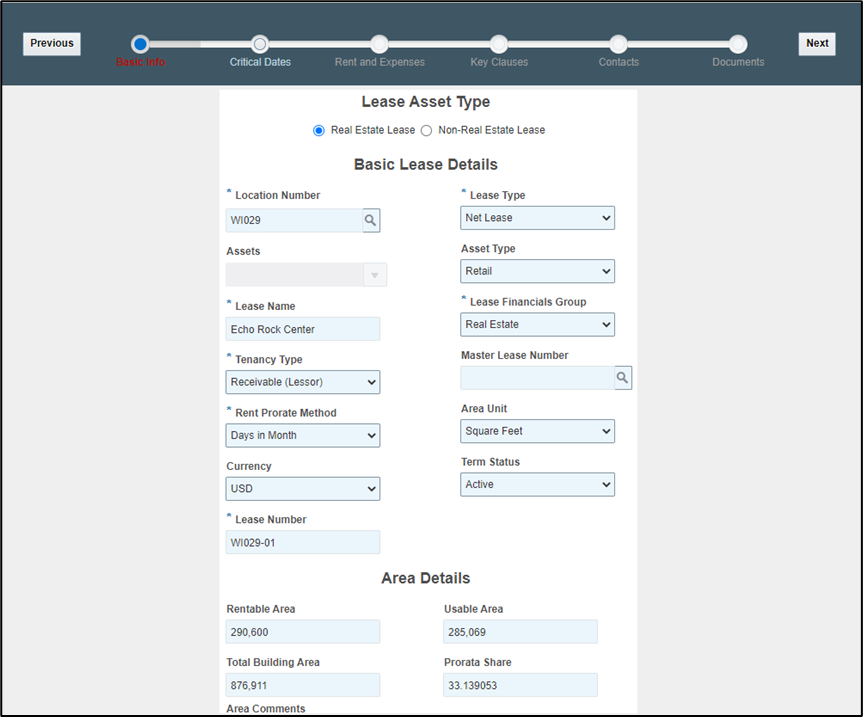
This will open a new tab displaying what is referred to as the Lease Wizard.
The Lease Wizard uses six predefined templates to help the user create the lease record in the database containing appropriate tables.
|

Basic Lease Information
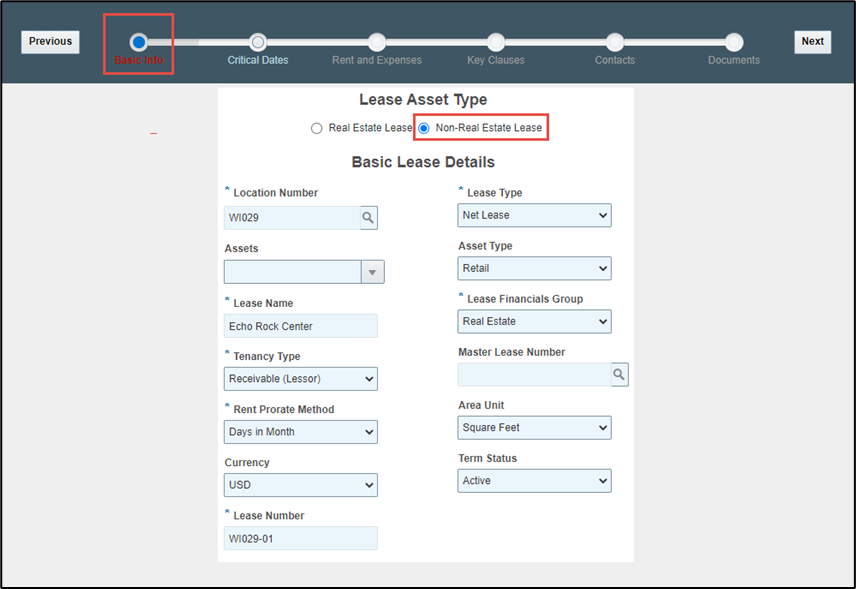
Upon entering the Lease Wizard, the user will be taken to the Basic Info form which displays some of the key basic lease details to be populated for either a Real Estate Lease or Non-Real Estate Lease.
Basic Lease Details
To complete the Basic Info > Basic Lease Details section, proceed to carry out the following steps:
| Step | Action | ||||||||||||||||||||||||||
|---|---|---|---|---|---|---|---|---|---|---|---|---|---|---|---|---|---|---|---|---|---|---|---|---|---|---|---|
| 1. |
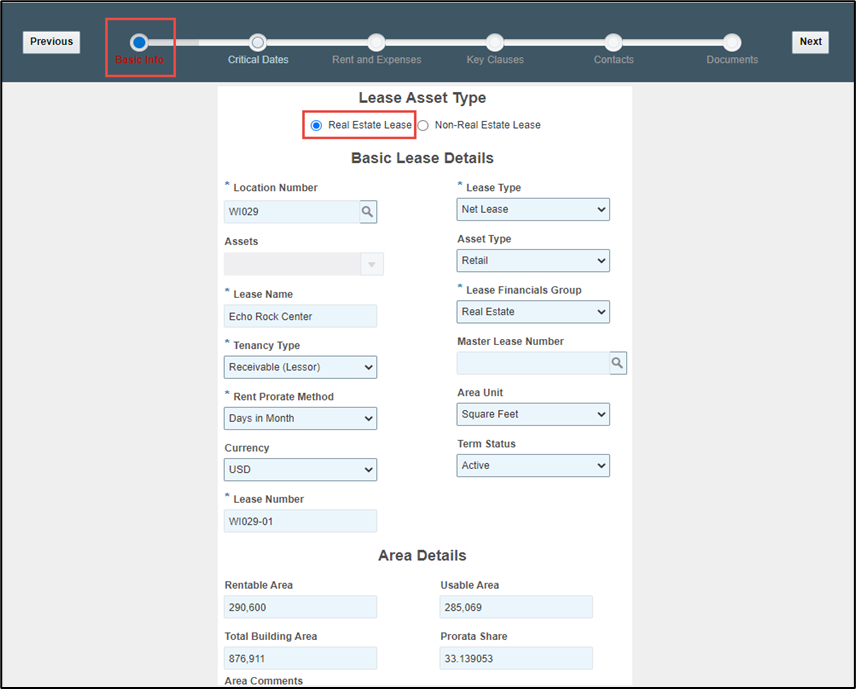
Upon entering the Lease Wizard, the form will, by default, display the fields required to create a Real Estate Lease as denoted by the radio button located at the top of the form.
Click the second radio button to create a Non-Real Estate Lease. This will change the form slightly, whereby, the Area Details will no longer be visible, and the Assets field will be enabled.
|
||||||||||||||||||||||||||
| 2. |
Populate the following required fields, at minimum:
|
||||||||||||||||||||||||||
NOTE: The Location Entity Type column allows for the user to filter by entity type, so a user knows if something is a property/building/location/store. |
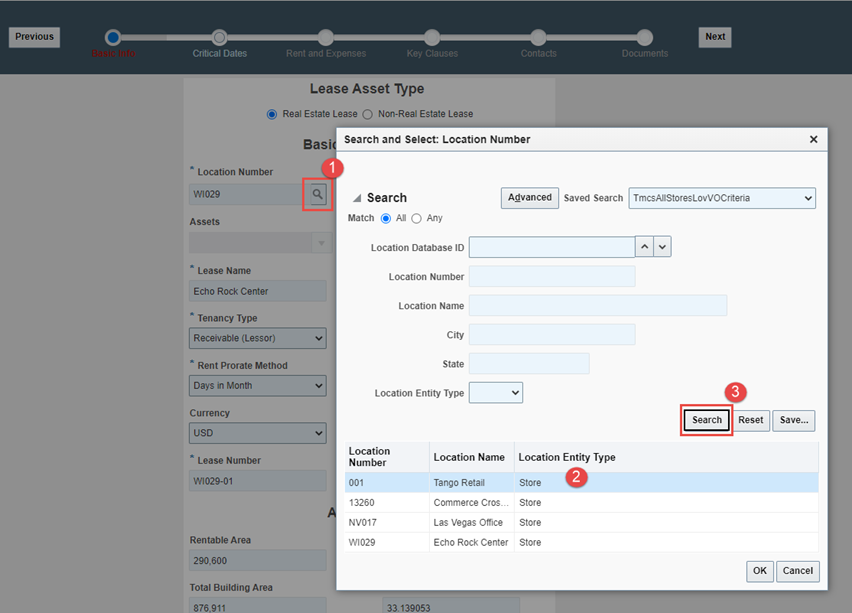
 ) leaving the field blank. This will bring a search and select the dialog box with the Location, Property or Store number and name field. Clicking the Search icon (
 ) leaving all fields blank in the dialog box will display a list of all pre-existing store numbers to select from. Highlight the row of the record retrieved and click OK.
Area Details
To complete the Basic Info > Area Details section, proceed to carry out the following steps:
| Step | Action | ||||||||||||
|---|---|---|---|---|---|---|---|---|---|---|---|---|---|
| 1. |
In the Area Details section of the Basic Info page, enter the following information, if known:
|
||||||||||||
| 2. |
Click the Next command button. The screen will move to the next page: Critical Dates and Options.
|

Critical Dates and Options
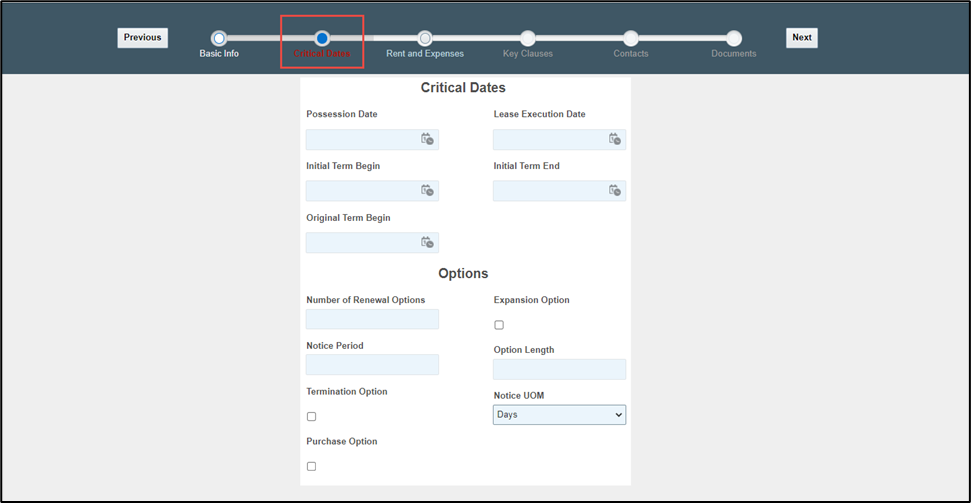
The Critical Dates and Options form allows the user to capture a variety of milestones and events identified throughout the life cycle of the lease.
Critical Dates
The Critical Dates section is used to manage common critical dates such as possession, commencement, and expiration dates.
Populate any known values in this section. The user can either use the calendar icon or manually input the date using the required date format (mm/dd/yyyy) in each of the following fields:
| Description | Explanation |
|---|---|
| Possession Date |
Enter the date that the tenant takes (or is authorized to take) legal possession of a leased premises to start the build-out process. NOTE: This field is key to the accounting processes as it drives the initial calculation of the straight-line rent. |
| Lease Execution Date | Enter the later of the two dates on which the Landlord and Tenant has executed the lease document. |
| Initial Term Begin |
Enter the date on which the original lease term starts or commences. NOTE: The Lease Term is the fixed noncancelable term of the lease plus:
|
| Initial Term End |
Enter the date on which the original lease term ends or expires. NOTE: The Lease Term is the fixed noncancelable term of the lease plus:
|
| Original Term Begin | Enter the original end date on which the lease is scheduled to end/expire. |
Options
The Options section is used to define the common real estate related events, options, or milestones as part of the initial setup (e.g., Renewal, Expiration, Termination, etc.).
To complete the Critical Dates > Options section, proceed to carry out the following steps:
| Step | Action | ||||||||||||||||
|---|---|---|---|---|---|---|---|---|---|---|---|---|---|---|---|---|---|
| 1. |
Populate any known values in this section as follows:
|
||||||||||||||||
| 2. |
Click the Next command button. The screen will move to the next page: Rent and Expenses.
|

Rent and Expenses
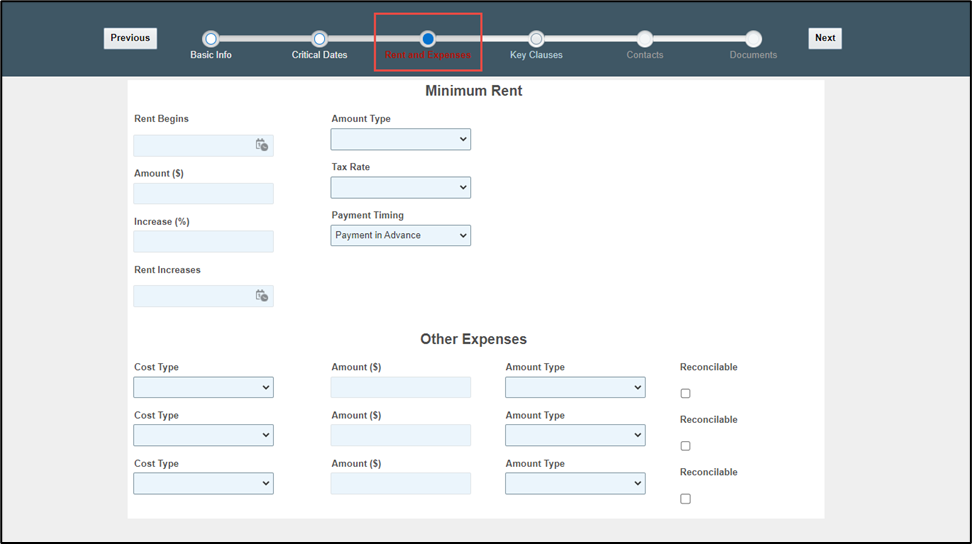
The Rent and Expenses form allows the user to capture the fixed rental fee(s) and additional costs incurred by the business to utilize the property within a specified term in the lease.
Minimum Rent
The Minimum Rent section is used to define the Base Rent due under the terms of the lease.
Populate any known values in this section as follows:
| Description | Explanation |
|---|---|
| Rent Begins | The user can either use the calendar icon or manually input the effective date set forth in the lease to start payment of rent. |
| Amount ($) | Enter the specified rental amount set forth in the lease to be paid over a defined period. |
| Increase (%) | Enter the percentage rate set forth in the lease in which the rent will increase during predefined periods in the future. |
| Rent Increases | The user can either use the calendar icon or manually input the effective date set forth in the lease for the current rent amount to increase. |
| Amount Type | Use the drop-down menu to select either ‘Monthly’, ‘Annual’ or ‘Annual Rate/SF’. This will dictate how the value in the Amount ($) field will be calculated. |
| Tax Rate |
The percentage of an amount of money that is required to be paid as sales tax on the rent amount. The tax rate is the tax imposed by the federal government and some states, where applicable. Use the drop-down menu to select from the list of values. NOTE: There is added support for effective-dated tax calculations. For more details, contact Tango Support. |
| Payment Timing | Indicates whether the expense is to be paid in arrears or in advance. |
Other Expenses
The Other Expenses section is used to define the Additional Rent or other costs and charges required to operate the property (e.g., municipal taxes, insurance premiums, repair and maintenance costs, utilities, etc.).
To complete the Rent and Expenses > Other Expenses section, proceed to carry out the following steps:
| Step | Action | ||||||||||
|---|---|---|---|---|---|---|---|---|---|---|---|
| 1. |
Populate any known values in this section as follows:
|
||||||||||
| 2. |
Click the Next command button. The screen will move to the next page: Key Clauses.
|

Key Clauses
The Key Clauses form is used to capture the clause types in the lease agreement to be tracked and reported (e.g., Alterations, Assignment/Sublease, Default, etc.).
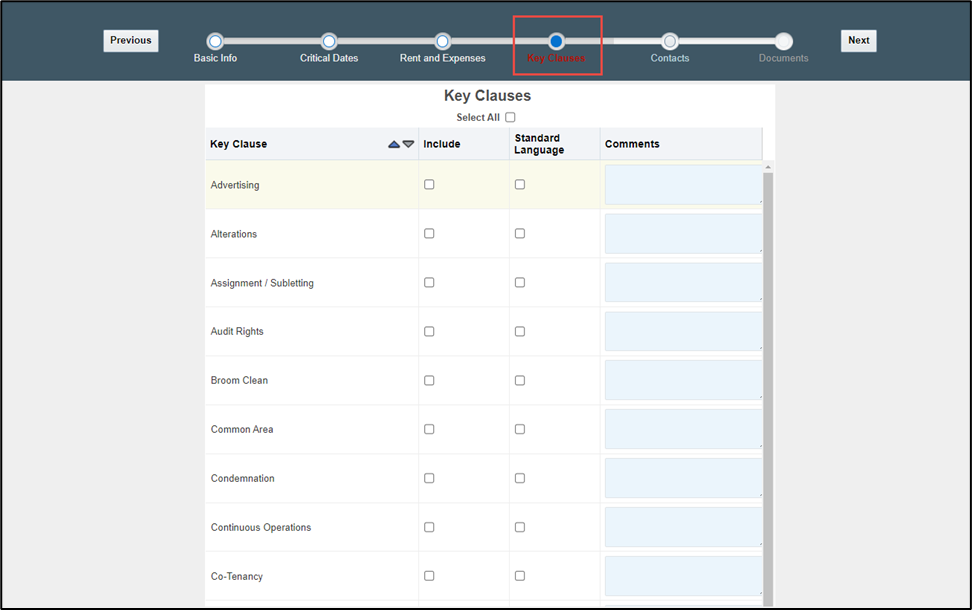
To complete the Key Clauses form, proceed to carry out the following steps:
| Step | Action | ||||||||
|---|---|---|---|---|---|---|---|---|---|
| 1. |
Populate any known values in this section as follows:
|
||||||||
| 2. |
Click the Next command button. The screen will move to the next page: Contacts.
|

Contacts
The Contacts form allows the end user to associate an existing Company or Contact, or to create a new Company or Contact.
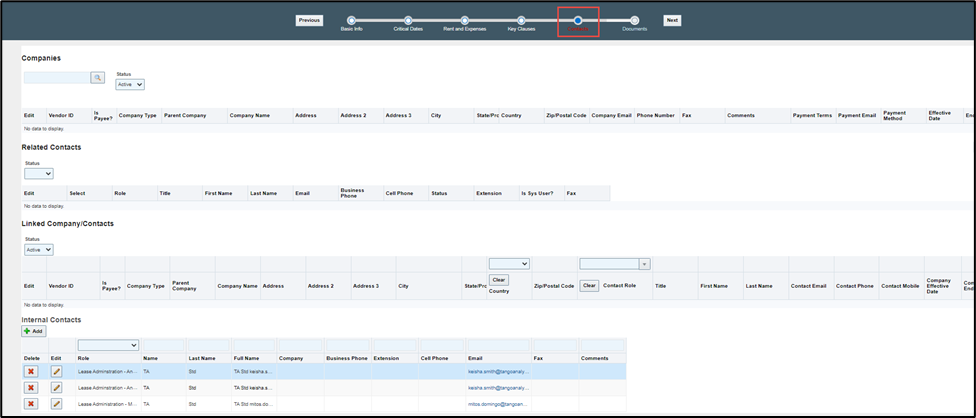
Associating an Existing Company
To associate an existing company / supplier site to a lease, proceed to carry out the following steps:
| Step | Action |
|---|---|
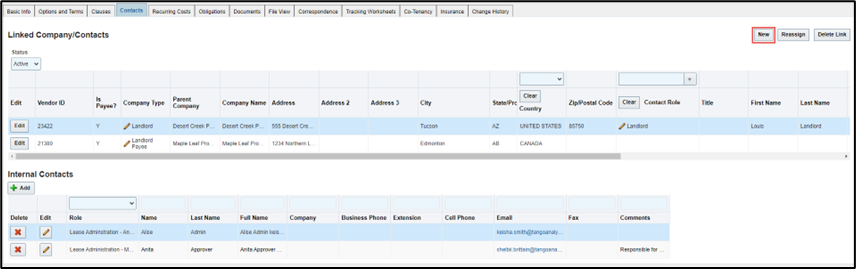
| 1. | Navigate to the Contacts tab in Lease. |
| 2. |
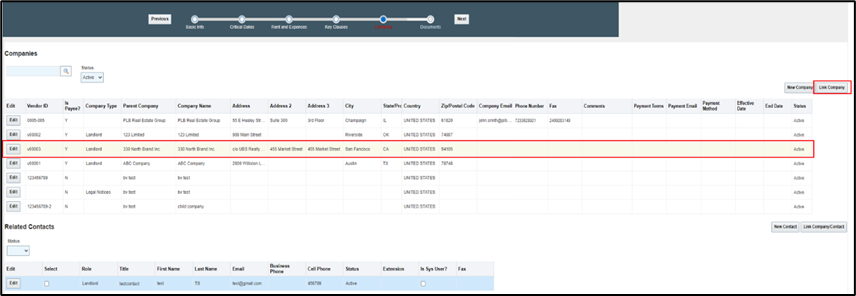
Click the New button. This will refresh and expand the screen to display the Companies, and Related Contacts sections.
|
| 1. |
Click the Search icon (
|
| 2. | Use the scroll feature in the Companies section to find the appropriate company. Alternately, enter full or partial criteria in the search field and click the Search icon ( ). ). |
| 3. |
Highlight the row of the Company. This will refresh the list of associated contacts displayed in the Related Contacts section of the form.
NOTE:
|
| 4. |
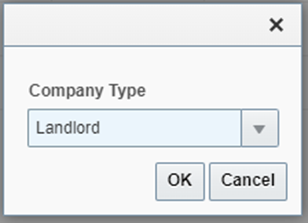
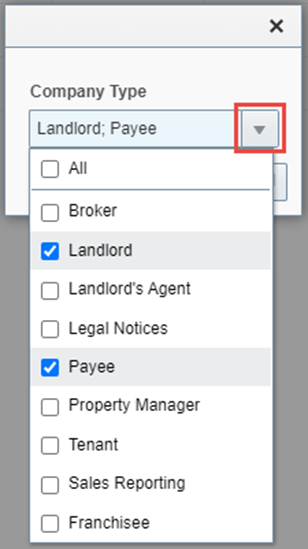
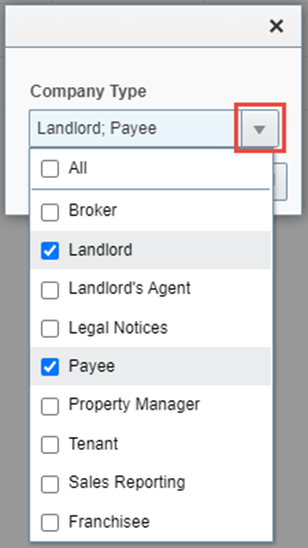
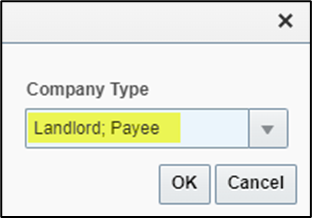
Click the Link Company button. From the dialog box that is displayed next, use the multi-select drop-down menu, by clicking on the inverted triangle, to select one or more company types.
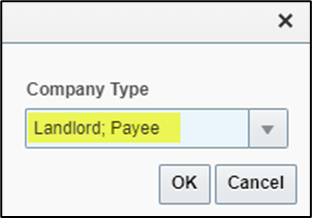
Once all the applicable company types have been selected, click the inverted triangle again or directly into the Company Type field to close the multi-select list and retain the selection.
|
| 5. |
Click OK. This will insert the company selected into the Linked Company/Contacts table which is now deemed to be associated to the Lease record.
NOTE: All suppliers where the Is Payee flag is denoted as ‘Y’ will be not editable. This is to ensure that suppliers received through vendor interfaces are not updated/managed through the User Interface (UI). The source for updates will be through the Client’s external Enterprise Resource Planning (ERP) system. If an immediate update is required to be made within Tango, then only authorized users will have been granted access to do so via the Supplier Management module and as defined through security configuration. |
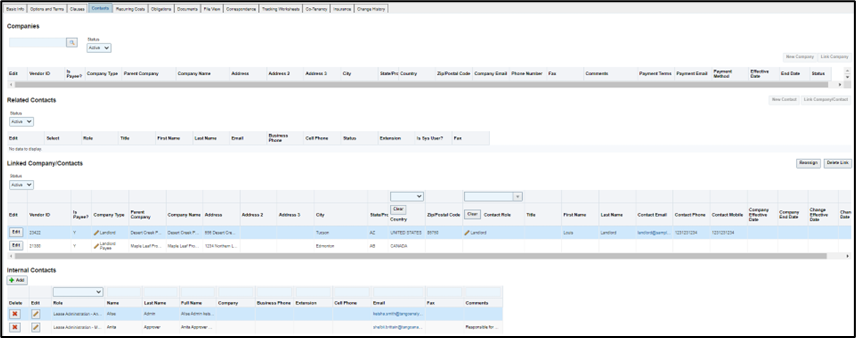
 ) leaving the search field blank in the Companies section. This will display the list of all companies that are available in the database. The New Company, Link Company, New Contact and Link Company/Contact command buttons will be enabled allowing the user to click on either one.
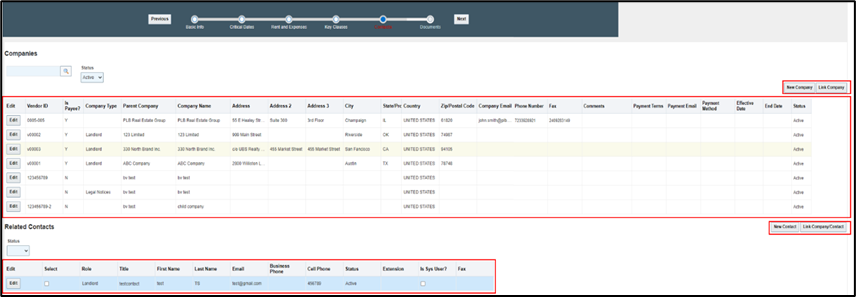

Creating a New Company
To create a new company / supplier site, proceed to carry out the following steps:
| Step | Action |
|---|---|
| 1. |
Click the Search icon (
|
| 2. | Click on the New Company button if the company you are searching for is not found. |
| 3. |
From the Add Company Site dialog box enter all details on the form, where available, and click OK.
NOTE: The Parent Company field is designed as a search field to allow easier selection of the proper value. If a value is not selected (via the Search icon (
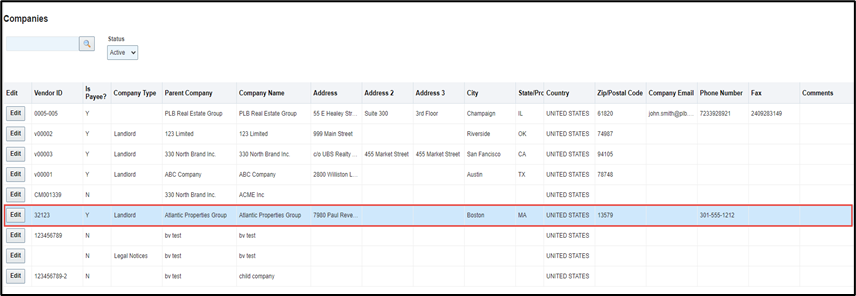
The newly added company will appear in the company list on the screen and will be available for future selection.
|
| 4. |
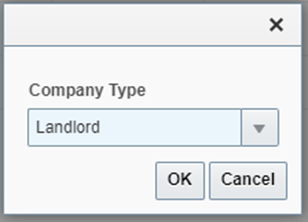
Click the Link Company button. From the dialog box that is displayed next, use the multi-select drop-down menu, by clicking on the inverted triangle, to select one or more company types.
Once all the applicable types have been selected, click the reverted triangle again to close the multi-select list and retain the selection.
|
| 5. |
Click OK. This will insert the company selected into the Linked Company/Contacts table which is now considered associated to the Lease record.
NOTE: All suppliers where the Is Payee flag is denoted as ‘Y’ will be not editable. This is to ensure that suppliers received through vendor interfaces are not updated/managed through the User Interface (UI). The source for updates will be through the Client’s external Enterprise Resource Planning (ERP) system. If an immediate update is required to be made within Tango, then only authorized users will have been granted access to do so via the Supplier Management module and as defined through security configuration. |
 ) leaving the search field blank in the Companies section. This will display the list of all companies that are available in the database. The New Company, Link Company, New Contact and Link Company/Contact command buttons will be enabled allowing the user to click on either one.
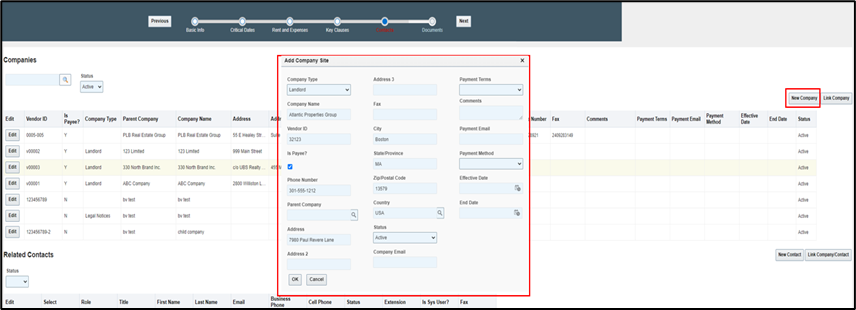
 )), the system will automatically create a parent company with data from the Add dialog box, creating a 1-to-1 relationship between a company and its parent.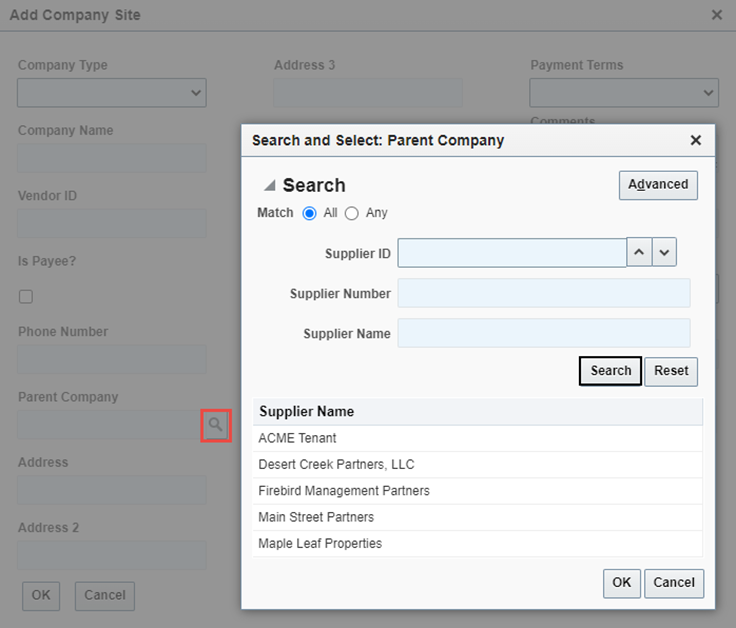

Associating an Existing Contact
To associate an existing contact to a lease, proceed to carry out the following steps:
| Step | Action |
|---|---|
| 1. |
Click the Search icon (
|
| 2. | Use the scroll feature in the Companies section to find the appropriate company. Alternately, enter full or partial criteria in the search field and click the Search icon ( ). ). |
| 3. |
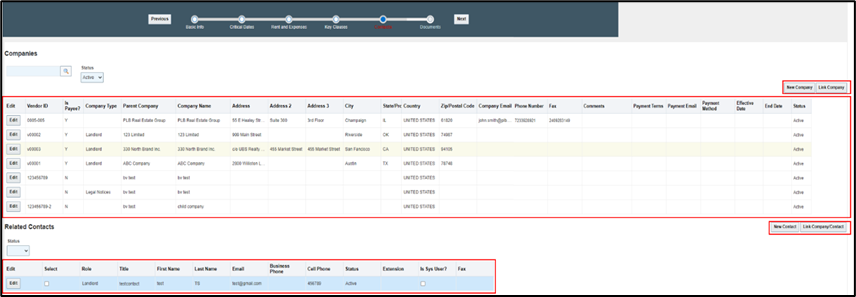
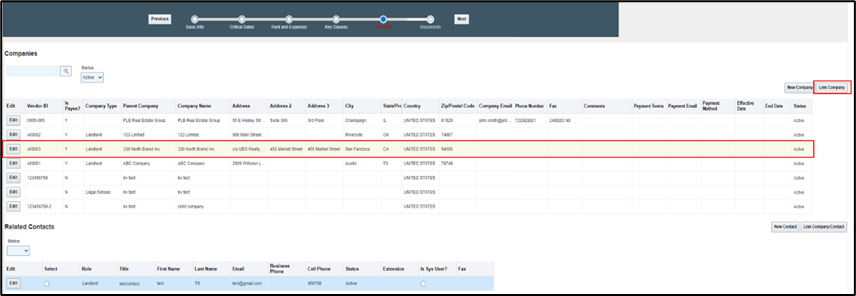
Highlight the row of the Company. This will refresh the list of associated contacts displayed in the Related Contacts section of the form.
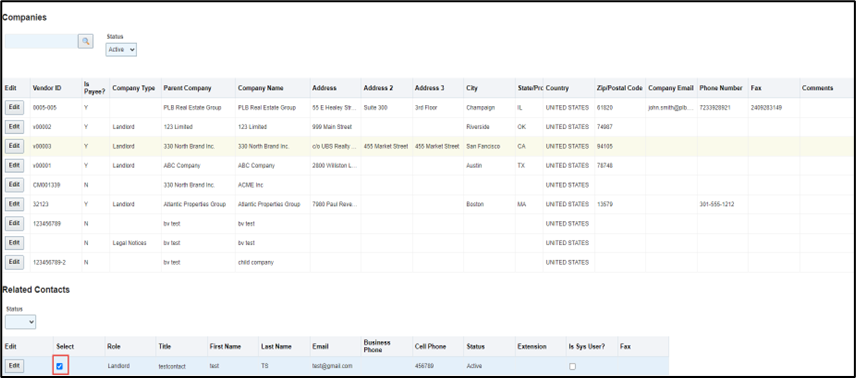
NOTE: To link the Company to the Lease at the contact level, a Related Contact record is required; hence, if there is no valid contact associated to the company as displayed in the figure below, a new contact will need to be created populating, at minimum, with one field (i.e., Title). |
| 4. |
Select the contact by using the checkbox in the Select column.
|
| 5. |
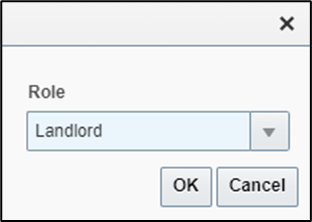
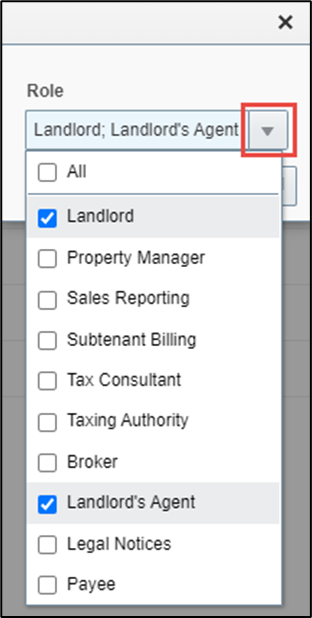
Click the Link Company/Contact button. From the dialog box that is displayed next, use the multi-select drop-down menu, by clicking on the inverted triangle, to select one or more roles.
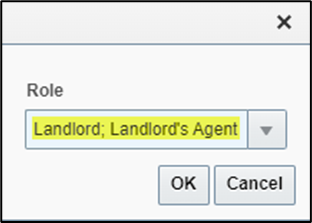
Once all the applicable roles have been selected, click the reverted triangle again or directly into the Role field to close the multi-select list and retain the selection.
|
| 6. |
Click OK.
NOTE:
|
 ) leaving the search field blank in the Companies section. This will display the list of all companies that are available in the database. The New Company, Link Company, New Contact and Link Company/Contact command buttons will be enabled allowing the user to click on either one.

Creating a New Contact
To create a new contact, proceed to carry out the following steps:
| Step | Action |
|---|---|
| 1. |
Click the Search icon (
|
| 2. | Highlight the row of the Company currently linked to the Lease record in the Companies section. |
| 3. | Click on the New Contact button if the contact you are searching for is not found. |
| 4. |
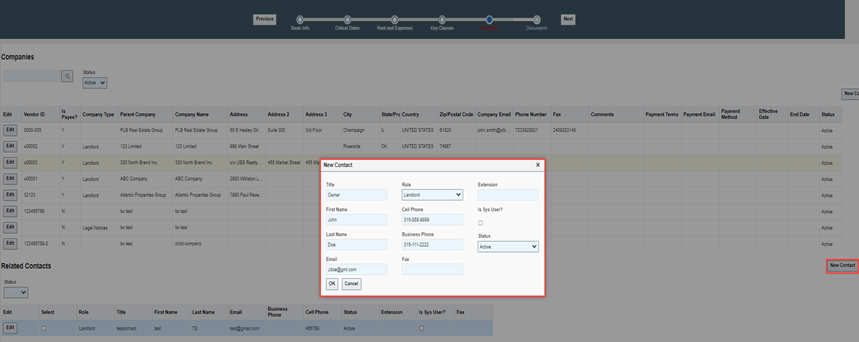
From the New Contact dialog box enter all details on the form, where available, and click OK. The newly added contact will appear in the contact list on the screen and will be available for future selection.
|
| 5. |
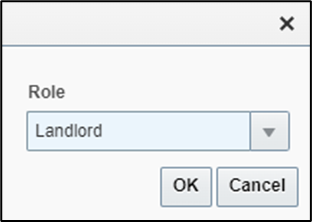
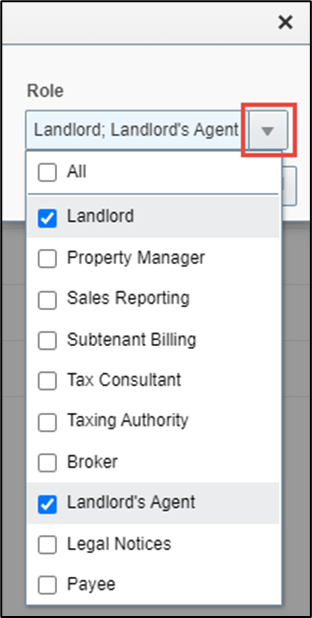
Click the Link Company button. From the dialog box that is displayed next, use the multi-select drop-down menu, by clicking on the inverted triangle, to select one or more roles.
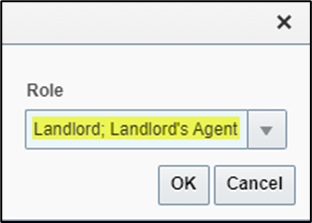
Once all the applicable roles have been selected, click the reverted triangle again or directly into the Role field to close the multi-select list and retain the selection.
|
| 6. |
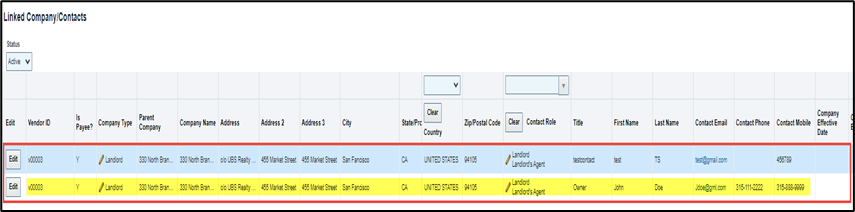
Click OK. This will insert the contact selected into the Linked Company/Contacts table which is now considered associated to the Lease record. NOTE: If the selected Company is currently linked to the Lease, with an existing contact, then the existing company will be inserted into the Linked Company/Contacts table in a separate row along with the newly selected Related Contact which is now deemed to be associated to the Lease record.
|
 ) leaving the search field blank in the Companies section. This will display the list of all companies that are available in the database. The New Company, Link Company, New Contact and Link Company/Contact command buttons will be enabled allowing the user to click on either one.

Adding a New Internal Contact
The Internal Contacts section allows for the following:
The end user to associate internal Tango users to a lease record for reference in terms in of knowing who to contact to obtain various information.
-
To specify the Tango user(s) which need controlling access to the Lease Abstract and the Batch Rent workflows. The workflows will not advance until a user selection is made.
NOTE:
At minimum, the contact role (e.g., Lease Reviewer, Payment Approver, etc.) in combination with the username, defined by the Client as required to systematically approve a workflow, must be selected.
A single person can be assigned to many roles in the Internal Contacts table. For instance, Joe Smith can be linked as both the ‘Lease Reviewer’ and the ‘Payment Approver’ if applicable but keep segregation of duties in mind when assigning roles to users for best practices.
If a specific role is associated to a workflow, it cannot be listed in the table more than once.
Within the My Actions > Generate Rent Roll and My Actions > Batch Rent widgets there is a ‘My Leases’ concept to rent roll generation and rent batching. ‘My Leases’ are leases where a user is associated as an internal contact.
To create a new internal contact, proceed to carry out the following steps:
| Step | Action | ||||||||||||
|---|---|---|---|---|---|---|---|---|---|---|---|---|---|
| 1. |
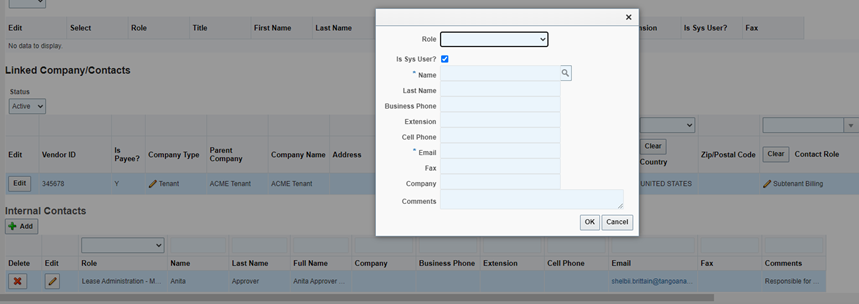
From the Contacts form click on the Add command button immediately below the Internal Contacts section.
|
||||||||||||
| 2. |
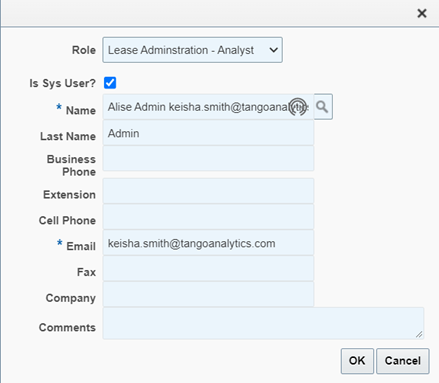
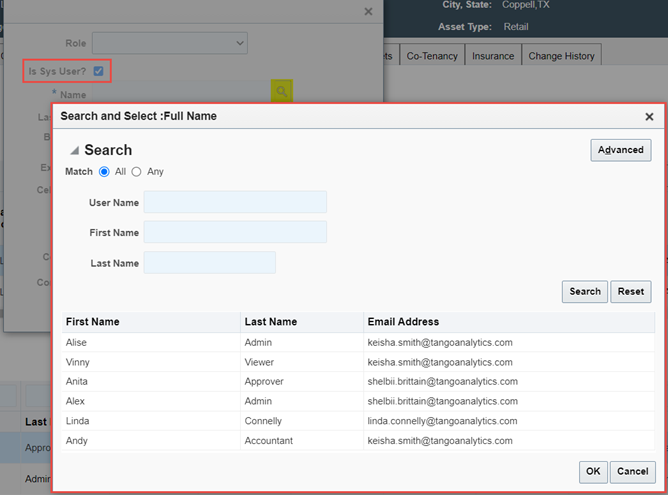
From the dialog box enter all details on the form, where available.
At minimum, populate the following mandatory fields required to link the contact:
|
||||||||||||
| 3. |
Click OK. The added contact will appear in the contact list on the screen.
|
||||||||||||
| 4. |
Click the Next command button. The screen will move to the next page: Documents.
|



Documents
Tango provides for robust document management feature, where documents relevant to leases, locations, projects or other data sets can be stored. Financial Transaction documentation is stored alongside User added documentation.
Folder Structure
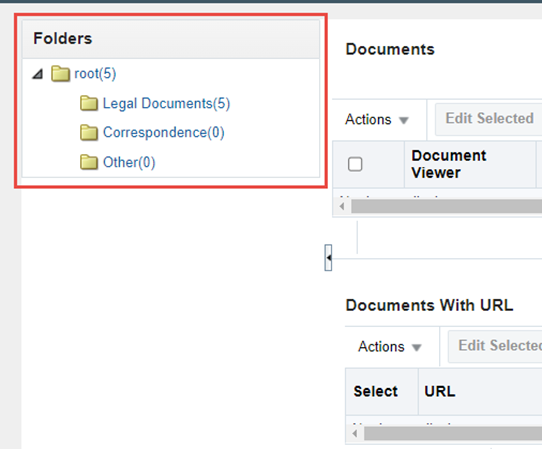
When a new record is created, Tango will create a default folder hierarchy in each record based on Client specifications. The folder hierarchy may be different for each record type, i.e., Sites, Locations, Lease, etc.
NOTE:
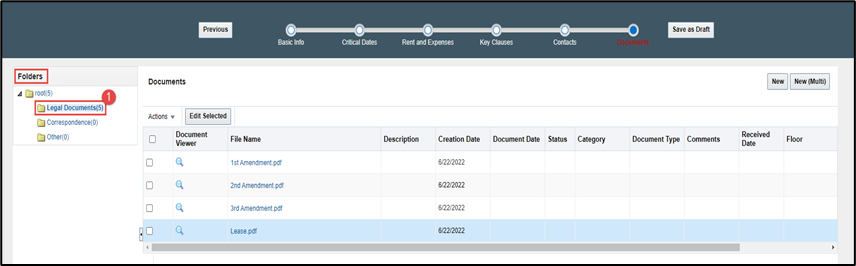
Located to the right of each folder there is a number displayed in parentheses represents document counts in the folder tree.
The file view of folders can be filtered based on the logged in user's security access.
Clients using folder security can inherit parent folder security rights when creating a child folder.
Documents of all types may be stored in folders to support lease activities, collaboration, and archiving.
Attaching Documents
Uploading new documents can be accomplished using either the New or New (Multi) options. Although either option will upload the document, there are differences on how metadata is added to the document record and the processing options available.
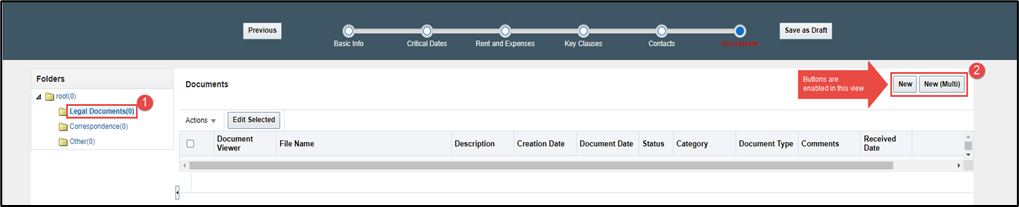
Click on the folder from the Folder Tree on the left side of the page to which the document is to be uploaded to.
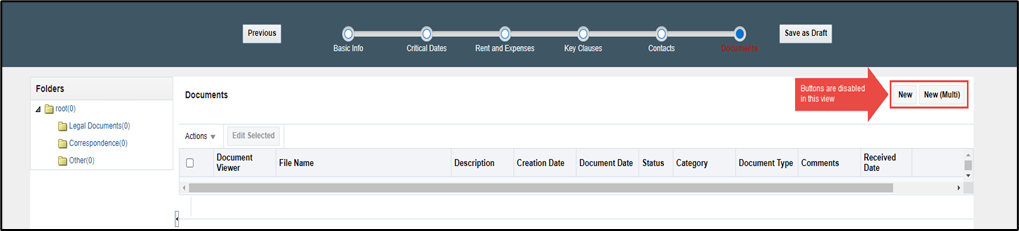
This will enable the New and New (Multi) upload buttons on the right side of the page, allowing the user to click on either.
New: Single Document Upload
To upload a single document to a lease, proceed to carry out the following steps:
| Step | Action |
|---|---|
| 1. | Navigate to the folder on the left side of the screen where the document should be added. |
| 2. |
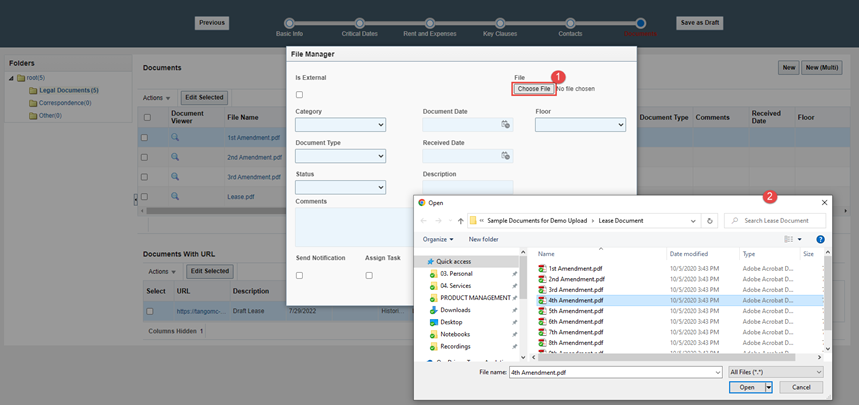
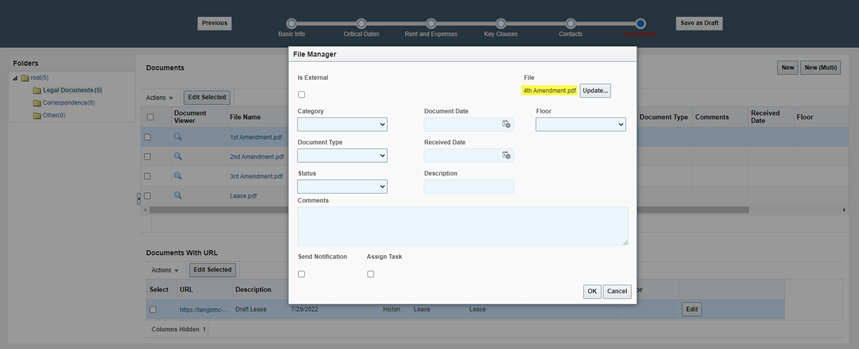
Click the New button. Document upload dialog box referred to as File Manager will display with options to browse for the file to be uploaded and the ability to populate a few attributes to describe the document. |
| 3. |
Click the Browse button to select the document to be used for upload. System will display Explorer folder structure to provide search and select functionality.
|
| 4. |
Select the desired file and click Open at the bottom of the Explorer folder window. System accepts file and returns user to the document upload dialog box.
|
| 5. |
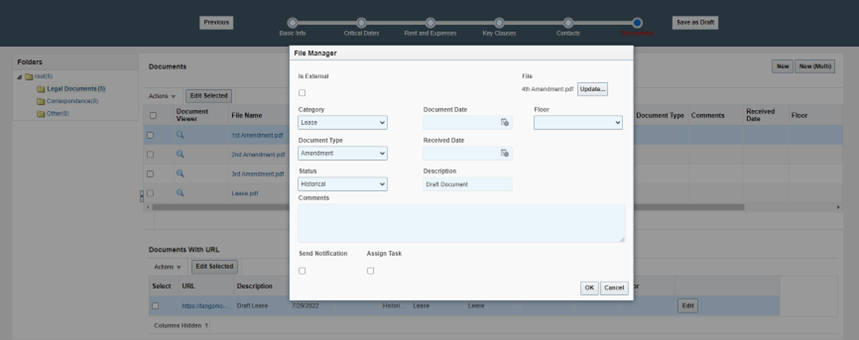
Populate the metadata fields for the document. The remaining fields are optional but can be used to facilitate organization and document searches.
|
| 6. |
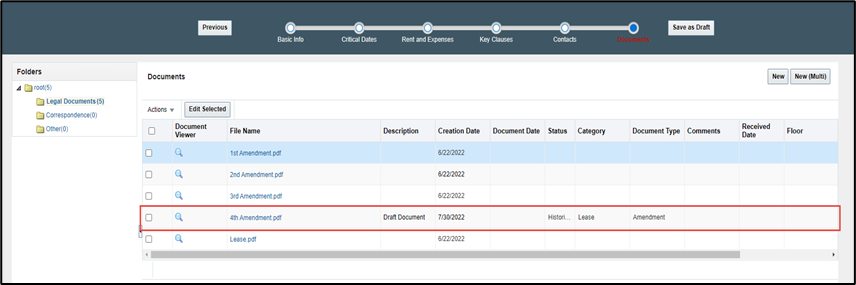
Click OK to add the document to the document grid.
|
| 7. | Click Cancel to annul the operation. |
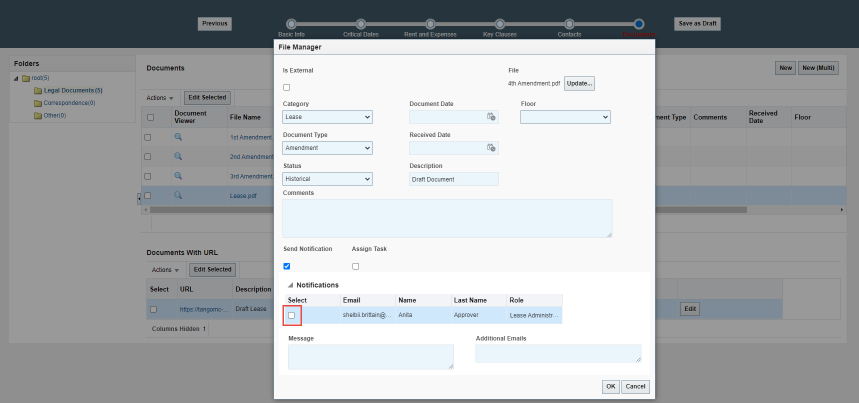
Send Notification
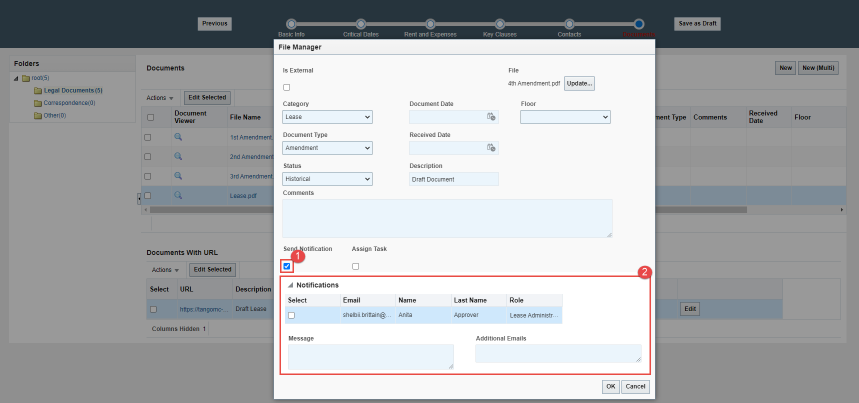
When a document is being added, the Send Notification checkbox will send a notification to the specified person regarding the addition of the new document to the documents folder.
| Step | Action |
|---|---|
| 1. | Select the Send Notification checkbox. |
| 2. |
The notifications section of the File Manager dialog box will display.
|
| 3. |
To add a recipient from the internal contacts grid displayed under the Notifications label, click the Select checkbox on the left next to the user.
NOTE: For non-system users or users not listed in the internal contacts grid that need to receive notification regarding the addition of the document, populate the email address of the individual(s) in the Additional Emails field. |
| 4. | Enter the desired message for the notification in the Message field. |
| 5. |
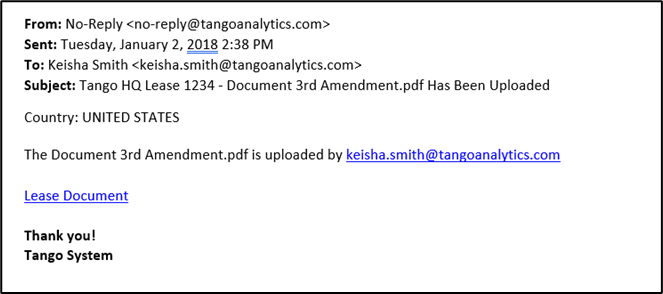
When OK is selected, the document will be uploaded to the document grid, and the message notification will be sent to the identified recipient(s). Image: Sample Email Notification
|
| 6. | Click Cancel to annul the operation. |
Assign Task
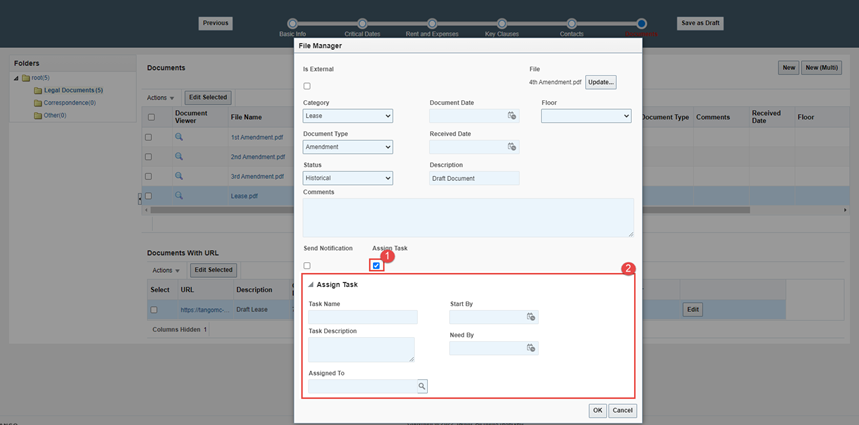
When a document is being added, select the Assign Task button to assign an Ad hoc Task notifying a User of the document and requiring the User to complete the task. This feature is useful for archiving document review and approval.
To assign a task to a user, proceed to carry out the following steps:
| Step | Action |
|---|---|
| 1. | Select the Assign Task checkbox. |
| 2. |
The Assign Task section of the File Manager dialog box will display.
|
| 3. | Complete the Task information. |
| 4. |
Search for and select the assignee. NOTE: The assignee must be a system user. |
| 5. | When OK is selected, the document will be uploaded, and the message notification will be sent to the identified recipients. |
| 6. | Click Cancel to annul the operation. |
Is External: Upload a Single Document Using an URL
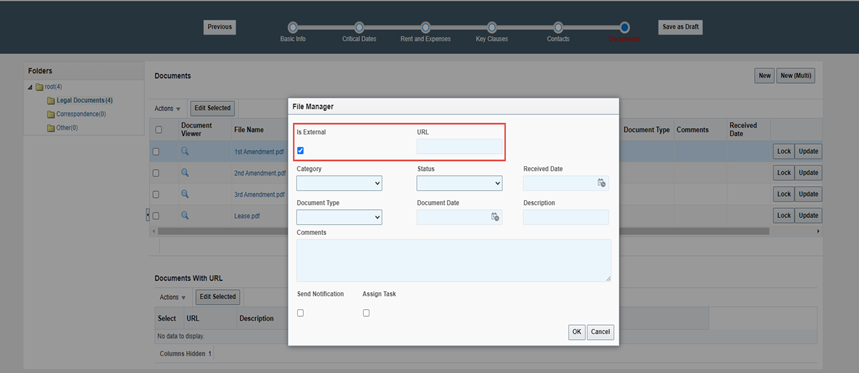
The Is External checkbox is selected if the document being upload is coming from an external site and is required to be added via a URL.
To upload a document to a lease via an external link, proceed to carry out the following steps:
| Step | Action |
|---|---|
| 1. | Navigate to the folder on the left side of the screen where the document should be added. |
| 2. |
Click the New button. Document upload dialog box referred to as File Manager will display with options to browse for the file to be uploaded and the ability to populate a few attributes to describe the document. |
| 3. |
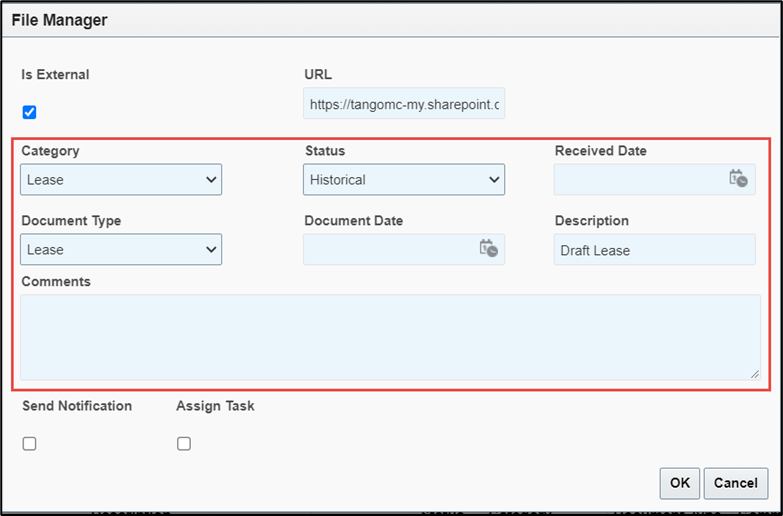
Click the Is External checkbox. When selected the Choose File option is removed from the dialog box and an open text field labeled URL is displayed.
|
| 4. |
Navigate to the location of the file then highlight and copy the URL from the address bar.
|
| 5. |
Paste the URL into the open text field in the File Manager dialog box. |
| 6. |
Populate the metadata fields for the document. The remaining fields are optional but can be used to facilitate organization and document searches.
|
| 7. |
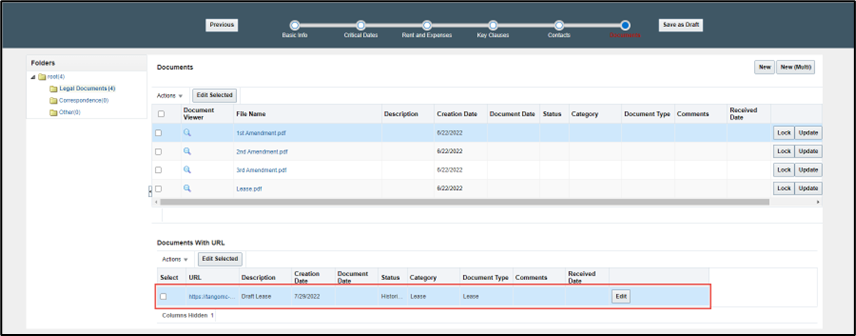
Click OK to complete the upload. The URL link will appear in the document grid located at the bottom section of the page labeled as Documents With URL.
|
| 8. | Click Cancel to annul the operation. |
| 9. | Click the Save as Draft button. The user will land on the defaulted Basic Info subtab of the Lease Details page of the Lease record that was just created. The Lease status will be displayed as ‘Draft’. |


New (Multi): Upload Multiple Documents
To upload multiple documents to a lease, proceed to carry out the following steps:
| Step | Action |
|---|---|
| 1. |
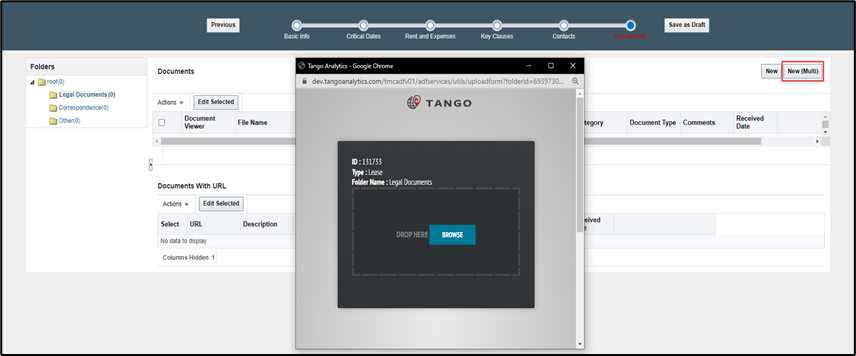
Add multiple documents by selecting the New (Multi) button. System displays a browser dialog box.
|
| 2. |
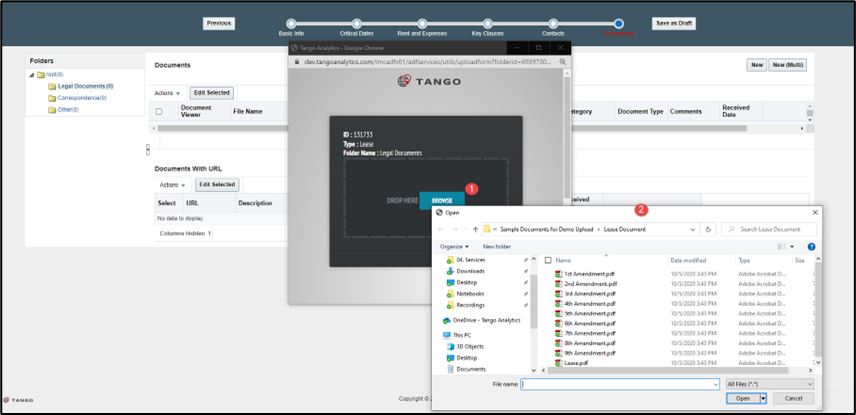
Click the Browse button. System will display Explorer folder structure to provide search and select functionality.
|
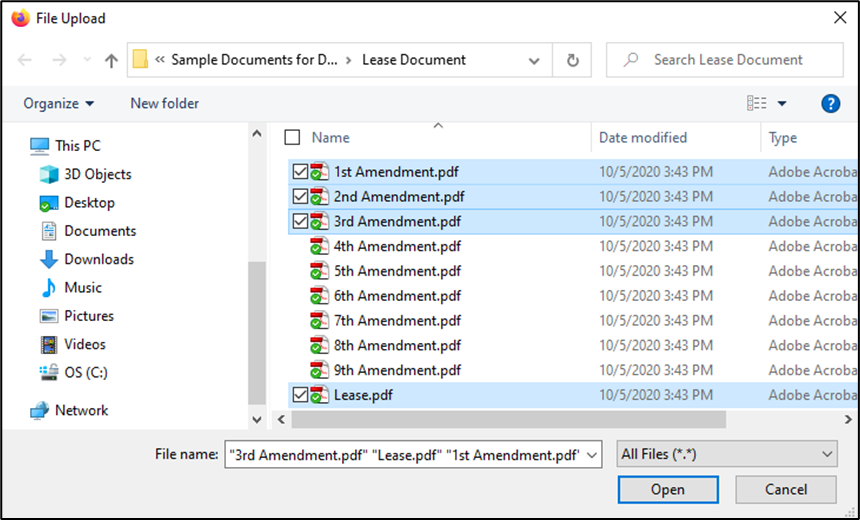
| 3. | Select one to many files by either single clicking one file at a time followed by clicking Open or select multiple files and drag to the Drop Here in the dialog box. |
| 4. |
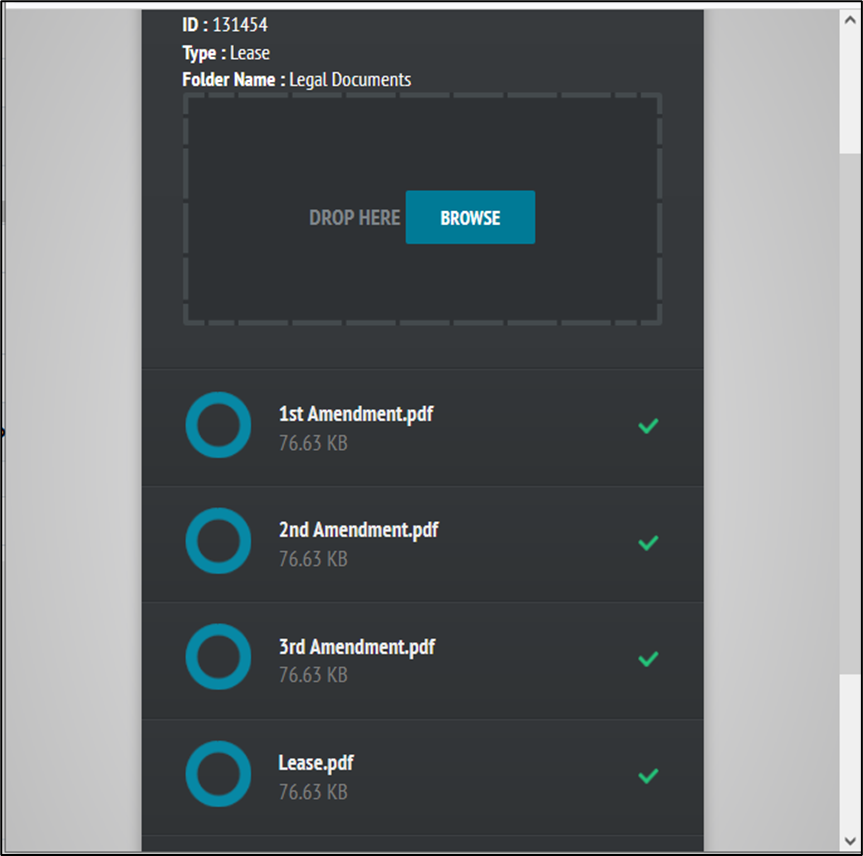
System will upload the files. The green check mark shows that the file was successfully uploaded.
|
| 5. | Select the ‘X’ in the upper right corner of the box to close the New (Multi) documents dialog box or click the green checkmark displayed next to each document to complete the upload. |
| 6. |
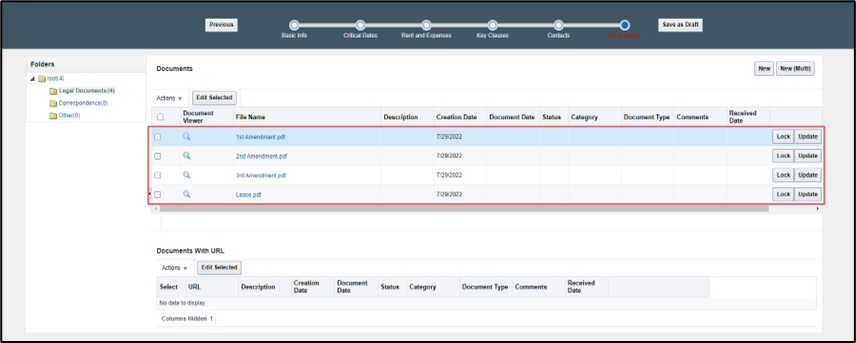
System closes the dialog box and returns the user to the Documents form. Documents will NOT display here until the page is refreshed. NOTE: To refresh the page, click the Previous button in the header once to go back one page. From there click the Next button and the documents will appear in the documents grid.
|
| 7. |
Click the Save as Draft command button. The screen will move to the next page: Lease Details > Basic Info tab of the Lease record that has now been created.
|

Viewing Documents
There are two options to view a document that has been uploaded.
Option 1: Download & View
To view documents under a lease, proceed to carry out the following steps:
| Step | Action |
|---|---|
| 1. |
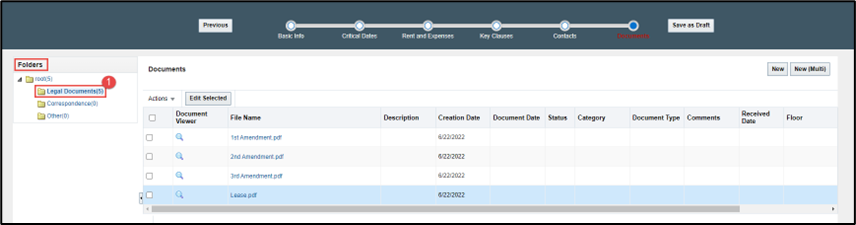
Click on the folder which contains the document to be viewed.
|
| 2. |
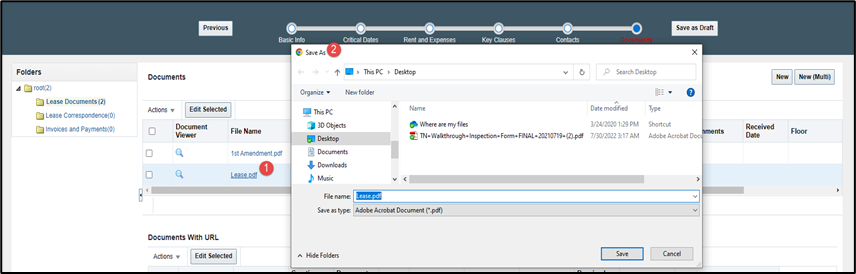
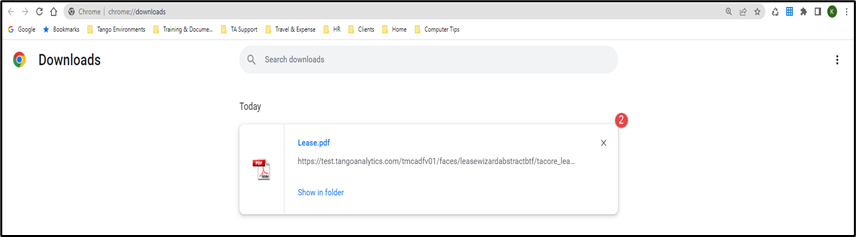
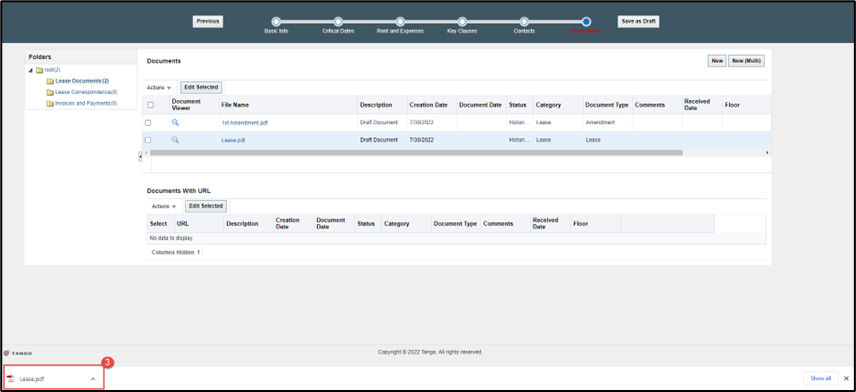
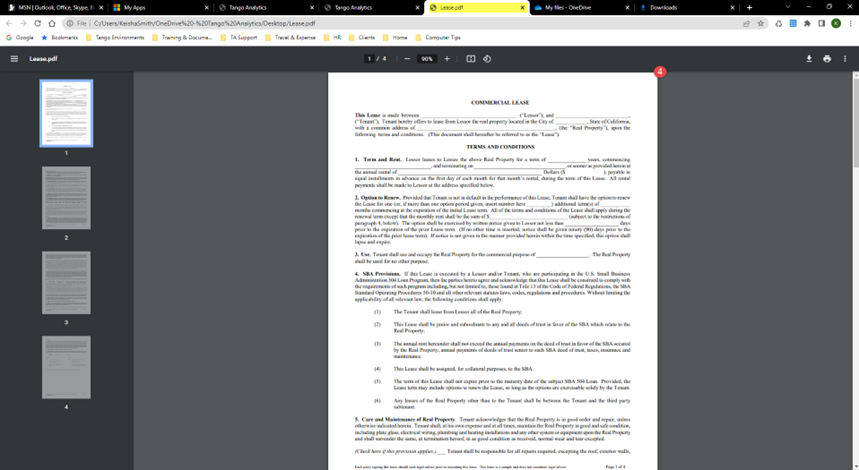
Click the hyperlink of the document under the File Name column. The following are examples of viewing the document in two different supported browsers:
|
| 3. | Select the ‘X’ in the upper right corner of the document to close it or click the File > Save As option in the menu bar to save any changes applied to the document on your computer. |
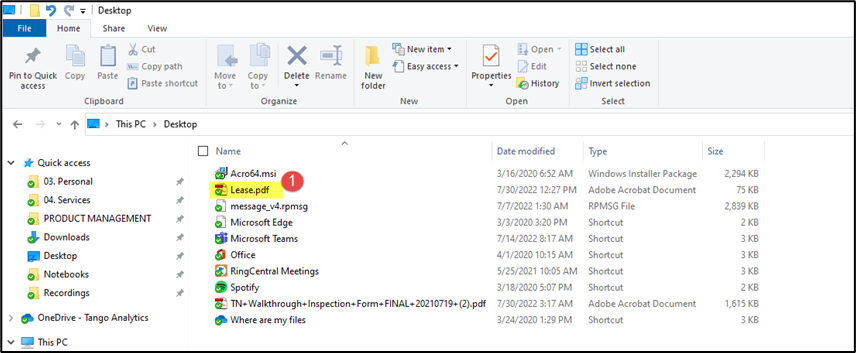
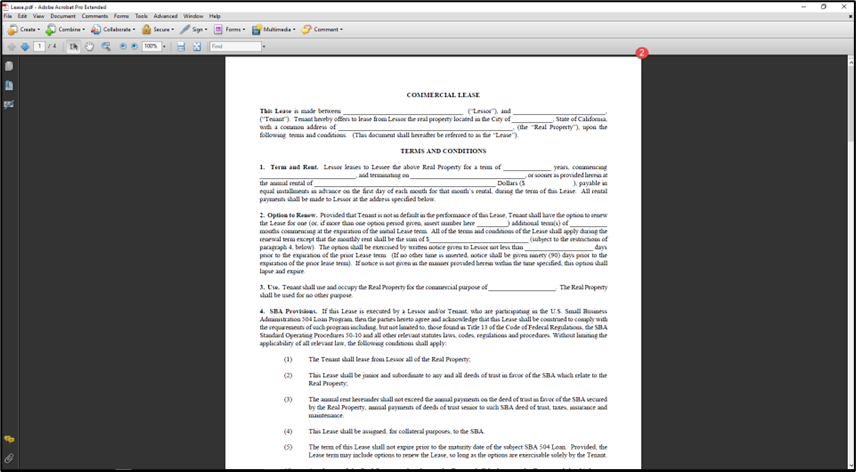
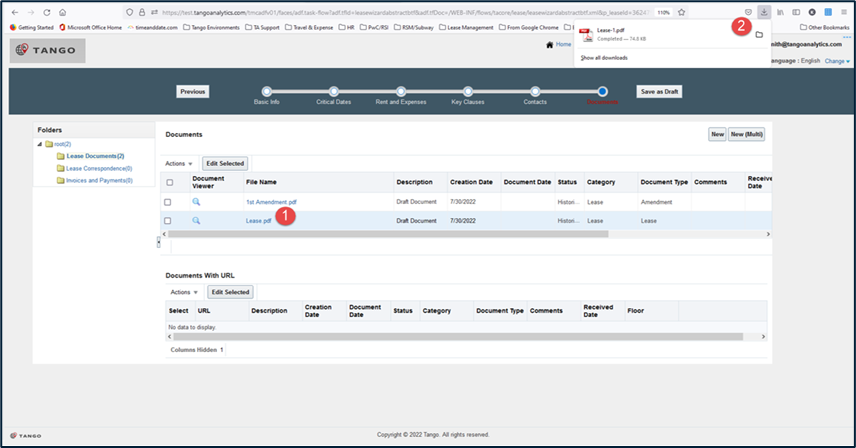
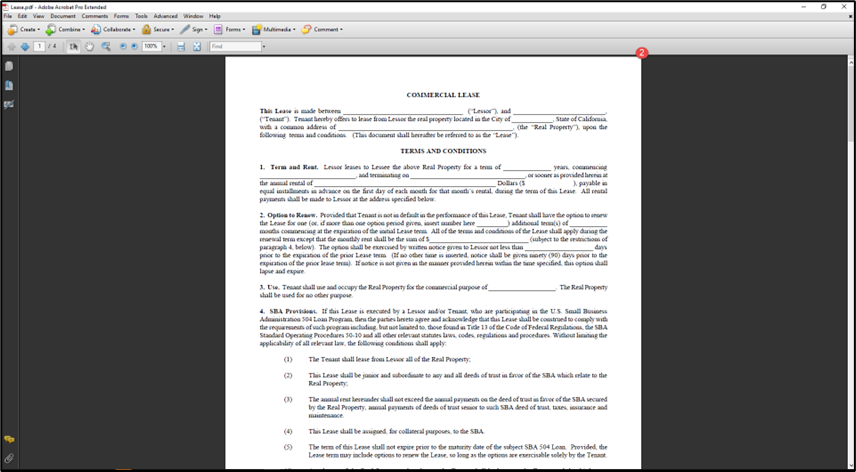
Option 2: File Viewer
The document File Viewer function allows for the ability to view and edit a document that’s been uploaded under the lease record.
To view and edit documents under a lease, proceed to carry out the following steps:
| Step | Action |
|---|---|
| 1. |
Click on the folder which contains the document to viewed.
|
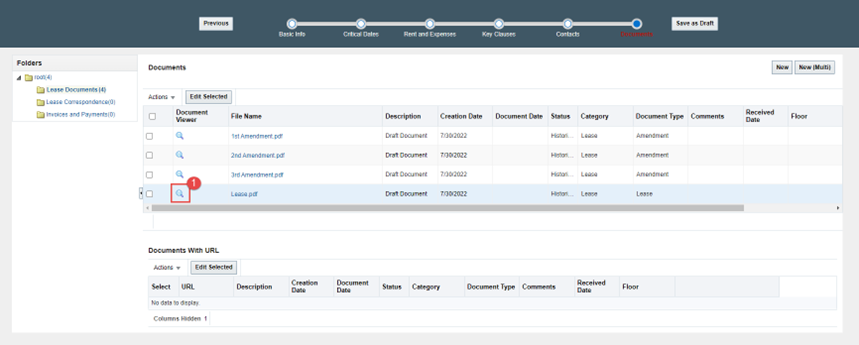
| 2. |
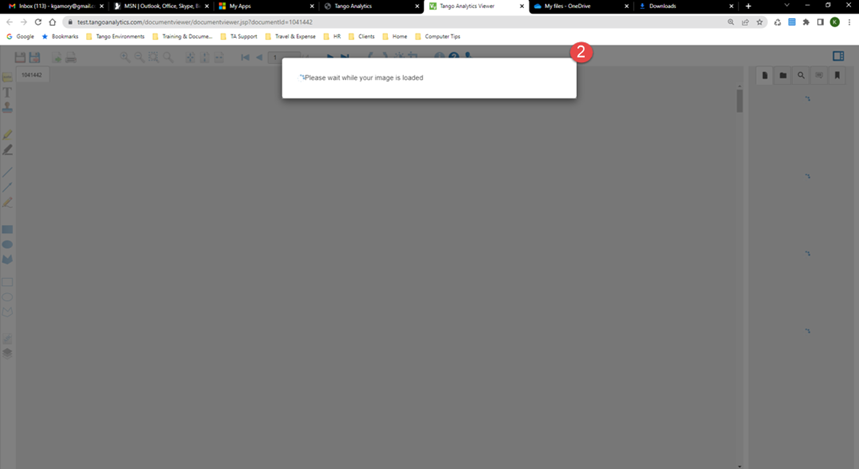
Click the magnifying glass to the left of the document under the Document Viewer column. This will open a separate tab displaying the message “Please wait while your image is loaded”.
|
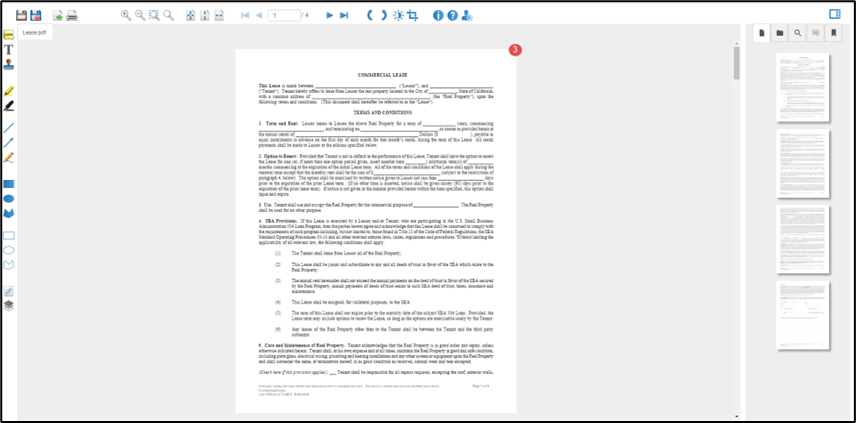
| 3. |
Once the document/image is loaded, proceed to view, modify and/or save as permitted.
|
Lease Clone
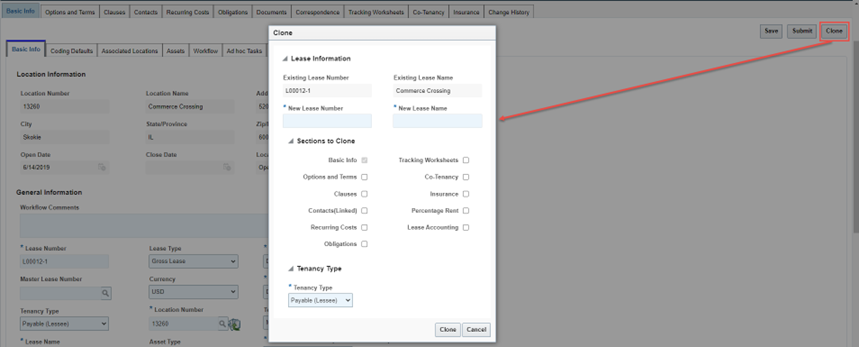
This feature is designed to allow the copy/clone of an existing lease to a new record with flexibility to select what information is copied (i.e., new lease number, new lease name and new lease tenancy type and more).
The feature is available only for existing leases where the Lease Status is ‘Draft’, ‘Active’ or ‘Inactive’.
To clone an existing lease, proceed to carry out the following steps:
| Step | Action |
|---|---|
| 1. | Search for the specific Lease record of interest via the Lease Home > Basic Search. |
| 2. | Click the Lease Details button above the search table or the shortcut icon in the search banner of the existing lease. |
| 3. |
Click the Clone button on the Lease Details > Basic Info tab.
|
| 4. | In the dialog box input the New Lease Number and New Lease Name. |
| 5. |
Select one or more of the following Sections to Clone:
NOTE: By default, the Basic Info section will automatically be checked as a mandatory requirement. |
| 6. |
Select the appropriate Tenancy Type. NOTE: The value will be defaulted to ‘Payable (Lessee)’. |
| 7. |
Click Clone to accept the inputs. NOTE: Each record will be copied as-is with the following exceptions:
|
Was this article helpful?
That’s Great!
Thank you for your feedback
Sorry! We couldn't be helpful
Thank you for your feedback
Feedback sent
We appreciate your effort and will try to fix the article